
Return
to the Contents Page
Proceed
to the next page
Return to the previous page
DEEPSPAWN:
This section is the lair of a deepspawn. It has chosen, for whatever reason, to breed trolls to mainly serve it, and this has proven to be a successful choice thus far, as trolls are tough, feared, and easy to maintain. The trolls now form a small tribe centred around the deepspawn, and these trolls worship the creature as a god. The troll shaman thinks its spells come from the deepspawn, but they actually come from the Maug Juiblex who is known in the Underdark as Ghaunadaur.
In addition to the trolls, the deepspawn has generated a variety of other creatures, some of which now wander the Underdark, and others which choose to remain near their creator. The deepspawn has recently begun to spawn bugbears, and these dwell in tandem with the trolls as its guards. The deepspawn has not yet decided to infiltrate the bugbear slaves of the drow.
Despite the fact that this deepspawn worships the same god as some of the nearby drow merchants means little to both parties, as Ghaunadaur is not a deity that cares much about its worshippers.
The deepspawn has been in this location for almost 20 years now, having cleared out a nest of trolls to establish itself here (that is how it learned to produce trolls). The deepspawn has instructed its spawn to bring to it for sacrifice any new creatures it encounters, and the deepspawn has the capability of spawning orcs, bugbears, kuo-toans, troglodytes, rothe, trolls, and most of the minor creatures encountered on the wandering monster charts for the entire section covered by the Entrance to the Underdark map.
The deepspawn's master plan is to eventually breed drow spawn and use them to infiltrate into the drow society in a quest for power and dominance. The problem it faces is that it is very worried that should it attempt it the capable drow will figure out who has infiltrated them and come to destroy the deepspawn and the trolls. For this reason, the deepspawn has not yet gathered enough courage to attempt such a feat.
At the DM's option, several orcs, troglodytes, and kuo-toans could be spawns that successfully infiltrated those societies. This has no real effect on their actions when encountered other than the fact that they will not harm the deepspawn and might reveal its existence if subject to mind reading. A good rule of thumb is a 1% chance for a normal member of those groups to be a spawn.
Currently, no members of the various tribes and humanoid groups know of the existence of the deepspawn. The drow have interrogated captured trolls but have only learned that they worship a many-limbed god, something the drow write-off as troll superstition. The deepspawn has had some initial contact with the Ghaunadaur Temple near the DROW OUTPOST.
Refer to the Deepspawn Lair map.
Reaction to the Party:
The deepspawn and its minions have no compunction at all to parley with the party, and as charm and mind-control spells cannot force a minion to betray or attack the deepspawn, and as the spawn exist solely to serve as guards for the deepspawn, the minions have no motivation to surrender. The deepspawn is quite interested in surviving, and has an escape route should things go badly. Nevertheless, should the party somehow corner it, it will agree to terms.
The deepspawn does not have enough control over its spawn to force them to cooperate or accompany the party, but it can convince them to stop attacking the party. Beyond that, it is difficult to say what help could be given to the party beyond its treasure and perhaps creating some additional humans and demi-humans to accompany the party. The deepspawn will be very loathe to do this if it determines the party is going after the drow (and it will via ESP) because it fears retaliation.
Unless otherwise stated, all caverns are liberally endowed with stalactites, stalagmites, fluted columns, and other underground structures such that ample cover and line of sight restrictions occur. The ground is generally detritus-strewn and uneven. Stone steps are natural and are usually 1'-2' high.
Shriekers and Violet Fungi dwell in the area, most being spawn of the deepspawn.
Assume each indicated location includes 2D4 shriekers.
Shriekers (AC 7, MV 1, HD 3, hp 10 ea, THAC0 17, #ATT 0, D nil, SD noise, AL N, XP 120 ea, Source: Monstrous Manual)
Where violet fungi are indicated, substitute 1D4 of the Shriekers with violet fungi.
Violet Fungi (AC 7, MV 1, HD 3, hp 10 ea, THAC0 17, #ATT 1-4, D nil, SA rotting (save vs poison or rot in 1 round), AL N, XP 175 ea, Source: Monstrous Manual)
The DM should roll for each violet fungus. Roll a D4 to determine number of tendrils and another D4 to determine the length of said tendrils (all of the tendrils of a given violet fungus will be of the same length).
1. Cave of the Pool
This large cave is over 60' high, though the ceiling is obscured in a mass of stalactites, many of them over the pool and dripping mineral laden waters into the water.
The pool is murky with minerals and sediments, but is potable water. It is basically a filled sinkhole and is steeply sloping down to its ultimate depth of 35'. Nothing seems to dwell within the pool.
A large colony of spawned pierces dwells here, these being spawn of the deepspawn. They are clustered usually around the red circles indicated n the map, in two groups (north group and south group). The trolls and other minions of the area bypass this area when needed by traveling the 5' wide ledge that curves around the backside of the pool. This ledge is not readily apparent from the other side of the pool, and it will likely appear as if the pool goes all the way back to the cave wall unless the path is actually approached and explored.
North Group:
Small Piercers (3) (AC 3, MV 1, HD 1, hp 6 ea, THAC0 19, #ATT 1, D 1-6, SA surprise (-7 to opponent surprise rolls), SD soft underbelly covers in acid when exposed to air (1 pt of damage per round), AL N, XP 35 ea, Source: Monstrous Manual)
Medium Piercers (3) (AC 3, MV 1, HD 3, hp 11 ea, THAC0 19, #ATT 1, D 2-12, SA surprise (-7 to opponent surprise rolls), SD soft underbelly covers in acid when exposed to air (1 pt of damage per round), AL N, XP 120 ea, Source: Monstrous Manual)
Large Piercers (3) (AC 3, MV 1, HD 3, hp 16 ea, THAC0 17, #ATT 1, D 3-18, SA surprise (-7 to opponent surprise rolls), SD soft underbelly covers in acid when exposed to air (1 pt of damage per round), AL N, XP 120 ea, Source: Monstrous Manual)
Very Large Piercers (3) (AC 3, MV 1, HD 4, hp 22 ea, THAC0 17, #ATT 1, D 4-24, SA surprise (-7 to opponent surprise rolls), SD soft underbelly covers in acid when exposed to air (1 pt of damage per round), AL N, XP 420 ea, Source: Monstrous Manual)
South Group:
Small Piercer (AC 3, MV 1, HD 1, hp 6, THAC0 19, #ATT 1, D 1-6, SA surprise (-7 to opponent surprise rolls), SD soft underbelly covers in acid when exposed to air (1 pt of damage per round), AL N, XP 35, Source: Monstrous Manual)
Medium Piercer (AC 3, MV 1, HD 3, hp 11, THAC0 19, #ATT 1, D 2-12, SA surprise (-7 to opponent surprise rolls), SD soft underbelly covers in acid when exposed to air (1 pt of damage per round), AL N, XP 120, Source: Monstrous Manual)
Large Piercers (2) (AC 3, MV 1, HD 3, hp 16 ea, THAC0 17, #ATT 1, D 3-18, SA surprise (-7 to opponent surprise rolls), SD soft underbelly covers in acid when exposed to air (1 pt of damage per round), AL N, XP 120 ea, Source: Monstrous Manual)
Very Large Piercers (2) (AC 3, MV 1, HD 4, hp 22 ea, THAC0 17, #ATT 1, D 4-24, SA surprise (-7 to opponent surprise rolls), SD soft underbelly covers in acid when exposed to air (1 pt of damage per round), AL N, XP 420 ea, Source: Monstrous Manual)
Should the trolls come to fight out here they will avoid the piercer areas, but will try to force the party into such areas. The pierces are inclined to attack troll or party members indiscriminately. There are also essentially an unlimited number of boulders for the trolls to throw here.
2. Shaman Cavern
This cavern is one of the lairs of the trolls. Most of them are currently at the Troll Bridge, however, the leader of the group, a shaman, dwells here along with a small retinue of paramours and personal guards.
The cavern is 30' high and sports the usual foul troll nests, bits of fungus and rothe bones and other bones set into a large round nest. There are a total of 12 nests here, and there is a small stone shelf 5' high in the far north of the cave that holds a rather larger nest made up of many bones including those of trolls.
There are also two large cave-like niches to the southeast. Each niche is 8' in diameter and 15' deep and serves as a lair for a two-headed troll.
There are 6 trolls here, as well as a two-headed troll and the shaman who dwells in the nest on the stone shelf. Scratched into the wall above her nest is the crude rendering of a round globe with eyestalks, tentacles, and mouth stalks (a representation of the deepspawn, the trolls' erstwhile deity).
The trolls speak the same languages as do the trolls at the TROLL BRIDGE.
Trolls (6) (AC 4, MV 12, HD 6+6, hp 34, 33, 42, 38, 30, 34, THAC0 13, #ATT 3, D 5-8/5-8/5-12, SA climb walls 80%, severed limbs can fight, throw stones (20 yards, D8 damage), SD regenerate 3hp per round, limb severed on an opponent roll of 20, AL CE, XP 1400 ea, Source: Monstrous Manual)
Two-Headed Troll (AC 4, MV 12, HD 10, hp 45, THAC0 11, #ATT 4, D 5-8 / 5-8 / 1-12 / 1-12, SA throw stones (20 yards, D8 damage), SD regenerate 1 hp per round, cannot reattach limbs, surprised only on a 1, AL CE, XP 3000, Source: Monstrous Manual)
Troll Shaman (AC 4, MV 12, HD 6+6, CL Pr, LV 7, hp 52, THAC0 13, #ATT 3, D 5-8/5-8/5-12, SA climb walls 80%, severed limbs can fight, throw stones (20 yards, D8 damage), SD regenerate 3hp per round, limb severed on an opponent roll of 20, Spell Points: 70, AL CE, XP 2000, Source: Monstrous Manual)
Spells Memorized:
Command (4), Faerie Fire (4), Obscurement (4), Hold Person (6), Chant (6), Detect Spirits (10), Dispel Magic (10), Dictate (10), Cloak of Fear (15), 1 Free Orison (1)
3. Troll Nest
This cavern is 40' high. It is the living area for others of the trolls not lairing in Room 2, including the rest of the trolls at the TROLL BRIDGE. While they generally spend most of their time at the bridge, the trolls still take turns living there and here at the direction of the shaman.
There are 9 troll nests of bones and fur and fungus stalks as well as 4 cave-like niches along the southern wall. These niches are some 8' in diameter and some 12' deep and serve as lairs for giant trolls.
There are 3 trolls here, along with 2 giant trolls. They will move to protect the shaman should a battle erupt in Room 2, grabbing up boulders to heave as they close.
Trolls (3) (AC 4, MV 12, HD 6+6, hp 30, 32, 33, THAC0 13, #ATT 3, D 5-8/5-8/5-12, SA climb walls 80%, severed limbs can fight, throw stones (20 yards, D8 damage), SD regenerate 3hp per round, limb severed on an opponent roll of 20, AL CE, XP 1400 ea, Source: Monstrous Manual)
Giant Trolls (2) (AC 4, MV 12, HD 8, hp 51, 40, THAC0 13, #ATT 1, D by weapon (+7 due to strength), SA grab and hurl opponents, hurl rocks 3-200 yards away for 2-16 damage, SD catch boulders 25%, regenerate 2 hp per round, cannot be brought below 1 hp unless 10hp of fire damage taken, cannot reattach severed limbs, AL CE, XP 1400 ea, Source: Monstrous Manual)
4. Death's Floor
At the rear of this cavern is a marble door before which sits a chest. These items are just visible through the stalagmites that dot the floor.
There are two hidden creatures in the cave section, which work in cooperation, though neither is intelligent.
First, a large patch of gray mold exists on the floor here, as indicated on the map. The mold is not a spawn of the deepspawn, but simply exists in the cavern and cannot really be defeated by the other residents. The mold grew fat on spawn for a time until they learned to leave it alone.
The mold is grey in colour, looking much like the rock of the cave, and is wrapped around columns and stalagmites, such that even if torches are brought in it will be obscured in shadows.
Anyone stepping on the mold will be subject to its effects,
Gray Mold (AC 9, MV 0, HD n/a, hp n/a, THAC0 n/a, #ATT 1, D 1-6, SA spores (when stepped on emits a cloud of gray spores once per 6 rounds, creatures within the cloud suffer 1D6 damage and must save vs poison or inhale 1D6 spores which do 1 point of damage per round per spore until death; a Cure Disease spell kills the spores but those killed by the spores become part of the mold [man-sized creatures become a 10' square patch), SD immune to weapons and fire-based attacks, cold based spells cause dormancy for 1D8 turns while Ice Storm, Wall of Ice, or other cold spells above 3rd level kill it outright, MR 35%, AL N, XP 65, Source: Monstrous Compendium 2)
Second, a killer mimic is in the form of the door and the chest. The mimic is also not a spawn of the deepspawn, but it is a child of Ghaunadaur and so has been welcomed here by the deepspawn.
The mimic will try to use its form to entice the party onto the fungus. It will then wait patiently for the hopefully now injured persons to reach it, in which case it will attack as the person tries to touch the chest or the door, preferably after the victim grabs the door knob and gets stuck.
Killer Mimic (AC 7, MV 3, HD 10, hp 59, THAC0 11, #ATT 1, D 3-12, SA glue (alcohol weakens it in 3 rounds or a victim may make a single attempt at an open door roll, dissolves 5 rounds after the mimic dies), surprise (opponents gain -4 to surprise roll), SD camouflage, AL N(E), XP 3000, Source: Monstrous Manual)
The mimic, despite the knowledge of its existence by the nearby inhabitants, still feeds off of the occasional newborn spawn that does not know about this area and becomes victim to it. As the mimic does not need to eat regularly, it survives by this method.
5. Remains Cave
The partially dissolved remains of a 50' long giant slug lie here. This beast blundered in through Room 7 and Room 6 and was finally paralyzed by the carrion crawlers as it sought to flee. Trolls then came to finish it off and carry as much as they could to eat. The remains, mostly the bottom of the slug, lies festering and many small beetles and grubs now work at the remains.
There are also 3 giant centipedes and 2 carrion crawlers (the crawlers are spawns of the deepspawn) here. The centipedes will not bother the party unless the party stumbles onto them as they feast on the remains. The carrion crawlers have burrowed into the remains and are hidden there chewing away. They will not bother the party or even be seen by them unless the party in some way approaches or molests the slug remains.
Giant Centipedes (3) (AC 9, MV 15, HD 1/4, hp 2 ea, THAC0 20, #ATT 1, D nil, SA poison (save at +4 or be paralyzed for 2D6 hours), SD -1 to saves due to small size, AL N, XP 35 ea, Source: Monstrous Manual)
Carrion Crawlers (2) (AC 3/7, MV 12, HD 3+1, hp 14, 19, THAC0 17, #ATT 1 or 8, D special or 1-2, SA paralysis (2' long tentacles paralyze for 2D6 turns unless a save is made, AL N, XP 420 ea, Source: Monstrous Manual)
6. The Hapless Troll
This largish cavern is some 40' high and studded with the usual columns and obstructions. To the southeast is a murky pool of water, potable and some 20' deep.
Four carrion crawlers dwell in this room. In actuality, 2 others do as well, but these are currently to be found in Room 5 chewing through the remains of the giant slug.
The crawlers currently in this chamber have a unique opportunity. When the giant slug lumbered into Room 5 and the deepspawn called the trolls for help, one of the trolls was knocked below zero hit points by the beast. While it waited to regenerate, the opportunistic carrion crawlers scrambled in and grabbed it and dragged it back into this room. As the troll regenerated, the carrion crawlers continued to paralyze it and feast on its remains.
The result is that the troll keeps regenerating and the crawlers keep eating its flesh. Thus far the hapless troll has been in this condition for several days. It is to be assumed that eventually the crawlers will have gorged themselves and the troll will be able to escape. But for now, he is essentially in troll hell.
What the party will see are two carrion crawlers chewing on what remains of a troll. It will take a close look to see that the troll is still regenerating, as it does not move at all due to its paralysis.
The two other carrion crawlers are on the walls or ceilings, likely obscured by stalactites. All will attack if the party molests any of them.
The carrion crawlers are spawns of the deepspawn.
Carrion Crawlers (4) (AC 3/7, MV 12, HD 3+1, hp 22, 10, 17, 14, THAC0 17, #ATT 1 or 8, D special or 1-2, SA paralysis (2' long tentacles paralyze for 2D6 turns unless a save is made, AL N, XP 420 ea, Source: Monstrous Manual)
These carrion crawlers are relative newcomers to the area and have been well fed enough not to pose a danger to the other residents yet. It is likely that eventually they will wander out of the lair on their own or be killed off by the other residents of the lair.
7. Entry Cavern
This long gallery is studded with fluted columns and stalactites and stalagmites. A large cluster of piercers dwells at the red circle indicated on the map. These will attack anything that comes below them mercilessly. They recently assaulted the giant slug that lumbered through here, wounding it and driving it to the south.
The bugbears and other intelligent residents of the lair know of the piercers here and avoid them. The carrion crawlers do not really know of them but as they tend to travel along the walls and ceiling as a matter of routine, they become effectively immune to the piercers anyways.
Small Piercers (2) (AC 3, MV 1, HD 1, hp 6 ea, THAC0 19, #ATT 1, D 1-6, SA surprise (-7 to opponent surprise rolls), SD soft underbelly covers in acid when exposed to air (1 pt of damage per round), AL N, XP 35 ea, Source: Monstrous Manual)
Medium Piercers (2) (AC 3, MV 1, HD 3, hp 11 ea, THAC0 19, #ATT 1, D 2-12, SA surprise (-7 to opponent surprise rolls), SD soft underbelly covers in acid when exposed to air (1 pt of damage per round), AL N, XP 120 ea, Source: Monstrous Manual)
Large Piercers (2) (AC 3, MV 1, HD 3, hp 16 ea, THAC0 17, #ATT 1, D 3-18, SA surprise (-7 to opponent surprise rolls), SD soft underbelly covers in acid when exposed to air (1 pt of damage per round), AL N, XP 120 ea, Source: Monstrous Manual)
Very Large Piercers (2) (AC 3, MV 1, HD 4, hp 22 ea, THAC0 17, #ATT 1, D 4-24, SA surprise (-7 to opponent surprise rolls), SD soft underbelly covers in acid when exposed to air (1 pt of damage per round), AL N, XP 420 ea, Source: Monstrous Manual)
8. Bugbear Cave
This cave is one of two that serves as lair to a clan of bugbears. These bugbears are all spawn of the deepspawn, and like the trolls worship it as a god. These bugbears have no loyalty or affiliation with the bugbear slaves of the drow. These specimens are entirely at the beck and call of the deepspawn. The latter does not let them roam outside of the lair area for fear that the drow will get wind of an independent tribe of bugbears and come to enslave them.
The bugbears and trolls are aware of each other and both accept their roles as guardians of their god. Each will seek to come to the aid of the other should a threat appear in the lair.
The bugbears are also aware of both the piercers in Room 7 and the carrion crawlers in Room 6 and 5. They are nervous about the carrion crawlers, and plan to kill them should they venture too near their lair, but thus far the crawlers have kept to themselves and that is just fine by these bugbears.
The cavern itself is 35' high and dotted with many stalactites and a few stalagmites. Many of the latter have been smashed so that their trunks form crude tables and chairs and even platforms for beddings of rothe furs.
Some 24 male bugbears dwell here, amidst cast off bones and many skins of fermented fungus wine. Several rothe carcasses hang from hooks or from cords and at least 3 orc corpses do as well.
Note: All male bugbears are assumed to have the following NWP:
Close-quarter fighting, Hunting, Intimidation, Eating
All female bugbears are assumed to have the following NWP:
Wild fighting, Eating, Hunting
Bugbear Males (24) (AC 5, MV 9, HD 3+1, hp 17 ea, THAC0 17, #ATT 1, D by weapon or 2-8 (+2 damage with weapon due to strength), Weapons morningstar (Av 2D4/1D6+1 kdD10 +1 to hit platemail), SA surprise (opponents get a -3 to their surprise rolls), AL CE, XP 120 ea, Source: Monstrous Manual)
Treasure:
D20gp, D50cp, D6pp (of drow mint)
These are led by the war leader, a huge brute who bullies the bugbears into submission.
Bugbear Warleader (AC 4, MV 10, HD 4, hp 25, THAC0 17, #ATT 1, D 2-8 or by weapon (+3 damage with weapon due to strength), Weapons footman's mace (Av 1D6+1/1D6 kdD10 +2 to hit mail bugbear may throw 1/r 2/3/4), SA surprise (opponents get a -3 to their surprise rolls), AL CE, XP 175, Source: Monstrous Manual)
Treasure:
An iron earring set with a crude
onyx worth 50gp, a tooth necklace, pouch with 56sp, 24ep, and
12pp (all of drow mint)
Halfway along the north wall is a crude forge, basically a stone
kiln and a stone anvil and some crude tongs and hammers. Two of
the bugbears are usually to be found hammering away making new
weapons or other needed items. A few picks for mining ore also
are stacked nearby. Ingots of iron and steel are piled near the
forge, showing that for the moment the bugbears have all the metal
they need.
9. Bugbear Cavern
This large cavern is over 50' high at its apex, and is only lightly sprinkled with columns, stalactites, and stalagmites.
Within this area are bugbear furnishings similar to those in Room 8 (i.e. crude fur pallets and rugs, stone tables and chairs, etc). Many rothe hides hang here, others being stretched on slabs of stone or boiled in a large stone cauldron set over glowing coals.
Some 20 female bugbears are here, along with 10 young. The young are not spawns of the deepspawn, but are instead the first generation of progeny of the spawned bugbears. They will likely be slain or chased away when they get old enough to become a threat.
In addition to the females and young (who are little more than chattel and do not fight unless cornered [in that case treat the females as hobgoblins and the young as kobolds]), the bugbear chief resides here, on a fur covered stone seat set on a 5' high shelf to the south. With him are several favoured females, a young he sired, and sitting at his feet a sub chief.
Nearby, in a small niche, sits the bugbear shaman, direct worshipper of the deepspawn and indirect worshipper of Ghaunadaur.
Bugbear Females (20) (AC 10, MV 9, HD 1+1, hp 6 ea, THAC0 19, #ATT 1, D 1-6, SA surprise (opponents get a -3 to their surprise rolls, AL CE, XP 65 ea, Source: Monstrous Manual)
Bugbear Young (10) (AC 10, MV 6, HD 1/2, hp 3 ea, THAC0 20, #ATT 1, D 1-4, SA surprise (opponents get a -3 to their surprise rolls), AL CE, XP 35 ea, Source: Monstrous Manual)
Bugbear Chieftain (AC 3, MV 11, CL Wa, LV 6, hp 48, THAC0 17, #ATT 1 or 3, D 2-8 or by weapon type (+4 damage with weapon due to strength), Weapon footman's mace in each hand (Av 1D6+1/1D6 kdD10 +2 to hit mail bugbear may throw 1/r 2/3/4) at no penalty, ambidexterity, surprise (opponents get a -3 to their surprise rolls), specialized in footman's mace (+1 to hit and +2 damage), AL CE, XP 420, Source: Monstrous Manual)
Treasure: Iron nose chain with an amethyst dangling from the end (worth 75gp), a needle of ruby stuck through the ear (150gp), a necklace of finger bones with crystals and small gems pounded into them worth 60gp), a pouch with 50gp and 27pp (of drow mint)
Bugbear Sub Chief (AC 4, MV 10, HD 4, hp 23, THAC0 17, #ATT 1, D 2-8 or by weapon (+3 damage with weapon due to strength), Weapons footman's mace (Av 1D6+1/1D6 kdD10 +2 to hit mail bugbear may throw 1/r 2/3/4), SA surprise (opponents get a -3 to their surprise rolls), AL CE, XP 175, Source: Monstrous Manual)
Treasure:
Mace has an opal pounded into the pommel (worth 450gp), copper hoop in one ear worth 20gp, pouch with 17pp, 34gp (of drow mint)
Bugbear Shaman (AC 5, MV 9, CL Pr [shaman kit], LV 8, hp 52, THAC0 16, #ATT 1, D 2-8 or by weapon type (+2 damage with weapon due to strength), Weapon footman's mace (Av 1D6+1/1D6 kdD10 +2 to hit mail bugbear may throw 1/r 2/3/4), surprise (opponents get a -3 to their surprise rolls), Spell Points: 90, AL CE, XP 2000, Source: Monstrous Manual)
Spells Memorized (Access to All, Guardian, Elemental Earth, Animal):
Bless (4), Invisibility to Animals (4), Strength of Stone (4), Light (4), Charm Person or Mammal (6), Soften Earth and Stone (6), Silence 15' radius (6), Chant (6), Speak with Animals (6), Dispel Magic (10), Control Animal (10), Meld into Stone (10), Adamantite Mace (15), 1 Free Orison (1)
NWP:
Healing (10), Herbalism (10)
Magic:
6 Fire Pellets (little pellets of two chemicals that, when mixed together by impact, ignite in a small flame, the flame causes no damage but can ignite flammable materials unless they save vs normal fire [oil and really flammable things will always ignite], range is 2/4/6 and despite being listed as magic these items are not magical but are chemical in nature).
The shaman will use the pellets to ignite the termite spit (see below).
Treasure:
A silver fish brooch of kuo-toan design which holds his ratty fur cloak together (150gp), a beaten iron armband with semi-precious gems pounded into it (65gp), a silver and iron unholy symbol to Ghaunadaur shaped like an eye with tentacles coming out of it (45gp), a pouch with a rough diamond (1000gp) and 45gp and 16pp of drow mint.
The shaman has two pets, which he created using the Giant Insect spell. These pets are of limited intelligence, and can only respond to his commands to attack, defend, run, or guard. They can be directed to attack where the priest points (or at least in that direction). The shaman is in no way attached to his pets and will throw them into combat at the first sign of trouble. He can always create more.
Giant Soldier Termites (AC 2/8, MV 9, HD 3+3, hp 18, 18, THAC0 17, #ATT 1, D 2-8, SA spit liquid (once per turn to a range of 15', blinds creatures for 5D4 rounds who do not save vs. poison, also the liquid is flammable and if ignited causes 4D4 damage), AL N, XP 175 ea, Source: Monstrous Manual)
10. Cavern of the Elves
This smallish cavern is only 20' high and is heavily studded with stalactites and stalagmites. Within dwell 7 of the newest spawn of the deepspawn. These are rockseer elves. These elves have been spawned only a few years ago and in keeping with their reclusive nature have rarely travelled outside the deepspawn lair except to quickly hunt for food.
Rockseer elves in Therra are those who refused to face the Deceiver and Lolth during the first battles of Blanthil and instead fled underground. It is rumoured by the very few in the know that it is likely that Lolth and the drow simply followed the trail underground blazed by the rockseers previously.
These rockseers are not individually very powerful. The deepspawn has created them in the misguided hope that they would provide insight into the drow mind and might be useful in dealing with the drow. It soon learned of its mistake in thinking this, but was pleasantly surprised when the elves started to manifest some very powerful communal abilities.
The elves are loyal servants of the deepspawn. They too regard it as a god, and given their heritage as a people abandoned by the gods for their shame, they have eagerly accepted the god in Room 13 who seems to regard them as worthy of its providence.
The elves will not initially be hostile to the party, even if the party has attacked the bugbears or trolls. The elves get along somewhat with the bugbears but are afraid of the trolls and usually meld into stone when they come. The trolls would love nothing more than to catch these elves, but they have quickly learned of their power and elusiveness and have turned to less difficult prey.
The elves will, however, try to conjure an earth elemental when they become aware of intruders within the area and will order the elemental to hide in the back of the cave and lurk there to be called as needed.
The elves worship the deepspawn and will not let the party pass into Room 13 without leaving all weapons behind and informing them regarding what business the party has with their "god".
The elves live in large hollowed out stalagmites. At their base, these are 6'-8' diameter and within is a little hut or cave which holds stone shaped furniture and utensils. These are clearly shaped by magic.
Many of the stalactites and columns here have been Stone Shaped as well into beautiful renderings of bugbears, elves, cave crickets, and even one of the deepspawn. Many of these carvings even have coloured lichen and fungus planted in just the right spots to provide accurate or fanciful colourings to the stone portraits.
Rockseer Elves (6) (AC 4 (16 DEX), MV 9, CL Wa, LV 3, hp 23, 25, 20, 25, 29, 23, THAC0 18, #ATT 2, D by weapon type, Weapons: longsword [made by the bugbears] (Av 1D8/1D12 kdD8), short sword (Fa 1D6/1D8 kdD6), Armour: metal-studded furs and hides including a stone helm [head is AC 2], SA +1 to hit with longsword, ambidextrous (no penalty for fighting with 2 weapons), communal powers, SD meld into stone at will, stone walk 100 yards per day, sense distances between caverns, immune to petrifaction, 90% resistant to sleep, charm, hold and web, -1 on saves vs Elemental Air spells, MR 50% to Elemental Earth spells, AL N, XP 975 ea, Source: Monstrous Compendium 3)
Lead Rockseer Elf (AC 4 (16 DEX), MV 9, CL Wa, LV 5, hp 36, THAC0 16, #ATT 2, D by weapon type, Weapons: longsword [made by the bugbears] (Av 1D8/1D12 kdD8), short sword (Fa 1D6/1D8 kdD6), Armour: metal-studded furs and hides including a stone helm [head is AC 2], SA +1 to hit with longsword, ambidextrous (no penalty for fighting with 2 weapons), communal powers, SD meld into stone at will, stone shape 1/day, stone walk 300 yards per day, sense distances between caverns, immune to petrifaction, 90% resistant to sleep, charm, hold and web, -1 on saves vs Elemental Air spells, MR 50% to Elemental Earth spells, AL N, XP 975 ea, Source: Monstrous Compendium 3)
Communal Powers:
3 or more rockseers with 10 experience levels can cast Wall of Stone at will
5 or more rockseers with at least 20 experience levels can conjure a huge earth elemental once per day with no chance of losing control.
Huge Earth Elemental (AC 2, MV 6, HD 20, hp 133, THAC0 5, #ATT 1, D 4-32, SA attack constructions, -2 damage per die against air or water borne creatures, SD +2 or better weapon to hit, AL N, XP 14000, Source: Monstrous Manual)
11. The Roper
This section of the cavern is 25' high. At the point where 'R' is marked on the map is a 9' tall stalagmite, not common in these caves but certainly not the only such stalagmite. This one, however, is a spawned roper. It will attack all creatures within reach. The trolls use Room 9 and 10 to access the deepspawn.
Roper (AC 0, MV 3, HD 12, hp 59, THAC0 9, #ATT 1, D 5-20, SA strands (one per round up to 6, 50' range, pull 750 pounds at 10' per round to the mouth, strand can be broken by an open doors roll or cut at AC 0 for 6 hp by a slashing weapon in 1 attack), strength drain (strand hitting causes save vs poison or lose 1/2 STR rounded down 1D3 rounds after the hit for 2D4 turns), surprise (opponents get -2 to surprise roll), SD immune to lightning, half damage from cold, save at -4 vs fire, MR 80%, AL CE, XP 12000, Source: Monstrous Manual)
Within the gizzard of the roper are 14 pp (drow minted) and 10 gems (amethysts and hematite) worth a total of 1000gp.
12. Servants of the Slime
This cave is below the level of the rest of the lair, accessed by descending stone steps some 2' in height each.
Within is a cave filled with columns, to such an extent that line of sight is severely limited.
Within dwell the prime servants of the deepspawn, the ghaunadan oozes. There are 4 of the intelligent oozes here, and they have no furniture here or other sign of habitation, as they normally reside in ooze form.
If surprised, they will be observed as 4 5' diameter puddles of plum and mauve coloured ooze. If the oozes are aware of the party's approach, two of them will change into humanoid form, appearing as beautifully proportioned male humans with no hair and slick copper and amber skin. These will use their Friends ability to speak with the party and determine what they seek of their master. Should they detect any hostile intent or should the party have already shown a proclivity for destruction with the bugbears and/or trolls, then the two humanoid ghaunadans will chat amiably while the other two ooze along the ceiling in jelly form to drop on the party in a surprise attack. The humanoids will then also attack with their pseudo-pod hands.
Ghaunadan Oozes (4) (AC 1, MV 12 [half if moving through small cracks], HD 5, hp 20, 28, 29, 26, THAC0 15, #ATT 2, D 3-12/3-12, SA Friends spell gaze, paralytic slime (save when struck vs paralysis at +2 or be paralyzed for 2D6 turns), SD half damage from blunt weapons, disarming (if hit the ooze in jelly form can forego all attacks that round and mold around the weapon that hit it trapping it so that it takes a bend bars roll to free the weapon), CHA 15 in humanoid form (+2D4 for Friends spell), AL CE, XP 4000 ea, Source: Monstrous Compendium 2)
13. The Deepspawn
This is the central portion of the lair, the nexus of the power here, as represented by the deepspawn. This creature emerged from the deepest depths of the earth, driven out by a power conflict with another of its ilk, some 25 years ago. Being new to the upper reaches of the Underdark, it began to experiment with the various creatures of the area, in order to find suitable spawn with which to begin its power base. It first came upon the trolls, and determined them powerful enough to be useful yet stupid enough to be fooled. Using its powers it captured a troll and began to create spawn. These easily infiltrated the troll clan and eventually dominated it. The spawn then slew their rivals and took over the troll lair, inviting their master to move in.
This he did. Over the course of the ensuing twenty years or so it has captured and learned to spawn a variety of creatures. The only group the deepspawn really fears is the drow. It has been working lengthily and subtlety to try and infiltrate the drow, but as mentioned previously, it does not underestimate the drowish capability for reprisals, and so is afraid to take any action against them unless success is assured.
Towards its aims, the deepspawn has worked on infiltrating those peripheral to the drow. This includes the kuo-toans, the bugbears, and the rockseer elves (in a misguided attempt to try and divine the drow nature through the rock elves [it soon determined that not all elves are created equally]).
The deepspawn will likely be hostile to the party. It is a very powerful creature with many guards and believes it has a really good thing going where it is currently. Any party powerful enough to fight its way to this chamber is likely to be viewed as a threat to be tricked and decimated if possible, or avoided and fled from otherwise. Any party members who try to parley with the deepspawn are likely to be viewed by it as weak and suitable for prey. Significantly, the deepspawn has never absorbed humans, surface elves, or dwarves, and it will be eager to do so.
The chamber is 40' high and has stalactites that are smallish and come to a point some 25'-30' above the level of the floor. In the centre of the chamber three stone steps some 2'-3' high each descend to a pile of what can best be called gems. The pile is mostly crystals and quartz, possibly worthless, but even from a distance, some valuable looking gems can be seen, along with the glint of nuggets of precious metals and even a coin or two. The pile rises some 4' out of the innermost depression, though it is impossible to say how deep the pile is without digging it out and determining where the bottom lies.
Within this pile dwells the deepspawn. It is usually buried beneath the pile, far beneath it such that detect spells will not function. The valueless crystals actually serve several purposes.
First, the gleam of treasure may draw potential victims within reach of the deepspawn.
Second, the crystals are hard and provide a very good amount of cover for the deepspawn. Assume the creature has 90% concealment when spying from the pile, and 75% cover when attacking from it (-7 and -10 to AC respectively against missiles and +7 and +10 respectively on saves vs physical attacks and successful saves mean no damage is taken).
Third, the crystals are of a specific type that are imbued with a residual magic which serves to scramble detect spells. ESP and mind reading spells are not scrambled, nor is most scrying, but pretty much any spell with the word "Detect" or "Detection" will be foiled. This effect requires a large number of these crystals in close proximity (such as being under a pile of them or somehow fashioning a suit of armour from them) and requires them to cover at least 90% of the being or object being shielded. The party is unlikely to be able to make use of this function. Coincidentally, the crystals can be used as a component for magic items that foil detection and scrying.
The deepspawn usually rests about 5'-6' under the crystals, with at least 1 eyestalk at the surface, peering out at his chamber. The creature is massive and strong enough to burst through the weight of the crystals easily, so it can attack unhampered. The deepspawn will usually attack with its tentacles without revealing its body, likely causing the party to assume that separate creatures are attacking them
Deepspawn (AC 6, MV 6 sw8, HD 14, hp 98, THAC0 7, #ATT 6, D 3-12(x3)/2-5(x3) or by weapon type(x3), SA create spawns, tentacles may grasp with 17 STR, tentacles may constrict (for 1-4 in the first round and 2-5 thereafter [1 point of damage in the round the creature gets free], constricted victims can be swung as bludgeons, doing 1-2 damage to those hit and ruining spellcasting and forcing fragile items to save or break, escape constriction by severing the tentacle [tentacle arm has 2HD and is severed if half its hp is dealt by an edged weapon], or by tearing free [roll D20 for the deepspawn and the victim and add STR, higher total breaks free]), hold spell 1/3 rounds, SD ESP at will, Water Breathing at will, Heal 1/day, regenerate stalks and arms and tentacles at 2hp per day, immune to all venoms, MR 77%, AL CE, XP 12000, Source: Monstrous Manual).
The deepspawn has collected several weapons that it has secreted within its pile. These have been taken from the drow for the most part, not directly by the deepspawn, but by its minions. There is also a stash of missile weapons that the deepspawn can throw at targets in a pinch. These include:
A drow metal footman's mace +2 (Av 1D6+1/1D6 kdD10 +2 to hit vs mail)
A bec de corbin decorated with silver inlays on its head and shaft and taken from a deep gnome (Sl 1D8/1D6 kdD8 +3 to hit vs platemail)
A maul (Sl 2D4/1D10 kdD12 +1 to hit vs plate or mail)
3 kuo-toan harpoons (sans cords) (Av 1/r melee 2/4/6 2D4/2D6 kdD8)
2 troglodyte javelins (Fa 1/r 4/8/12 1D6/1D6 kdD6)
3 hand axes (Fa 1/r 2/4/6 1D6/1D4 kdD8)
The deepspawn's cavity is 35' deep and ends in a round stone plug. This plug can be twisted and removed by the deepspawn (even if the crystals fill the cavity) or by anyone with a 17 STR once the cavity is cleared of crystals. The plug blocks an 18' diameter shaft that goes straight down for 100' before emerging in the ceiling of a deep cavern. The cavern has a lake for its floor, deep and cold. The deepspawn will use this route to escape, trusting its swimming ability and its Water Breathing to evade pursuit. The deepspawn, in a pinch, will even simply remove the plug and hurtle straight down the shaft in a freefall if it means escape from a desperate situation.
The pile of crystals, in addition to the scrambling crystals already described, includes:
6 gold nuggets worth D100x10gp each
5 silver nuggets worth D100gp each
7 copper nuggets worth D10gp each
4 large rubies worth 5,000gp each
4 small diamonds worth 250gp each
14pp of drow mint
54sp of orcish mint
16ep of drow mint
40 gp of mixed drow and orcish minting
Most of these items have been placed near the top of the pile so as to be readily visible as a lure to potential victims.
DEEP DRAGON:
This area is the demesne of a very powerful deep dragon. This very old worm is undisputedly the master of this area, though the drow could imbue him with humility if they were inclined to mass and teach him a lesson. As such, the dragon is smart enough not to antagonize the drow too much. He prizes the kuo-toans as food, and sometimes swims down the underground river in snake form to the great underground lake and then hunts kuo-toans therefrom. He is smart enough, however, not to antagonize the fish men too much, for he knows that a great city of them is below the lake, and the kuo-toans of the outpost have enough concentrated power to give him a run for his money. Thus he tends to take small groups or stragglers.
In his lair the dragon is wont to go about in dragon form. He generally saves his snake form for burrowing or swimming, where wings are useless. Humanoid form is often in drow or duergar form, though he has infiltrated the trolls in the deepspawn lair once before he discovered, to his chagrin, that the deepspawn could read minds.
Reaction to the Party:
The dragon does not have a lot of experience with humans. Therefore,
he may be cautious at first, seeking to gauge the strength and
intent of the party. That said, he is very evil and very crafty,
and certainly he will, in the end, seek a way to slay the party
and take their treasure. However, he is not above striking a bargain
and waiting until the time to strike is right.
The dragon will see flattery and supplication as a sign of weakness and almost certainly attack such persons. If he is approached from a position of both strength and due respect, he might be induced to spare the party what is likely to be a deadly confrontation if they offer him enough to make it worth his while and display the ability or potential to make his attacking the party a painful proposition.
The dragon, as is all of his kind, is very fond of kuo-toan flesh, and he might be induced to strike a bargain with the party, agreeing to spare them if they bring him the head of the leader of the kuo-toans. In this case he will require hostages left in his care, and it is possible he will consume his hostages if he thinks the party takes too long to complete its mission.
If the party has already defeated the kuo-toans, the dragon will certainly be most impressed and ask for proof of this deed. If the party can bring back the head of the leader, the dragon will certainly be impressed with the party's prowess and will certainly cut a deal that would allow him to go and consume the kuo-toans unmolested.
Deep Dragon [Very old] (AC -5, MV 12 fl30[C] br6 sw9, HD 19, hp 94, THAC0 5, #ATT 3+ special, D 8-17/8-17/8-29, SA fear (automatic in 1HD creatures or non carnivorous/non aggressive creatures with fewer than 19HD for 4D6 rounds, other creatures with less than 19HD suffer fear versus the attacking or charging dragon within 45 yards and must save vs petrifaction at 11 or fight at -2 to attack and damage rolls), dragon attacks (see below), breath for 18D8+9 1/3 rounds (flesh-corrosive gas 50' long by 40' wide by 30' tall, save vs breath for half damage [if victim has dry exposed skin or leather armour, save at -2]), dragon powers (see below), spells (see below), SD detect invisible in 90' radius, clairaudience in lair at 180', immune to cold and heat extremes (-3 on each damage die to a minimum of 1hp per die), immune to charm, sleep, and hold magic, dragon powers (see below), spells (see below), save as a 19th level warrior, MR 45%, AL CE, XP 19000, Source: Monstrous Manual)
Dragon Attacks:
Snatch (dive and grab a creature, 50% chance the snatched creature has its arms pinned, can claw automatically or try to eat)
Plummet (jump from 30' or higher up to 7 creatures inflicting damage equal to bite, crushed creatures must save vs petrifaction or be pinned suffering crush damage next round, a save vs petrifaction at -7 will free a victim in subsequent rounds)
Kick (creatures attacking it from behind doing claw damage and forcing a roll vs DEX or be kicked back D6+10 feet and require a save vs petrifaction at -9 or fall)
Buffet (attacks sides as a claw and victims must save vs DEX or be knocked prone) - can be used with one claw attack and may not tail slap
Tail slap (to rear and sides, damage as two claw attacks and affects 9 targets, those struck must save vs petrifaction at -9 or be stunned for D4+1 minutes)
Stall (flying near the ground, the dragon may stop and hover for a single round, attacking with bite and all four claws before landing; this kicks up dust and debris if applicable for 1 round in 20 yards blinding those within and no spell casting is possible within)
Dive (attack at +2 to hit when attacking with claws from a dive)
Dragon Powers:
Change into winged snake form 4/day (AC 6, MV 9 fl 4[D] sw 11, no claws but constrict for 3-24 per round which hampers movement, spellcasting and causes the victim -1 to attack and AC)
Change into humanoid form [usually drow or duergar] 4/day (AC 10, MV12 sw12, armour worn is destroyed if snake or dragon form is attained causing 2-8 damage, 66% likely to be able to copy a specific being's features)
Regenerate 1D4 hp every 4 rounds
Free Action at will
Levitate 3/day
Infravision
True Seeing
Detect Magic
Transmute Rock to Mud 3/day
Telekinesis 3/day
Move Earth 3/day
Spells (all with fast casting time and at 18th level):
Wizard Spells - Grease, Charm Person, Shield, Phantasmal Force, Protection from Poison, ESP, Haste, Dispel Magic
Priest Spells - Command, Protection from Good
Book of Infinite Spells (see Room 11): Sleep 4/day [but note a 10% chance per use that a page will turn]
Refer to the Demesne map. Unless stated otherwise, all passages are as tall as they are wide, enough for the dragon to slither through in dragon form (except for Room 10).
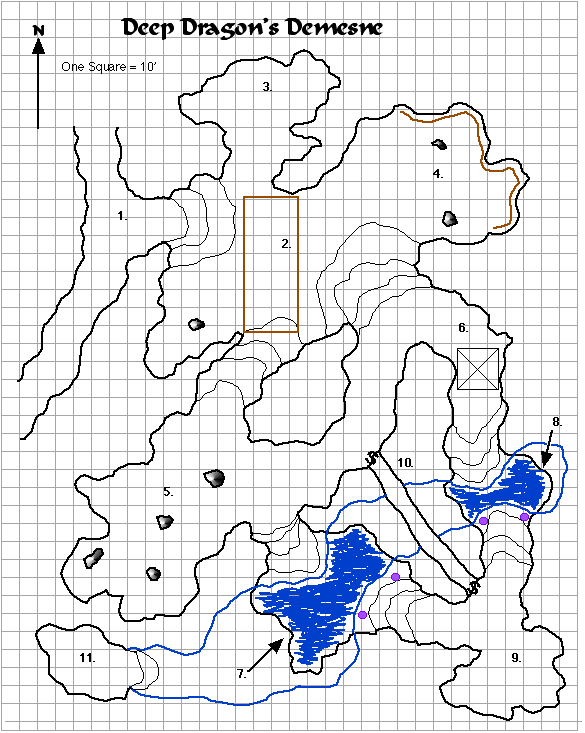
Please note that some aspects of Room 1 take place a good ways away from the actual entrance to the demesne.
1. Entrance to the Demesne
Although the passageway leading to the demesne is type C, the dragon has by force of its mass cleared away all of the stalactites and stalagmites that would obstruct its passage. This cleared area runs north to the type B passage and south to the crossing type C passage.
This clearance of obstructions is fairly abrupt, and is likely to be noticed by the party, giving at least a hint that something about the area is different. The occasional large claw gouge in the granite walls might also give away the size of the inhabitant, and such marks become more frequent as the lair is approached.
When the entrance is approached to within 1 mile, the party will begin to notice small puddles of a strange yellowish liquid. These small puddles are basically remnants of the breath weapon of the dragon. Anyone touching or tasting the liquid with bare flesh will suffer 1 hp of damage and will note the corrosive nature of the stuff. A good smell of it will burn the nostrils and cause coughing fits for 1 turn.
At some point about a half-mile from the entrance, the party will come upon a lone dragon beetle. This beetle, being a lone specimen, will not attack, but will try to flee from the party. If cornered or even attacked it will not fight, but will hunch up and hiss until captured or slain.
Should the party capture the dragon beetle and display it to the deep dragon, it will evoke a reaction from the dragon, which will back away from the beetle as if afraid. This fear will last only a moment, especially if it becomes apparent that the party has no idea what the beetle is. In this case, it is likely to become enraged should the party continue to brandish the beetle.
Once the party reaches Room 1 proper, they will likely be noticed by the dragon, assuming the party has not already encountered it and defeated it elsewhere. The dragon has the ability of Clairaudience within 180' of it while in its lair, and since it usually rests in Room 5, this is within range to hear any and everything that occurs in Room 1 and within 80' down the corridor leading to Room 1. The dragon spends most of its time while relaxing concentrating on listening to its entrance. If the DM wishes he can allow a 20% chance that the dragon is instead asleep in Room 9.
Thus, unless the party is absolutely quiet upon reaching Room 1, the dragon will likely be ready and waiting for them.
Should the dragon be ready, it will not attack until Room 2 is reached (see that room for details).
2. The Entry Cavern
This large cavern is over 55' high at its apex, descending unevenly to about 30' high at its edges. Several large stone columns stand as indicated on the map. The cavern is entered from Room 1 by a set of 3 natural stone steps, water eroded, as if at one time a pool of water filled this room.
Across the room and to the south, other natural stone steps lead up to passageways into the darkness beyond.
Scattered here and there about the cave are the bones of previous victims of the dragon, many rothe remains, but also some bugbears, orcs, and troglodyte skeletons as well. A few broken bits of armour and weapons from such creatures also lie discarded about.
If the dragon is aware of the party's approach via Clairaudience to Room 1 or any other means, it will immediately cast two spells on the rectangular area shown in brown on the demesne map. The first will be a Phantasmal Force, and the illusion will look exactly like the cavern floor. The second will be a Transmute Rock to Mud in the same area. Given the dragon's ability to sense the party's approach from 80' away from Room 1 proper, this should be enough time, unless the party is traveling at a rapid (almost careless) pace, to cast both spells.
Needless to say, the Phantasmal Force conceals the Rock to Mud spell. The party is likely to get its lead members trapped in the mud before they figure out what is going on. It is during this confusion that the deep dragon will likely emerge and possibly attack.
The dragon will also use its Telekinesis powers to throw those in Room 2 who line up with Room 3 or 4 directly into Room 3 or 4, with a mind towards hitting them against the far walls and activating the slime or molds there.
The dragon can throw up to 475 pounds in a 10' cube of effect some 190' directly away from it. This should be enough to affect 2 persons even fully armoured. Victims are entitled to saves. Those affected will take 14 points of damage (19 normal less 5 for the cushioning effect of the slime/mold).
3. Slime Central
The deep dragon has managed to cultivate a colony of green slime here (by infecting charmed creatures and having them run towards his demesne until they were consumed and then repeating the process over again). The slime grows in 6 colonies here, all about 6' in diameter and covering the north wall and some of the ceiling and floor of the cavern.
The slime should not be much of a threat for a wary individual entering the cave here, which is approximately 15' high and clear of stalactites and stalagmites, as it is readily visible assuming a good light source is handy. Anyone using infravision or blustering around in the dark might be in for trouble.
But the real purpose of the slime is to attack those who get telekinesis-attacked in here by the deep dragon. Those hitting the far wall will be attacked by the slime, suffering all of the effects therefrom. To give the victim a chance, allow the slime to drop on the first round and then the full consumption of the victim will occur at the end of the next 1-4 rounds.
Green Slime (6) (AC 9, MV 0, HD 2, hp 12 ea, THAC0 19, #ATT 0, D nil, SA slime disease, dissolve metal (platemail in 3 rounds), dissolve wood (1 inch per hour), SD immune to all spells and weapons except for fire and cold, AL N, XP 65 ea, Source: Monstrous Manual)
4. Mold Central
All along the far wall of this portion of the entry cave grows a huge brown mold. This mold has grown big by the constant feeding of it by the deep dragon. Again, the dragon uses this mold as a deadly combination for its telekinetic powers.
Should a party member be telekinetically thrown into this area (within 5' of the mold) they will take 4-32 damage from cold per round.
Anyone entering this section of the cave will certainly feel the sudden drop in temperature once past the stone steps that ascend to Room 6. Furthermore, it is not difficult to miss the large brown fuzzy growth on the wall at this point (the growth will not be apparent from Room 1 or the western half of Room 2 unless someone is very carefully examining the far away walls [and has the means to do so]).
Brown Mold (AC 9, MV 0, HD n/a, hp n/a, THAc0 n/a, #ATT 0, D n/a, SA freezing 4-32 damage, SE absorb heat (double size from a torch, quadruple from flaming oil, eight-fold from fireball), AL N, XP 15, Source: Monstrous Manual)
5. Dragon's Roost
This large chamber is where the deep dragon usually dwells. The place is 60' high and clear of obstacles except for four large stone columns as indicated on the map. The dragon can often be found resting here, usually laying against the northwest wall, head watching out towards Room 2.
A large stone table and 8 stone chairs are in the far south of the place, and nearby are 6 fur pallets belonging to the bugbears. Rothe carcasses hang from hooks in the wall nearby, and there are several barrels of water here as well. Atop the table is a stone chess set with various strange creatures used as pieces. A chess player can tell that one side is clearly a much better player than the other side. A fletching set and some arrows in various stages of fletching are in proximity. A stone box containing large insect wings sits nearby.
Set into the northeast wall are 6 rothe-hide targets with a bulls-eye painted on each. The targets have seen much use.
The deep dragon has 6 bugbears held in thrall with its Charm Person spell. These will fight to defend the dragon and its lair as best they can. The bugbears wield weapons specially obtained for them by the dragon and are aware of the mold, slime, and Transmute Rock to Mud tactics of the dragon and will avoid becoming caught by those traps. The bugbears know nothing of the rooms beyond the water.
Bugbears (6) (AC 5, MV 9, HD 3+1, hp 17 ea, THAC0 17, #ATT 1, D by weapon or 2-8 (+2 damage with weapon due to strength), Weapons morningstar (Av 2D4/1D6+1 kdD10 +1 to hit platemail), longbow (Av 2/r 14/28/42 1D6/1D6 kdD6), SA surprise (opponents get a -3 to their surprise rolls), AL CE, XP 120 ea, Source: Monstrous Manual)
NWP:
Close-quarter fighting, Eating, Hunting, Intimidation
Treasure:
D20gp, D50cp, D6pp (of drow mint)
Each bugbear has a leather quiver with 24 flight arrows with insect wings instead of feather flights.
These bugbears have been taught specifically by the dragon to target spellcasters. Furthermore, they have been taught to use the cover option (see Players Options: Combat and Tactics). This means that assuming they have their bows pre-knocked and drawn (i.e. only for their first shot and only should they know the party is coming), they can cover a person within short range (70') such that they may attack in Fast and always win initiative and gain a +2 to hit that person. The bugbears have also been trained to shoot one arrow at a time at a spellcaster so as to save their other arrows for later rounds. Thus, if unmolested, the bugbears will get 6 shots off in Fast with initiative. If there is more than one spellcaster evident, the bugbears will fire a single shot at each per round. After they shoot their covered shot in a round, they will fire their second shoot in that round at any targets of opportunity.
Should the bugbears get a further chance to shoot, they will draw another arrow and fire and then draw but not shoot their second shot. They will instead use this arrow to cover for next round.
The bugbears will try to take cover behind the stone columns here, gaining 25% cover while shooting. They will try to stay out of the way of the dragon's breath weapon. The dragon will try to keep his bugbears alive, simply because he does not wish to have to train another group of the slow-witted creatures in the marvelous bow tactics he has picked up from the drow.
Note that most bugbears are not intelligent enough to fire in so disciplined a manner, but the deep dragon has trained them and they are so loyal to him (due to the charm) that they have learned the tactic. The deep dragon himself learned this tactic by watching the drow in battle with their hand crossbows.
6. Trapped Hallway
This hallway bears a pit trap. The trap is covered by tarp of rothe leather covered by dirt and small stones. The result is not a perfectly concealed trap, but one which will catch the unwary. The tarp will fall if any substantial weight is placed upon it.
The pit within is 60' deep and will cause 5D6 (1D6 less because of the mold) of falling damage. Even worse, a patch of yellow mold has been grown at the bottom of the pit. Anyone falling will hit the mold, causing it to erupt in spores.
Yellow Mold (AC 9, MV 0, HD n/a, hp n/a, THAC0 n/a, #ATT 1, D n/a, SA poison spores (save vs poison or die), SD fire destroys it, Continual Light spell renders it dormant for 2D6 hours, MR 20%, AL N, XP 65, Source: Monstrous Manual)
7. Underwater Cavern
Natural stone steps lead down to a pool of cold, clear water. The roof of the cavern dips down to the level of the water as well, forming an underwater passageway that leads to Room 9. The water is deep, some 40' deep, and is startlingly cold. Anyone unprotected from the chill who enters the water must roll under their CON on a D20 or go into immediate shock. Those in shock can do nothing but flop around in the water for each round they make a swimming proficiency check (at -1 for each round thereafter). A failed check results in drowning (1D8 damage per round).
The water here is actually a part of an underground lake of relatively small size. The dimensions of the lake are shown on the map in blue. The lake is a full 60' deep in the area between Rooms 7 and 11 but remains 40' deep everywhere else. The ceiling of the cavern in these areas is at lake level (or below in some cases). DMs should take note that the passageway at Room 10 extends above the level of the lake and is in no way visible or accessible from the lake itself.
The deep dragon is an excellent swimmer and can hold its breath for quite some time. Given this and its immunity to extremes of cold, these watery passages make for excellent means of retreat and an effective way to bar intruders.
The deep dragon has managed to capture some very unique creatures and has set them as guardians here. These are skum, millennia-bred servants of the most ancient and deep aboleths. Such creatures as these skum are so rare at this depth that even the kuo-toans and drow regard them as mere rumour for the most part. In actuality, these skum are spawn of the deepspawn (see the DEEPSPAWN section). The deepspawn came from a place deep enough in the earth to be on the border of the realms of the aboleths. It absorbed some skum many years before being driven up to its present location and created a few of them when it first arrived as servants, as these were about all it could create at the time. The deepspawn eventually determined that the skum were not much use to him and let them leave, expecting them to die.
However, the skum were found by the deep dragon hiding in an underground pool. The dragon was delighted to find that the aboleths had bred the skum mind to be extremely susceptible to charm spells, and he used this to quickly charm them into his service. While the skum could not speak (having no vocal cords) and can only communicate telepathically with their aboleth masters, the deep dragon was able to teach them his language, and so command them. Being spawns of the deepspawn, the skum will not harm the deepspawn in any way, even while charmed.
The skum now serve as guardians of the underwater portion of his demesne. The dragon understands that the skum are not the fiercest creatures around, but they are a rather rude surprise for anyone swimming underwater who is not adapted to aquatic combat (and who perhaps has had to remove his armour in order to swim).
Skum (6) (AC 7, MV 6 sw15, HD 2+2, hp 14 ea, THAC0 17, #ATT 5, D 2-16/1-6/1-6/1-8/1-8, SA -2 to hit with weapons, -2 to hit out of water, only bite and 2 claws out of water, SD -4 save vs enchantment/charm spells, AL LE, XP 175 ea, Source: Monstrous Compendium 1)
The skum have excellent water hearing (twice what a human can hear) and they will certainly respond to any commotion occurring in Room 8. They will not leave the water to attack unless the dragon commands them.
8. Underwater Cavern
Similar to Room 7, and with the same risk of cold shock and drowning, this area is guarded by more of the skum charmed by the dragon.
Skum (6) (AC 7, MV 6 sw15, HD 2+2, hp 14 ea, THAC0 17, #ATT 5, D 2-16/1-6/1-6/1-8/1-8, SA -2 to hit with weapons, -2 to hit out of water, only bite and 2 claws out of water, SD -4 save vs enchantment/charm spells, AL LE, XP 175 ea, Source: Monstrous Compendium 1)
The skum have excellent water hearing (twice what a human can hear) and they will certainly respond to any commotion occurring in Room 7. They will not leave the water to attack unless the dragon commands them.
9. Repository
Leading up from the two underwater rooms, this cave is 45' high and its ceiling is dotted with stalactites, though many of the longer ones have been broken off at the tip. Stone detritus litters the floor.
The dragon has cultivated shriekers near the two watery passages here to alert him against invisible or particularly stealthy intruders, for he does not wish to be caught sleeping and unawares. The shriekers are induced to remain by piles of bat guano that have been placed at certain spots, and these are supplemented by dead bats and other small prey killed by the dragon that have been left to rot and be consumed by the fungi. The water also serves as a barrier against the shriekers' wandering off.
The shriekers are marked on the map as purple dots. If the dragon wishes to pass by the area where they are, he must either accept that they will shriek, possibly alerting the party, or he can choose to dispatch them with his breath and then pass by. This will mean the dragon cannot breathe for 3 more rounds, but the dragon may consider it worth the price tactically to be able to sneak up on the party. Remember the dragon can also emerge from this room without disturbing the shriekers by way of the secret passage (Room 10).
Shriekers (4) (AC 7, MV 1, HD 3, hp 15 ea, THAC0 17, #ATT 0, D nil, SD noise, AL N, XP 120 ea, Source: Monstrous Manual)
This chamber serves as the dragon's inner sanctum. If sorely pressed in combat the dragon will retreat here, with a mind of attacking those emerging from the watery passages, or to escape via either of the watery passages or the secret passage (Room 10).
It is also possible for the dragon, if the party is not aware of its shape-changing abilities, to flee from the party and change into a human shape and pretend to be a captive. In this case the dragon may claim that the deep dragon went through the secret passageway to escape in the hope that the party will chase after it and allow him to escape.
The dragon also sleeps here. While Room 5 is his living room, so to speak, this is his bedroom. The DM can allow a 20% chance that the dragon is asleep here when the party first arrives. Note that sound travels decently well underwater (through Rooms 7 and 8) and dragons have excellent senses, and so loud combat in Room 5, for example, will awaken the dragon.
Within the chamber the dragon has prepared a bed of coins and gems. Being underground and with no real access or desire to access the surface, this dragon's hoard is not as impressive as one might expect. Most of the coins here are of drow mint, though some near the top of the pile are of orcish make and bear the stamp of Gruumsh upon it. Others are blank coins, and a few even bear the likeness of crossed pickaxes on one face and an earth elemental on the other (these are deep gnome coins).
4,500cp
1,600sp
1,200ep
2,000gp
1,000pp
An assortment of 400 uncut gems ranging in value from 10-100gp each in their uncut state (if the actual gem type is needed [e.g. for material components], the DM may determine randomly).
An assortment of 150 cut gems ranging in value from 100-600gp each (if the actual gem type is needed [e.g. for material components], the DM may determine randomly).
A large uncut diamond worth 6,500gp
A large cut diamond worth 8,000gp
A huge uncut sapphire worth 10,000gp
A large cut ruby worth 3,500gp
In addition, a suit of drow chain armour lies nearby, along with drow cloaks and boots, drow clothing, and a drow short sword. These items have lost their quasi-magical abilities, but retain the look and feel of drow equipment and the dragon uses these when traveling about in drow form. Amongst the pockets of the cloak are 4 packets of drow sleep poison. These are sealed in small bladders and will remain potent for another 3 months or so. The poison is typical drow sleep poison (save at -4 or become weakened [-4 to hit, move at half speed, +4 to AC] for the next round and then fall asleep for 2D4 hours thereafter).
Also here is a drow hand crossbow and a rothe-leather quiver with the following:
6 normal darts
1 Dart of Screaming (see Drow of the Underdark for details)
2 Darts of Silencing (see Drow of the Underdark for details)
1 Dart of Stunning (see Drow of the Underdark for details)
Set on a stone table here are 6 crystal vials. Two of these are drow fungus wine. The other four are magical potions:
Potion of Sweet Water
Potion of Gaseous Form
Potion of Feign Death
Potion of Alertness (gives a person the Alertness NWP for 1D4 hours, if the person already has the NWP, it raises it by +2 for the same period of time)
Nearby on the floor leaning against the cavern wall are 3 scrolls of rolled rothe vellum. These are magical scrolls including:
A scroll with the priest spell Venom Immunity at 8th level (see Drow of the Underdark for details)
A scroll with the wizard spell Skyhook at 5th level (see Drow of the Underdark for details)
A scroll with the wizard spell Eyebite at 12th level
10. Escape Hatch
This passageway serves as an escape route for the deep dragon or as a way to sneak into the main area of the demesne without passing by the shriekers. The secret doors are activated by depressing and twisting a portion of the stone near to the door. The dragon had these built by a charmed duergar artisan who was then promptly eaten as a reward.
The dragon cannot fit into the passageway in dragon form. However, he may traverse it in giant snake form or in humanoid form.
11. Hidden Cave
This small cave is only accessible via the lake. Other than small cracks that allow air to filter in, there is no normal means of egress other than the lake. The cavern is clear of obstruction and is only 20' high. This place is used as a treasure cache by the deep dragon for some of its more valuable items.
The dragon has placed a guardian here, a kalin. This guardian is not a willing servant, and is under no charms or enchantment, but is trapped here by the lake, for it cannot swim and would perish in the cold water. The dragon brought the creature here after knocking it unconscious (i.e. to -2 hp) and it has been trapped here since.
The dragon feeds the kalin just enough to have it survive but still be very very hungry. The kalin hates its captivity and the dragon, but after a first few times sparring with the deep dragon it has learned to stay well away from it, and unlike most insects, it has enough intelligence to know it will never defeat the dragon.
Kalin (AC 5, MV 18 cl9, HD 7, hp 37, THAC0 13, #ATT 3, D 1-10/1-10/2-12, SA surprise (-2 to opponent surprise rolls by dropping from the ceiling on a webline and a hit from surprise causes double damage), grapple (if a bite hits the victim is grappled and automatically hit by all 3 attacks every round, victim may break free by making an open doors roll [or save vs breath if no STR rating]), AL LN, XP 650, Source: Monstrous Compendium 2)
Within the cave is the cache of the deep dragon. This includes:
Dicerion [candlestick] of Light and Darkness (refer to Encyclopedia Magica V1 pg 406) which bears a special candle in each holder and has 3 other such candles nearby.
Phandoorl's Bracers (refer to Encyclopedia Magica V1 pg 222) made of electrum and adamantium and engraved with images of snakes and spiders.
A Book of Infinite Spells set open faced upon a stone pedestal and with a lead weight holding down the pages. The book has 27 pages, of which 6 have already been turned. The current page and the remaining pages are as follows:
· Current - Sleep (1st
level wizard spell)
· Blank Page
· Eyebite (6th level wizard spell)
· Blank Page
· Arrow of Bone (6th level wizard spell)
· Blank Page
· Glyph of Warding (3rd level priest spell)
· Blank Page
· Wind Servant (3rd level priest spell)
· Mordenkainen's Faithful Hound (5th level wizard spell)
· Blank Page
· Blank Page
· Project Image (6th level wizard spell)
· Improved Invisibility (4th level wizard spell)
· Teleport (5th level wizard spell)
· Summon Lycanthrope (4th level wizard spell)
· Produce Ice (5th level priest spell)
· Blessed Warmth (4th level priest spell)
· Fire Charm (3rd level wizard spell)
· Speak with Plants (4th level priest spell)
· Fire Seeds (6th level priest spell)
2 pots of Prismal's Weaponblack (enough to coat 12 size M weapons) (refer to Encyclopedia Magica V3 pg 915)
Shade of the Shadow, in the form of a 3' tall grey cylinder of strange fabric bound by a velvet cloth and sealed with a wax stamp with a spider on its face (per Encyclopedia Magica V3 pg 1091)
Dragonshield (refer to Encyclopedia Magica V3 pg 1095) in the form of a metallic target shield with a boss showing a fog with 2 grey-white pupil-less eyes staring from it. The shield bears derro runes of protection against deep dragons.
Talking Skull (made from ivory and shaped like a drow skull) (refer to Encyclopedia Magica V3 pg 1118).
Also here is a large chest which is unlocked and holds 6000pp of mixed minting (duergar, drow, dwarven, and even orcish).
DRAGON BEETLES:
This is not an extensive area, but it is important because a large coven of dragon beetles dwells here, and these beetles can be of great use to a party that wishes to defeat or threaten the deep dragon. The beetles so threaten the dragon not only because of the damage their sting causes, but also because the sting leaves a permanent burning red scar on the dragon, and this mars its draconic beauty and perfection and lowers its draconic charisma.
The dragon beetle nest consists of a type C passageway which, approximately 5 miles from the beetle lair, begins to exhibit signs of ancient workmanship, specifically cut stones on the floor and occasional carved pillars along the walls.
At the end of the passageway is a square archway whose lintel is bedecked with ancient dwarven runes. It is not determinable if this place was once a dwarven temple, or perhaps merely a barracks of some sort, but it is clear there was once a grand structure here that has long since been buried.
Within the archway is a general collapse, and within the collapse dwells the dragon beetles. The main area beyond the archway is a space spared the collapse that is approximately 10' high and approximately 50' in diameter, though of more of a rough ovoid shape. There are plenty of small cracks and such in the collapse that allow the beetles to scurry away, though their nature suggests they will likely try to defend their territory.
On the floor of the main area is a corpse. The corpse is of a human ranger who bears a signet ring of the army of Bleton. He was part of a team of spies trying to infiltrate the drow lands from the same tunnel entrance through which the party entered into the Underdark. This was before the orcs moved into their current lair. Disoriented and unfamiliar with the Underdark, the team took casualties even before finally making it to the drow area. There they attempted to infiltrate the drow. Some were killed, others taken captive, but this ranger escaped. Unable to find his way back (he was not carrying the party map when he escaped the drow) he wandered lost and alone for quite some time. Finally, after somehow making his way back into the area near the Entrance, he ran into the trolls of the deepspawn and was wounded grievously. Now tired, broken, and hopeless, he lay down here in the main area to rest. The beetles emerged from their hidey-holes and attacked him in his sleep, killing him.
The body now bears some 20 dragon beetles eggs, which will hatch in a few days.
The ranger wears a torn and beetle eaten cloak, forester garb painted grey for underground camouflage, and a leather backpack resides nearby. At his side is a scabbard holding a bastard sword. A dagger rests in his belt and boots are on his feet. A longbow and quiver rest near his body. None of these items are magical. The leather backpack holds some edible fungus and a crude map the ranger had made of his journey through the drow lands and the entrance area after he had split from his party. This is on vellum and drawn with a charcoal stick, both of which can be found in the backpack.
The DM should give the party a copy of the Charcoal Map should they examine the vellum.

Dragon Beetles (16) (AC 7, MV 15, HD 1, hp 6 ea, THAC0 20, #ATT 1, D 1-4, SA poison sting (affects dragon and dragon-kin only for 2-20 [save for half damage]), AL N, XP 65 ea, Source: Monstrous Compendium 2)
Nest Leader (AC 5, MV 15, HD 3, hp 24, THAC0 17, #ATT 1, D 1-6, SA poison sting (affects dragon and dragon-kin only for 2-24 [save for half damage]), AL N, XP 120, Source: Monstrous Compendium 2)
Each beetle can produce 1-4 doses of dragon-affecting venom if milked or extracted.
JERMLAINE WARRENS:
This area is the haunt of a large clan of jermlaines. These gremlins have been successful here because, it being the outlands of several powerful Underdark civilization, there are many opportunities for mischief with less risk than were they to dwell in, say, the drow heartland.
The jermlaines technically consider all of the passageways south of the river as their territory, though one of the passages veers off to the west and into other areas of the Underdark, so only the portion shown on the map is generally watched by the little folk.
Note: It is highly unlikely to get the usual assortment of wandering encounters in the JERMLAINE WARRENS. The DM should either roll wandering encounters and ignore inappropriate ones or simply rule that no wandering encounters occur in the JERMLAINE WARRENS.
Reaction to the Party:
The jermlaine are unlikely to do more than spy on the party should they be formidable seeming until they get too close to their lair proper. Jermlaine are always watching the river crossing, and these will send messengers fleeing back should the party cross the river and begin to head south. The messengers will contact other watching groups that lair along the passageway who will send further messengers and so forth, so that the entire clan will be ready and prepared for the party.
Unless only a single or couple party members are traversing the halls, the jermlaines will not make their presence known, hoping that the party eventually tires of the halls and turns back. However, once the party crosses the third fork in the way and is still heading south towards the warrens, the jermlaine will then begin to strike. This will at first involve cutting straps on party equipment and then pilfering items. Should that not work, the jermlaine will begin to activate their traps.
Should the party reach the final fork and pass it, the jermlaine will then set up an ambush. Once this ambush fails, the gremlins will then retreat to their warrens proper and await the party's coming.
There is really no bargaining with the jermlaine until after the ambush. Should the party defeat them and then attempt to parley, the jermlaine will come forth. They have representatives who speak Dwarvish, Gnomic, and Orcish (though only 1 in 10 speak any language but their own). If offered treasure and threatened with dire punishment in equal and satisfactory doses, the jermlaine may agree to aid the party.
Jermlaine aid will include an offer to guide the party to the DROW OUTPOST or the DUERGAR OUTPOST, and the little ones know of most of the other inhabitants of the Entrance area and can guide the party to those areas as well. They also know that the deep dragon fears the dragon beetles and can lead the party to those insects also.
However, keep in mind that jermlaine are liars and tend to turn on their allies. The jermlaine will certainly consider leading the party into a bad situation and then fleeing into cracks and crevices to make their getaway, trusting in their size and speed to flee their vengeful pursuers.
Should the jermlaine capture party members, they will be bound and gagged (the jermlaine have learned about spells from dealing with the drow) and blindfolded and taken to their warren. There they will be stripped of all possessions and kept for a while to use as a bargaining chip should any of the victim's companions try to seek revenge. Should this not happen, the victims will likely be left shaved and naked in some remote and dangerous area of the Entrance to the Underdark area while the jermlaine watch with amusement as the victims struggle without light or equipment.
At all times the DM should remember that these weak creatures have managed to survive in the dangerous Underdark, and this belies their intelligence, which, according to the Monstrous Manual, includes genius-level cunning.
Jermlaine (AC 7, MV 15, HD 1/2, hp 3 ea, THAC0 20, #ATT 1, D 1-2 or 1-4, Weapons darts (120 yard range or 24/48/72), small pikes (1.5 feet long), blackjacks (ineffective against splint, banded, or platemail, causes 2% cumulative chance of unconsciousness), SA smell and hear invisible creatures 50%, stealth (-5 to opponent surprise rolls), cut straps which break D12 turns later, SD 75% undetectable if hiding, treated as 4HD monsters for saves, escape all damage from attacks that normally do half damage if save is successful, AL NE(L), XP 15 ea, Source: Monstrous Manual)
Osquip (AC 7, MV 12 br1/2, HD 3+1, hp 18 ea, THAC0 16, #ATT 1, D 2-12, SA surprise (-5 to opponent surprise rolls if able to attack from a tunnel), SD no fear of fire, poor swimmers (50% drown, 50% paddle at a rate of 1), AL N, XP 120 ea, Source: Monstrous Manual)
The Approach:
The approach to the lair is divided into several parts:
The River Crossing - Deals with the two passages that cross the underground river
The Early Tunnels - Deals with the tunnels south of the river but north of the third fork
The Middle Tunnels - Deals with the tunnels south of the third fork but before the final fork
The Final Tunnels - Deals with the last bit of tunnel before the warrens proper and the ambush
DMs should keep in mind that in all of the jermlaine tunnels, small cracks and jermlaine sized tunnels give unprecedented mobility and escape potential to the jermlaine. The party should not assume that the tunnels marked on the Entrance map include any of the tiny jermlaine tunnels that parallel the type D tunnels on the map.
The River Crossing:
Two type D passages cross the underground river south of the FOMORIAN GIANTS and lead into jermlaine territory. The river is swift here and cold and flows to the north, fed from the great underground lake near the KUO-TOA OUTPOST. Characters that fall into the river can be presumed drowned as the river submerges for a great length of time after a precipitous 150' fall some 1 mile northwest of where it leaves the map. Those characters that can breathe underwater and survive the buffeting will find themselves deeper in the Underdark and the DM is encouraged to refer to the large-scale Underdark map presented with this scenario to determine a likely place for the victim to emerge.
Each river passage is 50' wide. The mouths of the passageway are 30' above the river and 30' below the stalactite-laden ceiling.
A close examination reveals that several of the stalactites in the centre of the river passage have thick rothe furs tied around them, secured with tight cords of fungus rope. Several small darts stick out of the fur, some with bits of cord hanging from them. There are 4 such furred stalactites per crossing. When the jermlaine wish to cross the river, in either direction, they simply hurl their darts at the fur. The darts have a cord attached to them. When the darts make a good hit in the fur, the jermlaine twist the dart in such a way that the barbs, which are specially curved for use as crossing darts, hook into the fur. The jermlaine then swing across and twist the dart the other way, usually dislodging the dart from the fur for recovery.
The jermlaine are able to use such a method due to their almost supernatural ability to hurl the darts so forcefully and so far (almost 120 yards or the equivalent of over a third of a mile in comparative size!). When they need to take their rats or osquips with them, the jermlaine tie them to a cord and groups of them swing them across. This takes some time and leaves the jermlaine vulnerable, so they only attempt such a maneuver when they feel safe.
At any given time, some 8 jermlaine watch each river crossing. They watch from the south side of the crossing and are usually hidden in tiny little cracks high up on the wall. These cracks run down to tunnel level about 250 yards down the twisting tunnel and so the jermlaine, on sighting crossers of the river, can immediately dart down the crack and out into the tunnel and south to warn their kin.
The remaining jermlaine will amuse themselves watching the party attempt to cross the river. These jermlaine will only go into action should the party leave a lone sentry or two nearby or perhaps on the other side of the river. Then the jermlaine might attempt to pull something.
The Early Tunnels:
Along these tunnels the jermlaine will simply observe the party and relay messengers back to the warrens to keep them updated on the party's advance and any insight into their capabilities. Once again, unless the party has a straggler or two who look to be easy pickings, the jermlaine will take no action. The jermlaine will try to take out any lone scouts who travel ahead. They will also possibly make some initial very furtive forays into the party's camp should they bed down for the night. This will involve sneaking in and stealing easily transportable items from sleeping characters.
It is also likely that should the party bed down, the jermlaine will send in a few osquip to test the party's camp for magical wards and to see how lightly they sleep and to observe any magic the party may use. There should be no evidence from the osquip attack to suggest the jermlaines' involvement.
Some 60 jermlaine dwell at various points in the early tunnels. These are in a dozen living groups of 5 adults and they dwell in small caches high up in the passageway accessible via small natural looking cracks in the walls.
At the edge of the cache is a bundled fungus cord rope or ladder that can be lowered to allow the jermlaine to descend to the passage floor.
Such cracks lead usually about 15' (in a 1' wide by 1' tall passage) to what appears to be a dead-end but is actually a concealed door made of stones glued to a fungus mesh frame. Within is a den usually about 3' tall and 10' in diameter which is the jermlaine nest.
The nest includes bits of stone carved into crude little furniture (i.e. table, stools, cups, platforms for fur beds, etc.). Small lizards seem to be the staple of their diet, and lizard skins usually adorn the nests. The nests are also full of junk…scraps of drow mail, bits of blades and leather, teeth from small creatures, mushroom bits, etc. The jermlaine operate as packrats. Allow each nest to have D6sp and D8gp plus a 50% chance of D6 gems worth 1-100gp.
Each nest will also have 12 jermlaine pikes and at least 24 jermlaine darts.
There will be D4-1 juveniles in each nest, and these do not fight.
Every single nest has at least 2 escape routes that are concealed to look like a part of the nest wall but are similar to the concealment of the initial entryway into the nest. These escape ways are also 1' diameter and twist and wind for as long as a half mile before emerging into the main passageways.
Another concealed opening in the nest will usually lead down a 1' diameter passageway to a chamber near the floor of the main passageway. This is the den of the family osquips. Each family has D3 osquips, which serve the jermlaine as sort of family pets. The osquips are very loyal and will defend their masters to the death. The jermlaine feed the osquip well and often ride them into combat when making war on other small subterranean creatures.
Each of these nests owes allegiance to the jermlaine elder in the warrens proper. They dwell here as hall guards. Each osquip nest has a 2' diameter short passageway that leads to the main passageway. This entry into the main passageway is concealed by the jermlaine in the same way the entrance to their nest is.
The Middle Tunnels:
Some 120 jermlaine live in the middle tunnels area. Of these, 90 of them dwell on the long outward loop while the remainder dwell on the short direct tunnel.
These jermlaine dwell in caches and nests similar to those described for the early tunnels and the DM may use that description to represent these jermlaine.
By the time the party reaches these passageways, the jermlaine become concerned that the party knows of the warrens and is heading towards them. As such, the jermlaine begin to take direct action even against a powerful party. However, this action is designed to be annoying enough to perhaps cause the party to give up their progress but not enough to anger them so that they come seeking revenge. As such, the jermlaine will first take to cutting straps on backpacks and pouches and the like.
Should that not work, they will attempt to pilfer items, especially valuable seeming magic items, which they will seek to take back to their warrens. There they hope to ransom such items back to the party if need be to induce them to leave the warrens in peace. Remember that the jermlaine elder can destroy the magic in any magic item she handles for a short time, so the jermlaine can use this to threaten the party's magic items (i.e. if they attack the jermlaine, they will never recover their magic item(s) because it will be drained).
These jermlaine will not attack the party directly unless they see a chance at an easy capture (i.e. a lone party member separated by a good distance from the rest of the party).
The Final Tunnels:
Some 20 jermlaine dwell in each loop of the final tunnel in caches similar to those found in the early and middle tunnels. By the time a party has reached here, unless they have managed to do so undetected, the adult jermlaines from this area, along with some from the warrens proper, and many who will have made their way down from the early and middle tunnels, will set up an ambush.
The ambush will involve an area the jermlaine have selected specifically as an ideal ambush site. There are at least 3 of these in each branch of the final tunnels, though the jermlaine will only pull one such ambush versus the party.
The ambushes start and are centred around a pit trap. The pit spans the entire hallway and is covered by a very cunningly concealed net mesh that is stretched very tight across the top of the pit and then under the floor in tunnels to crude pulleys and levers in small chambers beneath the floor of the passageway. Atop this mesh flat slabs of slate have been laid loosely, but in such a way that they do not break or fall even under the weight of an armoured human as long as the mesh is in place. A being the size of a warhorse or larger will collapse the mesh immediately.
The jermlaine have 12 adults stationed at each of the twelve anchor points of the mesh, each with a hand on the levers that hold the mesh taught. At the ambush signal, these jermlaine release the pulleys and levers, dropping the mesh and all atop it into the pit.
The pit is 12' wide and 12' deep and the jermlaine will obviously seek to cause as many party members to fall into the pit as possible. Even more importantly, they will try to drop the pit halfway into the party marching order, both to get mages and important persons marching in the centre of the group and to split the party into two groups. The pit spans the entire passageway.
The pit is 60' deep and at the bottom resides 3 gray oozes. The oozes cannot climb the walls of the pit, and so they are essentially trapped here. The jermlaine feed the oozes, and occasionally capture one when it buds off to either set free near the lair of an enemy or to restock their other ambush pits.
Gray Ooze (3) (AC 8, MV 1, HD 3+3, hp 19 ea, THAC0 17, #ATT 1, D 2-16, SA corrode metal (chain in 1 round, platemail in 2 round, magical armour with an additional 1 round per plus or ability), SD corrode weapons (metal weapons have a % chance of corroding equal to the base weapon damage done minus the magical plus of the weapon), immune to spells, fire, and cold, full damage from lightning and electricity and weapons, AL N, XP 270 ea, Source: Monstrous Manual)
Damage from the fall is either 6D6 if the floor is hit, or 4D6 plus gray ooze damage if an ooze is landed on (50% chance of either). The oozes, being confined, are smallish, being 4' in diameter.
While the party deals with the pit, other things will happen as well.
First, the jermlaine will release oil held in bladders atop camouflaged meshes attached to the ceiling. The mesh extends 30' before and after the pit as well as over the pit itself (as the gray oozes are not trouble by the fire). When the mesh is released, the bladders will fall and burst. There are literally hundreds of these osquip bladders full of flaming oil (which the jermlaine harvest from the ground and brew from renderings from osquips). Also held in the mesh are small stone pots holding glowing coals. These coals hold their embers for some time (at least an hour) and the jermlaine will place them into the mesh about a half hour before the party arrives. The dropping mesh will release the stone pots, which will crash to the ground, releasing their coals and igniting the conflagration.
Several jermlaine will also stand by with darts soaked in oil-steeped osquip skin and jermlaine hair. Should the party delay such that the coals go out, they will ignite the oil with fired darts. The jermlaine prefer to use the coals, however, as the darts give away their location.
Anyone caught in the conflagration takes oil damage as standard flaming oil. Furthermore, the entire passageway will come alight during the duration of the burning oil, and the smoke caused thereby will foil infravision and blind the victims, making spellcasting at range impossible. The cloud will also cause smoking akin to a Stinking Cloud spell in the area for D4+1 rounds after the oil burns out.
If any of the party is standing outside the pit after this time (i.e. after the smoke has cleared), the jermlaine will begin to shoot acid at the party. These are milked from various sources, such as fungi, oozes, puddings, and slimes and held in stone containers. The jermlaine shoot these with slingshots they have set up at the mouth of special caches set up near the ambush sites. These caches are exactly like the nests previously described, except that they have no nest, the nest chamber is empty. The jermlaines only use these particular caches for their ambushes. The caches normally hold supplies for the ambush (oil bladders, much spare cord and ropes, spare pulleys and levers, stone pots, coals, fire making equipment, many darts and many pikes and blackjacks). They also hold the slingshots and acid missiles.
Each slingshot is made of a wishbone-shaped bone from a medium-sized beast…usually rothe. Sinew and flexible fungus cord are strung between the horns of the wishbone. The stem is stuck into a hole bored into the stone near the opening of the cache. This allows the slingshot to be swiveled to allow an aimed shot. The jermlaine load a pot of acid into the slingshot and fire. Each pot is 3" in diameter and covered with a wax seal to prevent evaporation or accidental splashing when handling the pot. The missile can be fired from 5' horizontally to 100' horizontally from the slingshot. Treat range categories as follows: 6/13/20.
The missile bursts upon contact with stone, causing a splash in a 2' radius. It will also break on contact with certain metal armours (see below). In addition, the wax portion is brittle and breaks easily on contact even with flesh. The missiles operate as follows:
· The missile always bursts
on contact with stone and splashes as mentioned above.
· The missile needs to hit AC 10 to strike a being, less
dexterity, speed, size, or magical protection.
· Should the missile strike a victim, there is a chance
it will hit the victim's armour or shield. If the missile hits
the victim but would have missed had the shield been counted,
then the missile hits the shield. If the missile hits the victim
even counting his shield but would have missed had the armour
been counted, then the missile hits the armour.
· Magic plusses for armour and shield are not counted for
the above purposes…assume they are non-magical for determining
whether the missile hit shield or armour. Do count bonuses for
shield proficiency however.
· Any missile hitting a shield bursts. The shield must
save vs acid or be destroyed in 2D10 rounds.
· Any missile hitting plate armor, banded armour, or splint
armour bursts, and the armour must save vs. acid or be destroyed
in 2D10 rounds, losing 1 AC value per round in any event.
· Any missile hitting any other armour has only a 50% chance
of bursting, forcing a save vs acid as described above. Otherwise,
the pot bounces off, not breaking the wax seal, and smashes on
the ground. The smashing on the ground will leave a puddle of
acid but will not splash enough to cause any damage.
· Anyone hit directly by the pot has a 50% chance of having
the missile break on them, doing full acid damage. If the missile
does not break, it bounces off of the victim and breaks on the
ground forming a puddle of acid but having no further effect.
· A puddle of acid is 5' diameter and does splash damage
to anyone running quickly through it barefoot (it is also slippery,
and anyone doing so must roll under DEX or fall into the acid
puddle, taking full damage). Boots must save at +2 or be destroyed.
Anyone standing barefoot in the puddle takes full damage. Boots
save at no plus if standing stationary in the puddle.
· A splash does 1-3 damage for the splash round only. No
item save is necessary.
· A direct acid hit does 2-8 damage the first round and
1-3 damage the second round. No item save is usually necessary.
· In any case, the missile itself does 1-2 damage whether
it breaks or not if it hits the victim directly.
The jermlaine will aim their acid missiles at heavily armoured opponents, in an effort to destroy their armour (so that they can eventually be blackjacked into submission). There will be some dozen slingshots sprinkled around the ambush site. Each slingshot is manned by 5 jermlaine, one to aim and swivel, 3 to pull the shot back with levers and hooks, and another to load the missiles. Each slingshot has a stash of 20 such missiles. It takes the jermlaine time to load the slingshot, such that each can only fire every other round. The slingshots fire in Fast.
While the slingshots fling their acid, the remaining jermlaine will throw darts at the party, usually from high up in their caches. These darts will generally be aimed at spellcasters. Assume the jermlaine have effectively an unlimited amount of darts here.
Finally, the osquip will be released once the burning oil stops flaming. Osquip are unafraid of fire, and the smoke will not affect them as they are so low to the ground. In fact, the smoke from the oil is blinding enough that the party may not see the osquip coming until they start getting bit on the legs and groin. The osquip will fight amidst the hail of darts and acid missiles.
The jermlaine are acquainted enough with drow spells to know not to release the osquip in a single massed group. The osquip will be released 6 per round, each coming from different dispersed burrows.
None of the jermlaine will engage the party in hand-to-hand combat in the hallway. They are quite willing to let their missile weapons and traps and osquip do their dirty work for them.
The slingshots will be aimed by a spotter who has 75% cover and the slingshot crews and the slingshots themselves are not even visible from ground level in the main passageway. The dart throwers also have cover, though theirs is only 25% and this only applies to opponents at ground level who are under 10' in height.
Should the party begin to attack the jermlaine at close quarters, they will flee into their escape routes and head back towards the warrens.
Essentially, there are unlimited numbers of jermlaine here. Certainly not enough for the party to catch them all. If exact numbers are needed, use the roster below:
45 jermlaine from the early tunnels
75 jermlaine from the middle tunnels
20 jermlaine from the final tunnels
12 jermlaine from the warrens
48 osquip
DMs should note that although the jermlaine will only conduct a single ambush, they will at the very least man the other 5 pits in the area and try to somehow catch the party in another pit.
Should the party split into two groups, one going down each of the final tunnels, then the jermlaine will conduct two ambushes. The number of slingshots will remain the same, but the rest of the roster will be split between the two sites.
The Warrens:
Refer to the map of the Jermlaine Warrens. Keep in mind that each square on the Warrens map is only a single square foot! Also, DMs should note that the map contains at many points a pair of dashed lines with a length designation between them. Because it is very likely that the party will shrink itself and enter the tunnels to hunt down the jermlaine (especially if the gremlins have made off with a valuable magic item), the map is presented with the rooms to exact scale. However, there was no practical way to keep the rooms at 1' per square and also include the entire length and breadth of the warrens. So, for expediency, the dashed lines and the length designation represent the distance the hallway traverses between those two lines. This distance is especially important when judging the effect of area of effect spells.
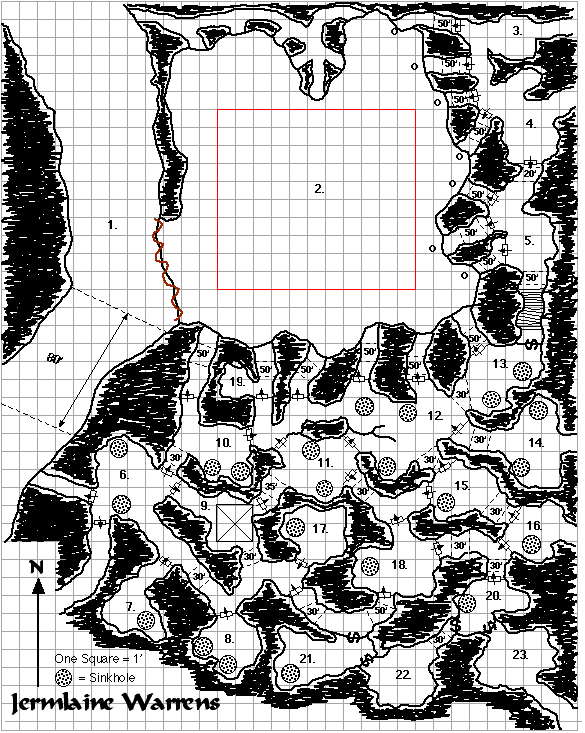
Unless otherwise indicated, all tunnels and rooms are as high as they are wide.
The jermlaine are cunning creatures who live in an environment very hostile to them. Their proximity to the drow have made them very experienced in ways to deal with hostile magic, especially such mass killing spells like Cloudkill and Fireball. As such, the jermlaine have learned (sometimes after hundreds of their kin have perished) to take defenses against extermination attempts.
The first defense is the inclusion of doors. For the jermlaine, these function much as watertight doors do in naval vessels. The jermlaine learned through experience that a single fireball could wipe out an entire warren. They also learned, however, that fireballs exert almost no pressure, and thus the flames from a Fireball spell could be stopped from running through the entire complex by building doors to stop them. These doors consist of a stone lintel over which hangs a tough piece of leather weighted down at the bottom by bones and rocks sewn into it. The leather is stiffened with various treatments so that it is somewhat like cuirbolli or leather armour. There is no latch to these doors, and the leather flap is larger than the opening, meaning that wind or pressure from the side that the leather hangs on will simply cause the flap to hit the lintel. The arrow designation shows which way the flap opens. A breeze or pressure flowing with the arrow will cause the flap to open. Thus, a fireball could pass through such an opening following the arrow, but a fireball could not pass through against the arrow.
The same holds true for beings running through these doors. If running with the arrow the door presents no impediment to movement, as one can simply ram right through the flap. Going against the arrow requires one to stop, lift up or pull aside the flap, and then continue. This is a half move action.
In addition, the jermlaine also have experience with Cloudkill, and they really dislike that spell. They have learned that the vapours caused by the spell sink when confronted with a sinkhole, and so the crafty jermlaine have set sinkholes throughout their complex in order to divert Cloudkill vapours. These sinkholes are 1' wide and 40' deep and end in a large single cavern that resides beneath the warrens. This cavern also serves as a dung heap, for the jermlaine use the sinkholes as toilets in addition to their defense capacity.
1. Main Passageway
This is the main passageway outside the jermlaine warrens. It is a type D passageway, meaning it is rather narrow (5'-7' wide here) and often choked with debris and slopes and stalactites and stalagmites. Some fifth of a mile north of the Warrens map, the two branches of the final tunnels (refer to the Entrance to the Underdark map) join and form this passageway. The passageway continues past the warren entrance for another quarter of a mile before ending in a large pool of water, perhaps 60' in diameter and a full 100' deep. Long stalactites hang from the ceiling over 70' above and drip water slowly into the pool. The jermlaine use this pool for their water supply.
The entrance to the warrens is 6' wide and 3' tall and is covered by a fungal frame mesh that has rocks and slates glued to it. Such rocks and slates have also been glued by the crafty jermlaine onto the walls near the opening and for a good fifth of a mile down each end of the tunnel. This helps ensure that the slates and rocks on the mesh are not conspicuous as compared to the rest of the passageway. So well has this been done that it can be treated as a secret door rather than a concealed door, though dwarves also treat it as movable stonework and elves can spot it on a 1 in 6 by merely passing within 10' of it (since it still generates tell-tale air currents and the like).
The door is opened by pulling on cords made of rothe sinew and osquip sinew. These cords follow the ceiling and are manipulable from the westernmost cache holes. The door is hinged to the top of the opening and the bottom flips up to the ceiling when it opens. Although it takes at least 3 jermlaine to open the door (from either side) a single human can do so.
There are several tunnels indicated on the map that open onto this passageway. These are high up the wall of the passageway (8'-10' high) and look like simple cracks or folds in the wall. The jermlaine keep ladders and ropes coiled at the top of these locations by which they can descend into the passageway below. They will also use these to spy on intruders.
The jermlaine are very careful to leave no sign of their traffic into and out of this area. They are, of necessity, experts at sweeping their tracks clean and are careful to leave no scraps of cloth behind. Nevertheless, an expert tracker familiar with the Underdark might be able to find the minutest of telltale signs of their passage here on a very good tracking roll. This is left to the DM's discretion.
2. Grand Cavern (Well…for the Jermlaine it is!)
This is the main cavern for the gremlins. It is 3' tall at the entrance from Room 1 and reaches a height of 5' at its apex. It sinks to about 4' high at the other edges. This cavern is clean of stalactites and stalagmites. The jermlaine use this chamber as a gathering place and as a place to drag and hide captives too large to fit in their tunnels. Any player characters captured will be here, bound hands and feet behind their backs by multiple sinew and fungal cords, gagged and blindfolded as well.
There will be at least 3 partially butchered rothe carcasses here as well. The jermlaine use them to make clothing, tools, meat, paint and dye, leather, and ropes. They also feed their pet osquips with the leftovers.
The passages shown on the map as intersecting with this room are caches. They are 1' diameter tunnels that the jermlaine use. The ones to the north are basically guard quarters, and the jermlaine will use these to spy on Room 1. The ones to the south allow egress to the living quarters of the little folks.
These cache holes are generally 3'-4' off of the ground and accessed by tiny little steps carved into the stone.
The passages to the north and east marked with an 'o' are osquip tunnels. These are slightly larger than the cache tunnels (being 1.5' wide and 2.5' tall) and are at ground level to Room 2. The osquips live in these tunnels.
The jermlaine have a nasty surprise for intruders who invade their domain. They have carved a trap door into the ceiling, some 10' square, and within is a stone cave about 6' high and matching the width of the trapdoor. The trapdoor's outlines are marked on the map in red.
Within they have placed a deadly black pudding. The jermlaine captured the creature when it was smaller (4' in diameter) by tricking it into a stone box. They then hauled the box home and set the creature free in the cave above the trapdoor. The jermlaine have kept the creature alive by feeding baby osquip to it as well as lizards and even the occasional baby rothe. Feeding the pudding is not an easy task, as it can seep through cracks even an inch in diameter.
The jermlaine manage this by using a set of two smallish doors set into the main trap door. By using cords and prods they can open the outer door, place the food into the trap door, close it, and then open the inner door, push the food into the cave above the trap door, and then close the inner door. Nevertheless, the jermlaine tend to feed the thing very very warily!
Should the party enter Room 2, the jermlaine may open the trap door. This can be done by way of cords leading into Room 12 which travel through holes in the rock from the trap door to the ceiling of Room 12. A single jermlaine pulling a cord in Room 12 can open the trap door. This has a 75% chance of dislodging the pudding immediately onto the floor. Otherwise, on a 76-00, the pudding is on the ceiling of its cave and will drop down the next round.
It is true that the pudding, once it has finished with those in Room 2, will be able to enter the jermlaine tunnels. For this reason the jermlaine will only drop the pudding if they consider themselves in real danger. Of course, anyone who has managed to penetrate their tunnels into Room 2 is almost certainly by definition a "real danger". The jermlaine would have to trust to their faster speed to escape the pudding after it finished with the party and devise a way to re-trap or drive off the menace. They do have enough flaming oil to eventually kill the thing.
Black Pudding (AC 6, MV 6, HD 10, hp 65, THAC0 11, #ATT 1, D 3-24, SA ooze through cracks 1" wide, travel on walls and ceilings, dissolve 2" thick wood in 8' diameter in 1 round, dissolve metal (chain in 1 round, plate in 2 rounds, each plus for magical adds 1 round), SD immune to acid, cold and poison, lightning and weapons divide them into smaller puddings, vulnerable to fire and magic missiles, AL N, XP 2000, Source: Monstrous Manual)
The osquips in Rooms 3-5 will not attack as long as the pudding is about. They instinctively know to avoid such a beast. They will emerge after the pudding is destroyed or if the jermlaine whistle them out.
3. Osquip Lair
This place holds 8 osquip. The lair has gnawed upon bones and osquip droppings as well as a trough of fresh water provided by the jermlaine. A passageway to the east leads to a winding tunnel that eventually emerges some third of a mile back up the type D passageway that leads to the warrens (it also connects with the passageway from Room 4, 14, 16, and 23). The room's walls show signs of osquip digging and gnawing on the walls.
4. Osquip Lair
This place holds 8 osquips and is in all ways similar the Room 3. The passageway to the east joins up with the passageway from Room 3 about 300 yards down.
5. Osquip Lair
This place holds 6 osquips along with 4 baby osquips. It is similar to Room 3 except it has no eastern passageway. Instead, small steps lead up to a secret door (concealed by stones glued to a bone and fungus frame mesh).
6. Jermlaine Nest
Like most jermlaine nests, this has tiny crude furniture made of rothe fur, leather, and bones and mixed with crudely carved stone items. The nest is a heap of collected junk as well, including teeth, eyeballs, lizard skins, and even a few scales from the deep dragon.
A thorough search of the room can locate hidden caches of treasure totalling:
D6sp, D6gp, and a 25% chance of D4 gems worth 1-100gp each.
A passageway to the west out of this room forms a spyhole looking onto Room 1 (see Room 1 for details).
Another passageway to the southwest travels parallel to the main passageway for about 500 yards before allowing egress onto that passageway.
4 adult jermlaine dwell here, along with 2 young.
7. Jermlaine Nest
Like most jermlaine nests, this has tiny crude furniture made of rothe fur, leather, and bones and mixed with crudely carved stone items. The nest is a heap of collected junk as well, including teeth, eyeballs, lizard skins, and even a few scales from the deep dragon.
A thorough search of the room can locate hidden caches of treasure totalling:
D6sp, D6gp, and a 25% chance of D4 gems worth 1-100gp each.
3 adult jermlaine dwell here, along with 1 young.
8. Jermlaine Nest
Like most jermlaine nests, this has tiny crude furniture made of rothe fur, leather, and bones and mixed with crudely carved stone items. The nest is a heap of collected junk as well, including teeth, eyeballs, lizard skins, and even a few scales from the deep dragon.
A thorough search of the room can locate hidden caches of treasure totalling:
D6sp, D6gp, and a 25% chance of D4 gems worth 1-100gp each.
4 adult jermlaine dwell here.
9. Pit Trap
This pit is activated by a lever in the wall in Room 17. When deactivated, the floor of the pit will support the weight of up to 8 jermlaine without collapsing. With the lever pulled the bone rods supporting the platform concealing the pit are withdrawn and even a light weight will collapse the platform, tumbling the victims into the pit. The pit is 20' deep causing 2D6 damage, and the walls are greased with rothe fat.
Within is a large scorpion, which is very angry and very hungry. The fall will hit the scorpion, likely causing it D4 of damage but also allowing it a first strike on the prone victim unless the scorpion itself was surprised (normal chance of this happening).
Large Scorpion (AC 5, MV 9, HD 2+2, hp 18, THAC0 19, #ATT 3, D 1-4 / 1-4 / 1, SA poison sting (save at +2 or take 15 damage [5 per round for the next 3 rounds], save means no damage), AL N, XP 175, Source: Monstrous Manual)
10. Jermlaine Nest
Like most jermlaine nests, this has tiny crude furniture made of rothe fur, leather, and bones and mixed with crudely carved stone items. The nest is a heap of collected junk as well, including teeth, eyeballs, lizard skins, and even a few scales from the deep dragon.
A thorough search of the room can locate hidden caches of treasure totalling:
D6sp, D6gp, and a 25% chance of D4 gems worth 1-100gp each.
4 adult jermlaine dwell here, along with 3 young.
11. Jermlaine Nest
Like most jermlaine nests, this has tiny crude furniture made of rothe fur, leather, and bones and mixed with crudely carved stone items. The nest is a heap of collected junk as well, including teeth, eyeballs, lizard skins, and even a few scales from the deep dragon.
A thorough search of the room can locate hidden caches of treasure totalling:
D6sp, D6gp, and a 25% chance of D4 gems worth 1-100gp each.
6 adult jermlaine dwell here, along with 1 young.
12. Jermlaine Nest
Like most jermlaine nests, this has tiny crude furniture made of rothe fur, leather, and bones and mixed with crudely carved stone items. The nest is a heap of collected junk as well, including teeth, eyeballs, lizard skins, and even a few scales from the deep dragon.
A thorough search of the room can locate hidden caches of treasure totalling:
D6sp, D6gp, and a 25% chance of D4 gems worth 1-100gp each.
2 cords emerge from the ceiling here and hang near the centre of the room. Either of these cords releases the trapdoor in Room 2.
5 adult jermlaine dwell here, along with 2 young.
13. Jermlaine Nest
Like most jermlaine nests, this has tiny crude furniture made of rothe fur, leather, and bones and mixed with crudely carved stone items. The nest is a heap of collected junk as well, including teeth, eyeballs, lizard skins, and even a few scales from the deep dragon.
A thorough search of the room can locate hidden caches of treasure totalling:
D6sp, D6gp, and a 25% chance of D4 gems worth 1-100gp each.
A secret door leads to steps descending to the osquip lairs.
4 adult jermlaine dwell here, along with 3 young.
14. Jermlaine Nest
Like most jermlaine nests, this has tiny crude furniture made of rothe fur, leather, and bones and mixed with crudely carved stone items. The nest is a heap of collected junk as well, including teeth, eyeballs, lizard skins, and even a few scales from the deep dragon.
A thorough search of the room can locate hidden caches of treasure totalling:
D6sp, D6gp, and a 25% chance of D4 gems worth 1-100gp each.
A passageway to the east leads about 400 yards to the east before joining up with the passageway from Room 3.
8 adult jermlaine dwell here, along with 4 young.
15. Jermlaine Nest
Like most jermlaine nests, this has tiny crude furniture made of rothe fur, leather, and bones and mixed with crudely carved stone items. The nest is a heap of collected junk as well, including teeth, eyeballs, lizard skins, and even a few scales from the deep dragon.
A thorough search of the room can locate hidden caches of treasure totalling:
D6sp, D6gp, and a 25% chance of D4 gems worth 1-100gp each.
4 adult jermlaine dwell here.
16. Jermlaine Nest
Like most jermlaine nests, this has tiny crude furniture made of rothe fur, leather, and bones and mixed with crudely carved stone items. The nest is a heap of collected junk as well, including teeth, eyeballs, lizard skins, and even a few scales from the deep dragon.
A thorough search of the room can locate hidden caches of treasure totalling:
D6sp, D6gp, and a 25% chance of D4 gems worth 1-100gp each.
A passageway to the east leads about 450 yards to the east before joining up with the passageway from Room 3.
5 adult jermlaine dwell here, along with 1 young.
17. Storeroom
This small cave contains the stores of the clan. There is a lever on the west wall that operates the pit trap in Room 9.
The storeroom contains coils of cord and rope made of sinew and fungus strands, stacks of osquip and rothe bones, piles of osquip teeth, deflated osquip bladders, bone needles, stacks of darts and cords of jermlaine pikes, stone pots with wax seals, a stone barrel filled with acid and 2 more filled with flaming oil.
18. Jermlaine Nest
Like most jermlaine nests, this has tiny crude furniture made of rothe fur, leather, and bones and mixed with crudely carved stone items. The nest is a heap of collected junk as well, including teeth, eyeballs, lizard skins, and even a few scales from the deep dragon.
A thorough search of the room can locate hidden caches of treasure totalling:
D6sp, D6gp, and a 25% chance of D4 gems worth 1-100gp each.
6 adult jermlaine dwell here, along with 2 young.
19. Weapon Niche
This small area holds 24 darts (8 of which are prepared to accept fire), 12 pikes, spare slingshot sinews, 16 pots of acid, a set of tinder and flint, and 12 pots of flaming oil.
At the entrance to this cache overlooking Room 2 is a bone slingshot set into a hole in the ground. Refer to the Final Tunnels section for details on these slingshots.
20. Guards Nest
This room serves as the nest for the favoured of the jermlaine elder. The place looks just like all of the other nests, including the same treasure, but the 8 adult male jermlaine here have maximum hit points (4 each). These are the lovers of the elder jermlaine.
The secret doors here are concealed doors made of bone and fungal meshes with stones glued on them.
21. Treasure Trove
This room, accessed by concealed doors made of stones glued to bone/fungus meshes, holds the communal treasure of the jermlaine.
The door leading to the hallways between Rooms 17 and 18 has little metal bells tied to the inside, so that if opened the bells ring, alerting the elder and her guards that someone is trying to enter the treasury.
Within are the following:
4 stone pots with wax seals holding glue.
6 hexagons of giant termite wax
300sp, 145gp, and 17pp of drow, duergar, and orcish mint
A Wand of Metal and Mineral Detection (15 charges) whose command word is Khilzynsha ("rare beryl" in Drow Elvish)
A pouch of Dust of Dryness containing 8 pinches
A drow metal dagger +1
A crystal vial holding a Potion of Worm Calling (refer to Encyclopedia Magica V3 pg 897)
An iron flask holding a Potion of Useful Appendages (creates 4 tentacles) (refer to Encyclopedia Magica V3 pg 895)
22. Elder's Nest
This secret chamber is the nest of the elder jermlaine. This jermlaine has 5hp (due to a 15 CON) and is dressed in a ring that she wears as a circlet. This ring is gold with a ruby stone set into it and worth 1,500gp. It also has magical properties, for it is a Ring of Silence (refer to Encyclopedia Magica V3 pg 999). The elder is unaware of its properties.
This elder has the power to drain any magic from any item it holds for 1-4 rounds. This power must be concentrated on. In other words, she can wield a magic item without draining it if she desires. She is worth 65 experience points if defeated.
The chamber looks like any other jermlaine nest but includes a concealed door to the south that leads to Room 23. There will be twice the number of coins found here and there will always be gems here and in twice the number found in the other jermlaine nests.
23. Escape Route
This cave is the start of the elder's escape route. The cave holds her favoured osquips, these having been raised by her from pups and fiercely loyal to her and her alone. If an emergency arises, she will flee down the passageway south of this room while commanding her "pups" to stop pursuit. The osquips will fight to the death. She has 3 such pups, and they are of maximum hit points (25 hp each).
The passageway to the south is 2' high and allows the osquips to use it. It curves in a wide arc to meet up with the passageway from Room 3 about 500 yards from Room 3. Where this passageway meets the one from Room 3 there is a concealed door. Only the elder knows of this passageway.
FOMORIAN GIANTS:
This area is the lair of a family of fomorian giants. These hideous brutes of the underworld did not so much fashion this lair as they did simply kick out and devour the previous inhabitants.
The giants now roam the area, eating whatever they can find, capture, and torture. They are not particularly interested in treasure, and cannot really be bribed. They only respond to power. In fact, the fomorian outlook on life is that there are two kinds of beings, those weaker than they are considered playthings and eventual food, and those stronger than they, which are considered dangerous.
The drow and the duergar, in fact most of the inhabitants of this area of the Underdark are aware of the fomorians, but no one has yet been angered enough by them to force them to move on. The jermlaine particularly love to sneak in and torment the giants, for the latter have no sense of humour and this adds to the gremlins' pleasure.
Reaction to the Party:
As stated above, the fomorians are not really interested in treasure. They do not have any experience with humans, and will consider them to perhaps be large duergar or pale drow. The fomorians will certainly attack any intruders, until such time as the party proves by force of arms that they cannot be defeated. If this should happen the giants will try to bribe their way to safety with their meager treasure. Should that fail, they will offer to serve the party, such service being only until they can flee from their erstwhile masters.
Anyone captured by the fomorians will be tortured (like a sadistic boy pulling the wings off of butterflies) and then eaten after a day or two.
Refer to the Fomorian Giants map.
Allow a 75% chance that each fomorian is present in the lair at a given time. There will always be 2 present at all times to guard the lair and the young, and the matron from Room 4 will always be amongst the ones here. Allow a 5% chance per turn that any of the ones gone will return.
1. Passageway
This is a type C passageway as indicated on the Entrance to the Underdark Map. The passageway, for about a mile in each direction, shows smashed stone columns and stalactites and stalagmites where the giants have taken out their aggression on the stoneworks.
At Room 1 proper is a fork in the passageway, and it is likely that the party will not immediately know that the south fork leads into the giants' lair.
2. Entryway
This small entryway is blocked by a crudely built stone wall made of boulders piled atop each other. The passageway here is 35' high, and the wall is a full 10' high. The fomorians simply climb over this wall when they need to emerge. The wall serves to keep smaller creatures at bay (the wall can be climbed with a climb walls roll) and to keep the fomorian children inside.
A pack of mites has recently set up shop here, hoping to get the pickings of these giants and also counting on their nearby presence to deter predators. The mites live in amongst a series of tightly packed columns that are so densely clustered that a being larger than a halfling cannot enter. The mites will certainly be curious if they spot party members approaching the giants, and given the fact that they are profiting from their giantish neighbours (even though they know the giants would kill them if they caught them) they might even warn the giants if the party tries to sneak up on the fomorians. The mites will not engage the party in any way unless attacked.
Mites (12) (AC 8, MV 3, HD 1-1, hp 4 ea, THAC0 20, #ATT 1, D 1-3, SA club (pummel victim unconscious if in armour less than splintmail for 2% cumulative chance per blow), AL LE, XP 35 ea, Source: Monstrous Manual)
3. Main Cavern
This rather large vault is over 75' high at its apex, though the edges are closer to 35'. The ceiling is literally covered with stalactites, though the floor is relatively clear except where columns are shown on the map.
In the centre of the chamber is a pool of still water, and moisture continually drips from the stalactites overhanging the pool. The water is fresh though murky and is quite cold and forms a shaft with sheer sides some 35' deep.
The stone steps in this cavern are natural, formed by water, and each is about 3' high, just right for giant sized feet.
Litterings of the fomorian giants can be found here. This includes rothe bones, giant bat bones, pieces of shriekers, crushed orc armour and weaponry, mattings of bugbear fur, and even a jermlaine head tossed into a far corner.
There is a 35% chance for each giant present in these caves that it is in this room eating, lounging, or even torturing an orc. Otherwise, it is in its cave.
While the fomorians are not very subtle, they are of average intelligence and certainly know to try and toss a heavily armoured foe into the pool in the centre of the room. A giant can do this using the grapple and throw rules in Players Option: Combat and Tactics.
Anyone thrown into the pool must save under CON or go into immediate shock due to the coldness of the water. Those in shock can do nothing but sink. Those who are not in shock may attempt swim rolls or to take off their armour. Shock rolls must be made every round.
4. Nursery
This cavern is roughly divided into 2 parts. The stalactites here are small and sparsely set in the 15' ceiling. In the northern section is a fur pallet of rothe furs sewn together with sinew cording which serves as a bed. The bedding is vermin infested.
The cave to the south is similar to the northern portion and has 2 juvenile fomorian giants usually wrapped up in rothe fur pallets. There are also crude dolls made of cords and rags, these are dirty and have been gnawed upon and pulled apart. The juveniles are non-combatant babes, with the same hit points as an orc. They are 3' tall.
Dwelling here is the fomorian matron. She is very protective of the children and will fight at +1 to hit and damage if her children are threatened. The matron bears many bruises from vicious fights with the male fomorians who have, at one time or another, wanted to "play" with the young (i.e. torture and eat them).
Fomorian Giant Matron (AC 3, MV 9, HD 13+3, hp 72, THAC0 9, #ATT 1, D 2-8 (+8 for strength), SA surprise (opponents suffer a -2 to surprise rolls), SD surprised only on a 1 in 10, AL NE, XP 6000, Source: Monstrous Manual)
Treasure: The matron has a single cooper hoop in one of her malformed ears (worth 35gp).
5. Female Cave
This cave is some 20' high and possesses a few stalactites that are short and stumpy. Within is a pallet of sewn rothe furs and a flat boulder used as a table. Atop the table is a set of large bone needles and sinews for thread.
This is the dwelling cave of a youngish female fomorian. She is, like all fomorian females, not well treated by the males, who take their way with her physically and sexually. Nevertheless, she accepts this as her lot in life, and although she would dearly like to hurt the males very badly, she would never side against them with outsiders (unless charmed).
Fomorian Giant Female (AC 3, MV 9, HD 13+3, hp 72, THAC0 9, #ATT 1, D 2-8 (+8 for strength), SA surprise (opponents suffer a -2 to surprise rolls), SD surprised only on a 1 in 10, AL NE, XP 6000, Source: Monstrous Manual)
Treasure: The female has a brass armband being used as a ring worth 10gp. She also wears through her nose a gold hairpin with one end shaped like a star worth 175gp.
6. Male Cave
This cave is 25' high and is the lair of a young male fomorian giant. The place bears a large bed of sewn rothe furs set on a long flat stone slab. The head of a giant lizard hangs on a stone protrusion above the bed, and a huge great club stands against the wall nearby.
Fomorian Giant Male (AC 2, MV 9, HD 13+3, hp 83, THAC0 9, #ATT 1, D 4-16 (+8 for strength), Weapons great club (Sl 4D4/2D6+2 kd2D12), Armour bits of metal armour sewn into rothe hides, SA surprise (opponents suffer a -2 to surprise rolls), SD surprised only on a 1 in 10, AL NE, XP 6000, Source: Monstrous Manual)
Treasure: The male carries a crudely sewn rothe fur pouch that holds 160cp, 34sp, 24gp, and a small bejewelled hand axe worth 250gp which is a duergar token of office.
7. Leader's Cave
This largish cavern is 20' high and bears some short stalactites. It contains a giant lizard hide and rothe fur bed set on a stone shelf as a bed. Various nude corpses hang from the walls, mounted on stone protrusions, all hung from the feet and horribly mutilated. The corpses include several bugbears, orcs, a troglodyte, and a duergar.
Fomorian Giant Leader (AC 1, MV 9, HD 13+3, hp 97, THAC0 9, #ATT 1, D 4-16 (+8 strength), Weapons great club (Sl 4D4/2D6+2 kd2D12), Armour bits of metal armour sewn into rothe hides, SA surprise (opponents suffer a -2 to surprise rolls), SD surprised only on a 1 in 10, AL NE, XP 6000, Source: Monstrous Manual)
Treasure: The leader carries a rothe fur pouch that contains an iron key (he has no idea what it opens), a stone cave cricket (was turned to stone by a medusa long since slain), a drow metal dagger now non-magical, a star sapphire set into a silver hand worth 1,600gp, a jar of Keoghtom's Ointment in a drow metal jar, and 500cp, 130sp, 34gp, and 10pp.
8. Secondary Entrance
This way leads to a type D passageway.
There is a set of stones piled here exactly like that in Room
2.
Return to the Contents Page
Proceed
to the next page
Return to the previous page