Return to the Riverine DM Only Page
Introduction:
This document is intended for DMs only. It details the entirety of the Riverine Guildhouse in Dwillingir in the Far Coast. As such, there are secrets contained herein that relate specifically to the Riverine Campaign. The entire layout of the guildhouse is also given here. The DM should only reveal to players the portions of the house that they routinely enter.
The Guildhouse:
The Riverine Guildhouse in Dwillingir is one of the larger structures in the city outside of the temples, the coliseum and official buildings of government. It is a stone structure, crafted by dwarven masons brought in from Aynayjor. The house is of solid granite, with tight fitting stones sealed with only minimal amounts of mortar. Portions of the compound surrounding the house are ringed by a fence. This fence is made of wrought iron, some 10 ft tall with spear-like points at the top. The fence is bolstered by large crosspieces of wrought iron running the length of the fencing at a height of 1 ft and 9 ft. The vertical iron bars are a full 1" thick and there is no more than a 3" space between any bars.
The house itself is four stories tall, one of the taller structures in the town that is not actually a tower of some sort. The structure looks normal in most respects, though at a more thorough scrutiny several odd things become apparent. There are no windows on the ground level of the structure. This is primarily for security reasons. It is simply too easy to gain access to the house by way of ground floor windows, and so the house has none.
In addition, no chimneys are visible anywhere. This is again because of security, as chimneys, in a world of magic, are very easy means of egress into a building. As such, all of the warmth needed by the house is provided by copious coal braziers that are placed in almost every used room. These braziers are not detailed on any maps or keys, but in case a heat source is needed or someone wishes to throw hot coals, be sure that in any rooms but cells or storerooms at least 2 braziers can be found lit.
There are also two levels below the house. These are carved directly out of the earth and then buttressed by fine dwarven workmanship along the walls, comprised of tight fitting granite bricks with no mortar at all.
Floors and ceilings are also of stone, and the roof of the house is comprised of wood reinforced by a think backing of steel and covered by baked tiles. The roof slopes sharply, though there is no formal attic to the house, the topmost floor having a ceiling that is formed by the vertex of the roof. The very top of the roof has a crystalline skylight along its length. This skylight is a Wall of Force coupled with a Permanency spell.
There are two outbuildings in the compound. The first, to the north, are stables and quarters for the stablehand, while against the town's curtain wall to the northwest is a two storey building used for storage of wares.
Finally, a cistern has been dug into the ground near the storage building. The cistern is covered and some 15 ft deep. Channels and gutters along the curtain wall funnel rainwater into the cistern, which is usually full (and during dry months servants fill it with water from the river).
There are windows on the top three stories. These are uniformly 2 ft wide by 3 ft tall. They are paned with frosted glass and cannot be opened. In addition, each window has wooden shutters on the inside. These are not so much for security, although they can be latched from the inside, but rather for privacy.
At several places smoke issues from the compound. These are the result of venting from Curinax' laboratory and from the basement kitchens. The former only vents intermittently, when Curinax has a brew boiling, while the latter is active almost every moment. The alchemical vent emerges from several small (1" diameter) holes right next to the northern wall of the house just outside where the Crosshall enters the Formal Dining Room. The kitchen vents, also comprised of groupings of small holes, emerge just east of the Ground Barracks.
Except for the few privies in the house, most inhabitants' needs are served by chamber pots emptied by servants. Bathing is usually done once a week at the river or the town bathhouses, and laundry is done at the river by servants or by the owners of the clothing.
Lighting is present in all inhabited areas, usually, unless detailed otherwise, by small oil lamps set into sconces along the walls. Desks usually have their own lamps set upon them. And candles are also usually present for use if needed. The oil lamps are maintained by the servants or by the occupants themselves.
Key to the Guildhouse:
Unless stated otherwise, all hallways are 7 ft tall and rooms are 9 ft tall.
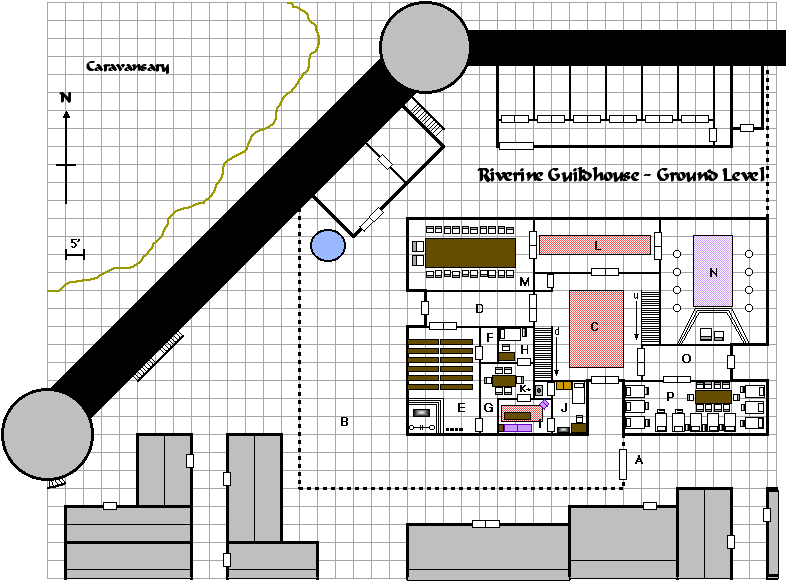
GROUND LEVEL
A. Main Gates:
The main entrance to the house is via the Main Gates, which let onto a small courtyard that marks the terminus of the north-south running Avenue of the River. This avenue runs only a couple of hundred of feet before letting into the broad Dock Street, which leads either to the northern docks area of the town, or to Market Street, which bisects the town.
The gates are solid iron, engraved with the crest of House Riverine, a hippocampus over a wave wearing a crown. It is as tall as the surrounding fence and, like the fence, bears spikes at its top. The portals can be opened easily when they are unlocked, the result of perfect balancing by dwarven engineers, and a dwarven specialist comes out once every six months to rebalance them and maintain the gates, so that they also swing open and shut soundlessly.
The gates are locked by lever mechanisms, three from each side, which ratchet stout iron bars across the gates and into solid iron brackets that were forged directly into the fence lintel. Because there are essentially six barring mechanisms across the gates, it would take thee Knock spells to magically force open these portals.
The gates are locked at all times, except when someone is entering or leaving. Strangers seeking to enter must report their name and business and, if applicable, present their credentials. These are then taken to a figure of authority who either allows or disallows entrance.
At all times, there are 2 house guards here. They announce strangers to the door guards (see Compound) who then report to the authorities of the house. Near the gate is hung a horn of ivory girded with silver. Any guard can sound the horn, which can be heard anywhere in the house except the Dungeon Level.
B. Compound:
The Compound surrounding the house abuts the curtain walls of the town. There is no access to the top of the curtain walls from the Compound, nor to the great wall tower that sits in the northwest corner of the Compound. The Compound itself is paved with cobblestones that have been flattened by design and over time, so that traversing the Compound is easy in a wagon.
There are, at all times, 5 guards in the Compound (not counting the two at the Main Gate). Two of these are stationed at the doorway leading to the West Hall, and two more serve as door guards at the double doors leading into the Grand Foyer. Another single guard walks the Compound, keeping an eye on everything in general. He walks this route with one of the four guard dogs owned by the house.
C. Grand Foyer:
The double doors leading into the Grand Foyer are made of rare teaks, imported from the Heynosht Archipelago, and are cunningly engraved with the sigil of the House. They are stout, thick affairs, reinforced on the inside with iron. Each can be locked with a cunning set of 2 key locks and reinforced by 3 stout bars dropped across the back of the doors in times of trouble. Usually, however, a single bar is lowered.
There are two small observation slats at about 4 ft that allow someone inside to observe who is at the door. In addition, on each side of the lintel is a pull chain that works a set of bells hung on the inside of the doorway that serves as a doorbell.
Within is the Grand Foyer, which ceiling towers some 18 ft above the floor. The place is masterfully designed to impress the visitor with the wealth and power of the place. Upon the floor sits a dazzling carpet of Gerilong silks interwoven with Amabong wools. The whole has been dyed and embroidered to show an amazingly detailed scene of river barges conducting trade and traffic up and down a mighty river that is dotted with towns and settlements of all sizes. The river snakes up and down the length of the carpet and one could spend hours studying the various bends in the river and the detailed inhabitants of each trade stop.
Directly over the carpet hangs a massive chandelier, consisting of at least 100 small candles set under prisms that reflect and refract the light, increasing its brightness and, if the prisms are adjusted, spraying the walls and floor with dappled spectral colours. The chandelier itself is of silver and gold and shaped into water motifs such as waves and waterspouts.
Potted plants are set here and there, providing colour to the stone portions of the floor, and along the walls are hung tapestries of obviously great value from a variety of nations that show various scenes of the history of House Riverine. The largest, hung flanking and over the double doors to the north, shows the original commissioning ceremony of House Riverine before the Emperor. The tapestry has lettering explaining the occasion and the name of the Emperor and the date of the commission.
Three sets of double doors lead out of the Grand Foyer (aside from the entry doors). These lead to the West Hall (via the doors to the west), the East Hall (via the doors to the east), and the Crosshall (via the doors to the north). All of these are engraved teak, less tout that the entry doors and with no locks.
To the far northeast of the Grand Foyer is a 5 ft square closet accessed by a small door. Within are pegs for cloaks and articles of clothing as well as a boot rack and a weapon rack.
At all times a servant is stationed here, to keep watch on the place, to make sure those with dirty feet do not soil the grand carpet, and to attend to the door and welcome visitors. The servant always carries a small brass whistle that, if blown, can be heard at every point of the house (magically so) and serves as an alarm whistle to be sounded only in the direst of emergencies.
To the southwest, a set of stairs leads down to the Antechamber of the Basement Level. To the northeast, a set of open steps leads up to a landing to the Second Level.
A small observation slit is hidden high up where it meets Veribor's Spy Room. The slit is almost impossible to detect from the floor (DC 45) and difficult to find even at slit level (DC 30). The room is subtly designed to send even whispers up to the slit. Anyone with Profession (Architect) or Knowledge (Engineering) may divine this fact (DC 30) or it may be divined by the keenest of ears (DC 40).
D. West Hall:
The West Hall leads to the Compound and to the House Chapel. It is lined with portraits in oil paints of previous Trade Lords of the House, with small plaques outlining their names and years of life.
The door at the far west of the hall is a single affair, plain and reinforced with iron bands. It is always locked by a key lock, which key is possessed by the Trade Lord Barnabus and the House Priest. There is also a stout iron bar that can be thrown across the door from the inside.
Double doors to the southwest of the West Hall are of expensive teak engraved with holy runes to Indolle. These lead to the Chapel.
The double doors to the west lead to the Grand Foyer.
E. Chapel:
The double doors from the West Hall lead to the Chapel. This is a small affair, as the main temple of Indolle is nearby in Dwillingir anyways. The Chapel is designed to cater to the immediate needs of the House and worship services are usually held weekly here.
There are two rows of pews here, six sets in each, and each pew can comfortably hold 5 people, meaning the capacity of the chapel is roughly 50-60 souls.
To the southwest is a raised dais. Three sets of steps lead up to a stone altar in the shape of a rectangular obelisk with a flattened top. The altar is engraved with scenes of commerce and trade and is bedecked with precious metals, mother of pearl, and precious stones so that it, on the whole, is quite valuable. Assume the altar contains 100 stones worth 1D6x100 gp each and another 1250 gp in inlaid precious metals and mother of pearl.
Behind the altar is a metal sculpture of a trade balance and scales that actually functions and was designed by dwarves. It is extremely accurate and consecrated to Indolle such that it cannot be used in any way to mis-weigh anything placed within it. Furthermore, anything placed in it will be revealed to be counterfeit since a single copper coin placed on the other side will slam its side down and the other side up if the copper piece is set against an item that is counterfeit. Note that cursed items are not counterfeit.
To the east of the dais is a largish candelabra containing 4 large golden candles. Several incense dishes sprout from the base of the candle arms, and these are filled with holy incense. Several censers hang from chains nearby.
Aside from the double doors from the West Hall, two small doors are set along the eastern wall of the Chapel. The northeastern door leads to the Vestibule, while the southeastern door leads to the Priestly Common Chamber.
F. Vestibule:
This small chamber holds the vestments and equipment for the Chapel. The door to the chamber is locked with a simple key lock, the key being on the person of the Chapel priest.
Within are pegs holding ceremonial robes, shelves holding blocks of incense and ceremonial candles, semi precious service pieces, including chalices, goblets, and dishes, several fine commerce scales, and several hymnal books and scrolls outlining the history and dogma of the Church of Indolle.
G. Priestly Common Chamber:
This small chamber serves as the common chamber for the House Priest. Here the priest will entertain common guests and hold counseling or private meetings.
The chamber sports a small wooden table and six chairs. A tapestry along the west wall shows a vista of the grand temple of Indolle in the Imperial Heartland.
There are three doors in this chamber. The north leads to the Novate's Quarters, the south to the Priest's Living Room, and the southwest to the Chapel.
H. Novate's Quarters:
This small chamber is where the servant or low ranking priest of the House dwells. The room is a spartan affair, with a simple feather bed and a chest for possessions (locked by a standard key lock) and a desk and chair, the former having 3 small drawers set in it, none of which can be locked.
A large silver holy symbol to Indolle hangs on the east wall of the chamber.
The door to the south leads to the Priestly Common Chamber.
I. Priest's Living Room:
This comfortable room bears a small carpet on the floor that shows scenes of camels and desert caravans tracking through the endless dunes of the Wylag Desert. The people visible on the carpet are in Morakki desert garb.
Atop the carpet is a low table that serves a plush mauve couch against the south wall. Set to the west of the couch is a fine wooden end table upon which is set a potted cactus.
A plush mauve chair, obvious partner to the couch, sits in the northeast corner, and along the north wall to the west of the door to the Priestly Common Chamber is an ornate silver mirror bordered by golden figures of caravans marching up and down the mirror's edges.
The door to the east leads to the Priest's Bedchamber.
The door from the Priestly Common Chamber can be locked by a simple key lock opened by the Priest's key.
J. Priest's Bedchamber:
This chamber contains a plush feather bed with a mahogany frame with bedposts shaped like entwining vines. South of that is an ornate mahogany desk with four lockable drawers. A chair accompanies the desk. Adjacent to the desk is a metal chest with a complex key lock that is openable by a special key retained by the House Priest. The chest has a mechanism for a poison needle in it and within is a false bottom some 3" deep.
Next to the bed is an elaborate armoire made of carved cherry wood and decorated with wyverns and rocs.
The door to the southwest leads to the Priest's Living Room and can be locked with a simple lock openable by the Priest's key. The door to the northwest leads to the Privy.
K. Privy:
This small garedrobe holds a wooden toilet that is serviced by a large chamber pot. Next to it is stored a copper bathtub and several bottles of unguents and perfumes as well as a grooming set (mirror, razor, combs, brushes, etc.). The door leads into the Priest's Bedchamber.
L. Crosshall:
This is the large hallway that runs east-west connecting the Formal Dining Room with the Audience Chamber. Double doors along the south wall lead into the Grand Foyer. A long, thin carpet runs along the axis of the hallway, it being of plain peach in colour. The hallway is decorated with marble busts in small niches along the north and south walls, these being of famous personages connected to the House. Each bust bears a small engraved brass plaque with a name and years of life.
The double doors to the west are large and made of mahogany but are unadorned. They lead to the Formal Dining Room.
The double doors to the east are of teak and gilded with platinum traceries depicting geometric designs and runes dedicated to Indolle. These lead to the Audience Chamber.
M. Formal Dining Room:
This long hall is decorated with velvet tapestries depicting hunters on steeds blowing ivory horns, Thaneeri barbarians fighting Imperial phalanxes, and various local vistas and landscapes. A dozen large coal braziers are available for warmth, and a dozen oil lamps hang from chains suspended from the ceiling.
The room is dominated by a huge wooden table, made of oak with mahogany inlays and decorated at the edges and legs with whorls and vortices. Twenty cushioned chairs flank the table, while at the western end are two chairs of honour, both of wood with high-carved backs in the shape of falling coins and mounted with plush red cushions.
Some two dozen place settings are laid upon the table, these being silver ware with linen places and napkins in copper rings. Silver goblets complete each setting, and several large empty platters and large ewers and flagons sit in the centre of the table.
This room is where formal dining is held, and usually Barnabus, Abrinda, and the higher ups of the house take their sup here and discuss the day's events. When councils or meetings are required, the room can also become a planning chamber or, in dire circumstances, a war room.
N. Audience Chamber:
This grand room is where Lord Barnabus holds court for formal ceremonies, including induction of new members and reception of emissaries and important clients.
The walls are entirely of imported white marble shot through with black and silver veins. Eight small pillars support the weight of the marble ceiling. These pillars are also of marble and are carved to resemble serpents and dragons winding up the column, with gouts of flame reaching the ceiling.
A large mauve carpet is set between the two rows of pillars, it being unadorned but clearly of fine make and quite plush.
The carpet leads south to a dais of three steps. Upon the dais are two chairs. The larger chair, to the west, is Barnabus', and it is of teak with plush red cushions. Above the back rises a carved sunburst which surrounds the sigil of House Riverine done up in silver and gold. At least 20 gems (valued at 1d10x100 gp each) stud the chair.
The other chair is lesser in stature and is for Abrinda. It is also of teak, but in cross-legged ancient Amorian style with canvas cushioning.
The double doors to the northwest lead into the Crosshall.
O. East Hall:
This hallway essentially leads to the backdoor of the House. The double doors to the west lead into the Grand Foyer. Meanwhile, the single door to the east leads out to a small courtyard near to docks of Dwillingir. This door is not normally used, and is entirely made of iron and well constructed. It is triple barred from the inside and a mechanism is attached to it so that if the door is opened, bells will be sounded in the hall and the Ground Barracks.
Double doors to the south are stout and merely functional, reinforced with iron banding, and they lead to the Ground Barracks.
P. Ground Barracks:
Double doors lead from this room to the East Hall. The room is crowded and serves as the barracks for the ground floor guards. These are the guards that rotate watches at the Main Gate and in the Compound. Each works an 8 hours watch 5 days a week. That means on any given day, 7 guards are on duty, 7 are asleep or resting, and 7 are on leave (though these may still be in the Barracks). Each guard gets a full day off every 3 weeks, and this guard is usually in town or travelling.
There are 11 bunk beds here, made of metal with feather stuffed mattresses. Two footlockers are near each bunk, holding the personal possessions of the guards. Each is locked with the key on the guard.
Shoved into the east portion of the room are a well-scarred table and ten chairs.
Along the remaining wall space are hooks and racks for weapons and armour.
BASEMENT LEVEL
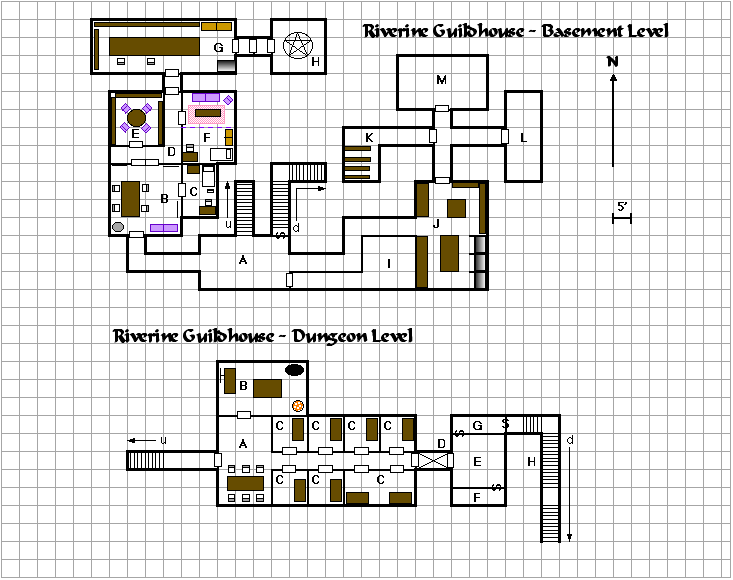
A. Antechamber:
This room is empty of furnishings or specific occupants, merely serving as an Antechamber for those descending or ascending the stairs along the north wall that lead to the Grand Foyer on the Ground Level.
A passageway to the west leads to Curinax' Common Chamber, while the passage to the east leads to the Kitchens.
A stout door, locked with the key on the Chamberlain, leads to the Storeroom.
A secret door (DC 30 to Search) to the northeast leads down a steep set of steps to the Guard Chamber on the Dungeon Level. This door is activated by twisting a loose bit of the wall on the wall just to the right of the doorway (DC 25 to Search). From the stairs side the door is neither hidden nor requires a switch to activate.
B. Curinax' Common Chamber:
The door to this chamber, at the end of the passageway from the Antechamber, is comprised of stout oak with a huge carving in the shape of a human face changing into a dragon's maw. There is an iron knocker held in the mouth of the image. There is a key lock of complex design on the door, with the key on Curinax, but the door is usually open, as few would dare to trespass in the demesne of the transmuter.
The room itself is not ornate. A large plain table dominates the western half of the room, with 4 comfortable chairs flanking it. In the southwest corner of the room is a marble statue of a beautiful female in flowing robes that reveal much of her figure. From her gesturing hand spring some sort of magical energy. This statue is the image of a lost love of Curinax', and he values it highly and often spends long whiles gazing at it and wondering what might have been.
A plush couch sits in the southeast corner, and several paintings and ornate mirrors hang from the walls. The paintings deal with lycanthropes in natural settings and seem to be the work of a talented amateur (they are in fact done by Curinax himself). The mirrors are silvered and decorated with figures twining along the edges and morphing from one shape to another.
Hung from the wall in the northeast corner is a rod and under it, sprouting from the wall, is a metal tray filled with wood shavings. This is the perch for Curinax' raven familiar, and if the wizard is in residence then the raven is usually perched here.
The door to the east leads to the Apprentice Chamber, while reinforced oak double doors on the north wall lead to Curinax' Hallway.
C. Apprentice Chamber:
Curinax no longer has an apprentice. He took one once simply to meet the terms of his old mage's guild and now the room sits unused, musty but tended by unseen servants.
The door, which cannot be locked, leads to Curinax' Common Chamber.
Within is a spare feather bed, a chest that may be locked by a simple metal key, a plain desk (with three drawers which may be locked by the same key as the chest), and a small nightstand with a porcelain washbasin.
D. Curinax' Hallway:
This small hallway connects the Library, Curinax' Private Chamber, and Curinax' Common Chamber. In addition, at the far north end of the corridor is a featureless steel door that fits tightly against the lintel. Strong slats of cured bark surround the metal and helps to make a tight seal on the door, so tight that water cannot easily get through. This door is warded by an Arcane Lock spell cast by Curinax at 9th level. It leads to the Laboratory.
E. Library:
A reinforced wooden door bears a key lock that opens with Curinax' key. However, the room is usually unlocked. Within, the room is lit by 7 torches lit by Continual Flame spells. Curinax replaces one of the spells on the torches each day.
Within the room sits a round wooden table and 4 plush reading chairs. The north, west, and east walls are covered from floor to ceiling with shelves. The shelves hold a bewildering variety of tomes, treatises, codices, books, librams, manuals, scrolls, and other written works. Most of these deal with history, arcane lore, astrology, transmutation, and herbalism. These can certainly be used to research magic items and new spells.
Set with each shelf unit is a rolling ladder that can be moved to any point on that set of shelves.
A small space in the northeastern corner of the room is devoid of shelves. About 4 ft up is a secret niche that is warded by a Fire Trap spell (at 9th level). The spell is centered on the rear of the niche, so that the explosion reaches only 2 ft out from the secret opening. In this way the flames will not harm any of the books on the nearby shelves.
Within the space are the most valuable writings owned by Curinax. These include:
· A spellbook containing
the following spells: 1 - Tenser's Floating Disk, Alarm, Identify;
2 - Flaming Sphere, Shatter, Obscure Object, Arcane Lock;
3 - Leomund's Tiny Hut, Explosive Runes, and Tongues.
· An arcane scroll with Dismissal at 9th level.
· An arcane scroll with Teleport at 9th level.
· An arcane scroll with Permanency at 9th level.
· An arcane scroll with Dispel Magic at 7th level.
· An arcane spell with Gentle Repose at 6th level.
· An arcane scroll with Water Breathing at 5th level.
The door to the south leads to Curinax' Hallway.
F. Curinax' Private Chamber:
The door in this chamber leads to Curinax' Hallway. It is locked with an Arcane Lock spell at 9th level.
Within, the room is divided into two portions by means of a thick velvet curtain that bears silver filigree in the shape of arcane runes.
The northern portion of the room is a living area, complete with a red carpet of Gerilong silk, a couch and low table, and a comfortable plush chair.
The southern portion of the room is Curinax' bed chamber, and includes a plush feather bed in a wooden frame of pine with bedposts carved to resemble wizard staves. Near the head of the bed is a metal perch and tray for Curinax' raven familiar. When Curinax is asleep, the raven is usually here.
At the foot of the bed is an ornate desk imported from Xydlont and carved with Morakki motifs. The desk has 4 drawers, each protected by an Arcane Lock spell at 9th level. Within are Curinax' personal notes, including diaries and letters from his lost love.
North of the bed is an ornate wardrobe decorated with scenes of mephits peeking from around corners and causing all sorts of mischief. Within are hung a variety of clothes and outfits, including formal attire, wizardly robes, and travel outfits.
G. Laboratory:
The door to the south is made of steel and is lined with cured bark so that, when closed, it forms a watertight seal. The door is locked by an Arcane Lock spell at 9th level. It leads to a 5 ft square chamber which south wall is pierced by another such door. That door leads to Curinax' Hallway.
Along the eastern wall is a solid steel door that is not treated with bark and is not watertight. It leads to a 5 ft square chamber with another such door, which, in turn, leads to a final 5 ft square chamber, and a final steel door that provides entrance to the Summoning Chamber. Each of these three doors is warded by an Arcane Lock spell at 9th level.
Within this long chamber is an alchemical laboratory. A huge trestle table dominates most of the room, this scarred and discoloured and, in places, burnt and melted. Upon it is an array of alchemical equipment, including scales, mortars and pestles, alembics, burners, flasks and beakers, scoops and spoons, hammers, tongs, gloves, knives and razors, etc. several books are scattered about, along with rolls of parchment bearing notes and research data. Several ink wells and quill pens and blotters are also on the table. Two functional chairs are set nearby.
Along the west and north walls are shelves holding books and manuals and scrolls detailing recipes and rituals for creating various magic potions and other items. Also here are various material components, including crushed gems, powdered metals, chemicals and liquids of various sorts, including ink for spellbooks, and the following magical potions:
· Four potions of Cure
Light Wounds at 2nd level.
· Two potions of Resist Energy (fire) at 4th level.
· Two potions of Resist Energy (acid) at 5th level.
· Four potions of Bull's Strength at 3rd level.
· Two potions of Cat's Grace at 3rd level.
· A potion of Neutralize Poison at 7th level (prepared
by an expert alchemist Prestige Class member).
In the southeast corner of the room is a hearth that vents up into the Compound. The hearth contains a tripod to hold a cauldron as well as a grill to hold items above the flames. Several hearth tools hang on a rack nearby.
In the northeast corner of the chamber is a cabinet warded by an Arcane Lock spell at 9th level. The cabinet is made of pine and is warded by a Fire Trap spell at 9th level. The entire cabinet is lined with lead on the inside, which helps to protect the contents from damage.
The cabinet often is used to hold Curinax' personal spellbooks when not in use. In addition, the following items are within the cabinet:
· A wand of Detect Poison
at 1st level with 32 charges.
· A wand of Identify at 3rd level with 23 charges.
· A wand of Comprehend Languages at 1st level with
48 charges.
H. Summoning Chamber:
This chamber is reserved for dangerous summonings performed by Curinax. While he does not yet have the ability to bind planar creatures himself, he has come into possession of arcane scrolls with such spells upon them. In addition, this chamber is useful to contain charmed or enchanted beings and to conduct dangerous experiments.
The floor of the chamber is enscribed with a Permanent Magic Circle against Evil spell at 9th level. This spell is focused inward and although Magic Circle against Evil cannot normally be made permanent, the wizard who cast the Permanency spell for Curinax researched a way to make it permanent. In addition, the floor bears magical diagrams that increase the potency of the circle (per the Players' Handbook page 157). Finally, a Dimensional Anchor spell at 9th level has been infused with the diagram and magic circle and it too is permanent because of the permanent nature of the magic circle. The Dimensional Anchor covers only the area of the diagram.
The diagram is of inlaid silver and cannot be easily disrupted short of prying the inlay out with a dagger.
In addition, the walls of the room are coated with a thin sheeting of lead, foiling many magical effects.
The steel door to the west is locked by an Arcane Lock at 9th level cast by Curinax and leads to the Laboratory.
I. Storeroom:
This room is accessed via a hallway that leads east from a locked door that provides egress to the Antechamber.
This dark room is the storeroom of the House, and the place is stocked full of barrels, crates, bags, and sacks. All sorts of mundane items can be found here, including:
· Hemp and silk ropes.
· Tools and nails.
· Torches and oil lamps.
· Spare braziers.
· Spare chamber pots.
· Candles.
· Flasks of lamp oil.
· Lumber.
· Handaxes.
· Hammers.
· Knives, forks, and spoons.
· Mugs and decanters.
· Plates and dishes.
· Baskets.
· Sacks of grain.
· Barrels (empty).
· Chests (empty).
· Lanterns.
· Pots and pans.
· Soap and lye.
· Block and tackle.
· Clay jugs.
· Bottle of ink.
· Parchment and paper.
J. Kitchen:
The passageway from the east wall of the Antechamber leads into the kitchen, a busy affair complete with three large hearths in the southeast that vent into the Compound, tables in the centre of the chamber, shelves along the northeast and north walls, and counters along the west wall. Racks of utensils hang from all of the walls, and built into one of the counters are several sinks and barrels of water and soap to clean dishes and pots and pans. The place is almost always busy, with so many people to feed, and usually some four servants are here, one cook and three apprentices.
The door to the north leads to a small hallway that lets onto the Wine Cellar to the west, the Root Cellar to the east, and the Pantry to the north.
K. Wine Cellar:
The door to the east leads back to the hallway that leads to the Kitchen (south), the Root Cellar (east) and the Pantry (north). The small room contains four floor to ceiling wine racks stuffed full of vintage brews, many in dusty bottles with wax seals. The bottles are etched with the vintage and year of the contents. Cobwebs hang in the corners of the chamber.
L. Root Cellar:
The door to this room leads from the small hallway that provides access to the Wine Cellar (west), Kitchen (south), and Pantry (north). This room is full of bins and tubs containing roots and tubers of all sorts, including potatoes, onions, turnips, and squashes of all sorts.
M. Pantry:
This large chamber's door leads to the small hallway that provides access to the Wine Cellar (west), the Kitchen (south), and the Root Cellar (east). The place is stocked full of foodstuffs of all sorts, including boxes of exotics prices, dried fruits, jerked meat, trail and iron rations, wedges and wheels of aging cheeses, blocks of salt, bins of salted meats, hanging sausages of all kinds, crates of nuts, barrels of apples, kegs of brandy and ale, barrels of water, etc.
DUNGEON LEVEL
A. Guard Chamber:
The door to the west of the chamber leads to a small hallway that ends at stairs ascending to the antechamber of the Basement Level by way of a secret door. The door here is locked by a key lock that can be locked from either side. The key is in the possession of one of the guards in this chamber.
A door to the north leads to the Torture Chamber, while the hallway to the east leads past the Cells and into the Warded Hallway.
To the south are a table and six chairs where the guards rest and dice and read and pass the time. There are always two guards here at all times, and this is increased to four if a prisoner is in the Cells and a full complement of six guards if there are two or more prisoners in the Cells. The guards do not live here, but serve from the Upper Barracks in eight-hour shifts. The guards do not know why they have to serve two at a time even when there are no prisoners, but they have learned to follow orders even if they seem to be nonsensical.
A weapon rack hanging near the table holds 6 light crossbows and 6 cases of 20 crossbow bolts each.
B. Torture Chamber:
While Barnabus is generally an affable man, the Byzantine politics of the Imperial Merchant Houses makes coercive persuasion a necessity. Hence the need for a Torture Chamber. The door to the south leads to the Guard Chamber.
Within the room is a wooden rack attached to a metal crank and chains to stretch victims. Another table with wrist and ankle straps is in the centre of the chamber and it has cranks that can be used to tilt the table to almost vertical and to pivot it around to any facing.
In the northeastern corner is a crude iron maiden, though the victim must be placed into it in a fetal position and the spikes are designed not to kill but to inflict horrible pain.
In the southeast corner is a cauldron filled with coals atop a fire pit that can be heated. A rack holds various iron rods and pokers with which to scald and brand victims.
Various manacles hang from the wall, and these can be hoisted to any height by chains and tied off.
The House here has no official torturer. Curinax might be good at it if he cared to apply himself to the task, but he does not. As such, Barnabus simply picks his most brutal guards and lets them use the apparatus on the rare occasions they are used. Often, Barnabus prefers to simply place a prisoner in the first Cell on the south side of the cellblock and then leave the door to the Torture Chamber open so that the prisoner can see the implements therein and perhaps be persuaded to confess without actually utilizing the chamber. When an extremely important confession is needed, Barnabus hires a professional torturer.
C. Cells:
The hallway leading east from the Guard Chamber passes a block of 7 Cells, four to the north and 3 to the south. Each cell is comprised of a 10 ft square chamber with a hard wooden platform with straw as a bed. Buckets are available for water, food, and waste. Straw and other material cover the floors.
Each cell has a pair of manacles linked to the wall by an iron ring. These manacles are openable by keys in the possession of one of the guards and are not long enough to reach the door.
The southeastern most Cell is 20 ft wide and can either hold two prisoners or a large captive.
Each Cell is fronted by steel bars 1 inch thick and separated by 2 inches from the next bar. Each bar is set deep into the granite floor and ceiling. And joined with a welded crossbar top and bottom within the stone. A portion of the bars forms a door that can be swung outward. Each door is locked from the outside by a key lock (the key is in the possession of one of the guards).
The doorway at the eastern end of the Cells is locked, with the key in the possession of Barnabus. All but Barnabus are forbidden to enter the doorway, and it is widely believed that Barnabus keeps the House treasure here. The door is stout oak reinforced with iron bands and it leads to the Warded Hallway. It is locked, with the key on Barnabus, and the lock is of dwarven make and extremely complex (DC 35 to pick).
D. Warded Hallway:
This small hallway is trapped in order to keep intruders from the rooms beyond. The door to the west leads back into the Cells, while the door to the east leads tot he Treasure Room. Both doors are of stout oak reinforced by iron bands and both are locked with the only key in the possession of Barnabus. Both locks are of dwarven make and extremely difficult to pick (DC 35). They are locked from both sides, and so prevent access to the House from the Sewers also.
The floor of the hallway is entirely made up of a camouflaged pit trap:
| * Camouflaged Pit Trap: CR 4; mechanical; location trigger; manual reset; hidden switch bypass (DC 25); Reflex save (DC 20) avoids; 40 ft. deep (4D6, fall); multiple targets (first target in each of two adjacent 5-ft. squares); Search (DC 25); Disable Device (DC 17). |
The trap can be disabled manually by tripping a hidden switch just inside the doorway from the Cells on the left side (DC 25 to Search). If disabled in this fashion the same switch must be thrown to reset the trap.
When 25 pounds or more steps on the eastern 5'-square of the Hallway, the trap springs. Further, if 25 pounds or more hits the bottom of the pit, a portcullis gate swings across the pit and locks into place. The same switch that disables the trap can release the portcullis.
In addition, when the pit trap is sprung, poisoned arrows spring forth from concealed holes in the wall at a height of about4' above the floor level. These will not hit anyone falling into the pit or even those potentially falling into the pit but making Reflex saves. Instead, these will hit those who are flying or levitating.
| * Poisoned Arrow Trap: CR 3; mechanical; touch trigger; manual reset; Atk +12 ranged (1D8 plus poison, arrow); poison (large scorpion venom, Fortitude save [DC 18] resists, 1D6 Str/1D6 Str); Search (DC 19); Disable Device (DC15). |
The easternmost door is also trapped, in this case a poison needle trap.
| * Poisoned Needle Trap: CR 2; mechanical; touch trigger; repair reset; lock bypass (Open Lock [DC 30]); Atk +17 melee (1 plus poison, needle); poison (blue whinnis, Fortitude save [DC 14] resists, 1 Con/unconsciousness for 1D3 hours); Search (DC 22); Disable Device (DC 17). |
In addition, if the needle is sprung, an alarm goes off that can be heard on the fourth storey of the House, alerting all there that someone is trying to penetrate the restricted Dungeon areas.
E. Treasury:
This room contains the mundane treasury of the House. There is a steel door to the west that leads to the Warded Hallway. The door is locked by a very complex lock (DC 35) which key is in the possession of Barnabus. Further, the door has a poisoned needle trap upon it.
| * Poisoned Needle Trap: CR 2; mechanical; touch trigger; repair reset; lock bypass (Open Lock [DC 30]); Atk +17 melee (1 plus poison, needle); poison (blue whinnis, Fortitude save [DC 14] resists, 1 Con/unconsciousness for 1D3 hours); Search (DC 22); Disable Device (DC 17). |
In addition, if the needle is sprung, an alarm goes off that can be heard on the fourth storey of the House, alerting all there that someone is trying to penetrate the restricted Dungeon areas.
The trap includes an alarm on the fourth storey of the House and the needle and alarm trap on this side of the door is separate from the same trap on the other side.
There are also two secret doors in the room, one to the northwest and the other to the southeast. Both are well hidden (DC 35 to Search) and require hidden switches to open (DC 25 to Search).
The southeastern secret door leads to the Magical Treasury of the House. The northwestern secret door leads to the Trapped Hallway.
The room itself contains a dozen chests and 4 small sacks, as well as some miscellaneous items. All chests are locked by cunning locks (DC 30) though none are trapped. The key to the chests is in the possession of Barnabus.
The chests hold the monetary funds of the House. This varies from time to time, but assume at any given moment each chest holds:
3D100x10 cp, 4D100x10 sp, 6D100 x5 gp, and 4D100 pp
Thus, on average the total amounts present are:
18000 cp
24000 sp
18000 gp
2400 pp
For a total gold piece value of 32580 gp.
The sacks hold a bewildering variety of gems and jewels, including 5D100 gems worth, on average, 100gp each and 1D100 jewels worth, on average, 250 gp each. Total value of the items in the sacks is, on average, 37500 gp.
Also in the chamber are several statues and paintings and objects d'art that could be sold, in total, for D10 x 1000 gp.
F. Magical Treasury:
There are 3 chests in this room, which secret door is plainly visible from this side and leads into the Treasury. The door is easily openable from this side without throwing any switches.
The chests are all locked with dwarven-make locks (DC 40 to Open) with the key in the possession of Barnabus. Each lock also bears an acid spray trap.
| * Acid Spray Trap: CR 6; mechanical; touch trigger; repair reset; lock bypass (Open Lock [DC 40]); Atk +17 ranged touch (2D6 plus 2 splash, concentrated acid); acid (spray in a 10' cone in front of the lock doing full damage to the opener if hit and doing splash damage to all [including the opener if he is missed by the main attack] in the area of effect, splash damage is never-miss); Search (DC 29); Disable Device (DC 29). |
The contents of each chest are listed below:
Chest #1 - 6 breaker bottles (S&S), a set of strings of spell storing (currently empty) (S&S), and a suit of banded mail +1.
Chest #2 - A necklace of favoured enemy detection (MoW), a cloak of the forest (DoF), a mirror of status (see below), and a dead grey ioun stone.
Chest #3 - a full set of horseshoes of a zephyr, a cursed amulet of inescapable location, a cursed mace of blood, and 4 potions of neverfey (see below).
|
* Mirror of Status: This small steel mirror is backed by runes of power on its opposite face. If a being's blood is traced over these runes, then anyone staring intently into the mirror will see an image of the being as he currently is. This vision includes only the barest minimum of his surroundings, perhaps 1-2' in either direction, but it is enough to generally determine what type of situation he is in. The image moves with the being to which it is attuned and lasts for 1 minute. The mirror may be activated 3/day. Caster Level: 5th; Prerequisites: Create Wondrous Item, Clairvoyance/ Clairaudience; Market Price: 18000 gp. |
|
* Potion of Neverfey: This potion affects only elves, half-elves, and fey creatures. Any such creature that drinks one of these potions must make a Fortitude save (DC 20) or be transformed into a human being. Any characteristics they had that are not available to humans are lost. The age of the transformed being becomes proportionate to the new human lifespan. Racial ability modifiers are lost. The new human may now learn skills at the rate for humans, but does not gain skill points or bonus feats retroactively. The imbiber may voluntarily fail the Fortitude save. These potions are often used by fey and elves who wish to mate with humans and do not wish to outlive their companions by centuries. The change is permanent and cannot be negated by any power less than a Miracle spell. Caster Level: 9th, Prerequisites: Brew Potion, Polymorph, Alter Self, Charm Person, Permanency [500 XP]; Market Price: 4500 gp. |
Barnabus uses this room to store away magic items that he has no immediate use for or which he considers too dangerous to use. It is possible for him to give some of these to the PCs if they perform well for him.
G. Trapped Hallway:
This Hallway is trapped in order to prevent unauthorized travel to the Hidden Stairway and from the Hidden Stairway.
The door to the southwest is a secret door (DC 30 to Search) and is openable from this side by a hidden switch (DC 25 to search). It leads tot he Treasury.
The secret door to the east is well hidden (DC 30 to search) and is also activated by a hidden switch (DC 25 to Search). It leads to the Hidden Stairway.
The entire hallway is warded by a Lightning Bolt trap. The trap will activate at all times when the central 5 ft section of the Hallway is entered (even if flying or crawling along the ceiling) and will begin at the western wall and shoot to the east, either stopping at the eastern secret door if that is closed or progressing to the turn in the Hidden Stairway if the secret door is open. The bolt is 10 ft in diameter and will certainly affect anyone in the path, even if they are pressed up against the wall or ceiling or are small.
| * Lightning Bolt Trap: CR 6; magic device; proximity trigger (alarm); automatic reset; spell effect (lightning bolt, 10th-level wizard, Reflex save [DC 14] for half damage, 10D6 electrical damage); Search (DC 28); Disable Device (DC 28). |
The trap resets every round and will continue to activate every round as long as the trigger conditions are met.
However, as long as the bearer of Barnabus' medallion is present in the trigger location, the trap will not fire.
H. Hidden Stairway:
This Stairway is used by the doppleganger Barnabus as an escape route and, more importantly, as a means to travel unseen from the Riverine House to the Thieves' Guild. The stairway leads down quite a bit to a rally room. This rally room is empty but has another set of stairs leading up to a secret door that allows access to the sewers beneath the town. Barnabus then travels the sewers to another secret door that provides entrance to the Thieves' Guild.
SECOND LEVEL
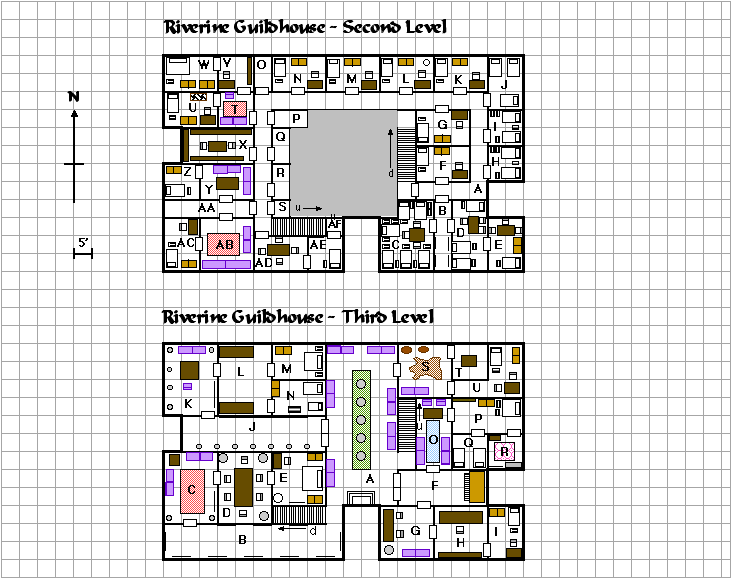
This level serves primarily as the living quarters for the House staff and regulars, as well as barracks for the remainder of the house guard.
A. Long Hallway:
This long hallway circles around the open area above the Grand Foyer, though there are now windows or openings allowing one to observe the foyer from within the hall. The entire length is lit at intervals by oil lamps set into small niches in the walls.
The hallway begins to the southeast of the floor, by way of a strong wooden door that leads to a landing and a set of stone stairs that allows egress into the Grand Foyer on the Ground Level. At the end of the hallway, to the southwest of the floor, stone stairs ascend to Level Three.
The hallway is pierced with doors along most of its length, oft times on both sides. These are all good wooden doors, and some of them may be locked. Refer to the description of the individual rooms to determine whether a door is locked.
B. Hall of Warriors:
The door to this area from the Long Hallway is unlocked. This hallway is lit by oil lamps set into recesses in the walls but is otherwise unremarkable except for several oil paintings showing famous warriors of House Riverine in combat. There are four such paintings, and each bears a small metal plaque on the bottom edge of its frame.
The paintings are:
1. A picture of a red bearded warrior slashing a battle axe into the skull of a smallish red dragon. The plaque reads:
| Harrumon Barush who slew the progeny of Yithwhallir the Terrible. |
2. A picture of a lithe female warrior in leather armour wielding a dagger in one hand that drips with either blood or poison and a sai in the other. She has slight Morakki features and is in a battle crouch. The plaque reads:
| Aramuna Tengishi who guarded the Grand Lord Tommas against twelve master assassins and gave her own life to protect him. |
3. A picture of a Thaneeri berserker with blond hair and beard and crystal blue eyes in a snowfield battles a white cave bear with a battle axe in one hand spraying blood from a slice to the bear's shoulder and a wooden shield in the other. The plaque reads:
| Unghosh the Freedman who saved many caravans through his bravery and was loyal enough to slay his own clansmen and to cause them to forswear attacking caravans as long as he drew breath. |
4. A picture of a one-eyed man with a horribly disfigured jaw wielding a two-handed sword against a ravening horde of Thaneeri barbarians jumping to shore from a longship. The plaque reads:
| Manidor of Way who struck fear into the barbarians and turned the northern bays red with blood. |
The doors to the east and west lead to the Barracks and the Officer Quarters. The latter is locked by a wooden latch operable from the inside when occupied.
C. Barracks:
This crowded room houses the second floor forces of the House. While the ground floor barracks are used for new recruits. The elite warriors of the House dwell here. They do not serve guard duty and are allowed more free time than the ground floor warriors. However, they tend to serve more on esoteric missions or guard missions for caravans, and as such, although some 12 warriors are housed here, at any given time from 2-8 of them will be absent on some mission. Of the rest, a third will be out of the House in town on free time while the rest will be found here sleeping or around the House.
When Barnabus holds an audience in his Audience Chamber, he will often recruit guards from here if there are not enough ground level guards or if he believes a particular visitor is dangerous and requires an elite guard.
The room holds six bunk beds and near to each are two footlockers, all locked (keys on their owners) and holding the personal possessions of the warriors. These include some changes of clothes, bric-a-brac and perhaps a few valuables picked up in the course of their service.
A well-used wooden table and three chairs are in the centre of the room, and the available wall space is taken with hooks for cloaks, shields and armour, racks for weapons, and a few paintings, many of them lewd, of lovers or favoured prostitutes.
D. Officer Quarters:
The door leading to the hall of Warriors can be latched from the inside, and usually is when occupied. The door leading to the House Commander's Quarters can be locked from the other side by a key lock and is usually locked when the Commander is not present. This room serves as the quarters for the officers of the House Guard. There are three such officers, and at any time two will be present in the House or the town while the other is off leading some mission or caravan escort. There is always 1 officer in the House proper, and there is a 50% chance that both are here.
Three single beds are in the room, each stuffed with feathers and accompanied by plain linens. At the foot of each bed is a locked footlocker (with the key on each officer) holding the personal effects of the officers, including clothing, personal effects, and likely some valuables.
A small table and three chairs complete the room, along with three armour stands and a weapon rack.
E. House Commander's Quarters:
The Commander of the House Guard resides here. The door leading to the Officer Quarters has a key lock, with the key on the Commander's person. The door is locked usually only when the Commander is not in his room.
A plush feather bed with fine linens sits to the southeast, with a locked footlocker at its fore. The footlocker is warded by a poison needle trap.
| * Poisoned Needle Trap: CR 4; mechanical; touch trigger; repair reset; lock bypass (Open Lock [DC 30]); Atk +17 melee (1 plus poison, needle); poison (concentrated blue whinnis, Fortitude save [DC 20] resists, 2 Con/unconsciousness [2D6 hours]); Search (DC 22); Disable Device (DC 20). |
The footlocker contains maps of the town of Dwillingir, the surrounding area, and several other nearby villages, hamlets, and towns. Many of these maps have notations on them detailing the occupants, the number of guards, and whether they are loyal to Riverine or some other House. Also here is a coded listing of Riverine spies that have infiltrated other Houses. The code is the Commander's personal one and there is no key available to decode it, though magic or a concerted cryptographic effort could solve the code eventually. In addition, the footlocker contains a pouch holding 100 pp. Also present within are 3 crystalline vials each containing a potion of Heroism.
To the north, a table finely carved with legs and edges shaped like climbing ivy is flanked by 3 plush chairs. Several manuals on tactics and war craft sit on the table, along with sheaves of parchment, a writing set, wax for sealing envelopes, several envelopes, and a couple of standard maps of the area around Dwillingir.
Along the east wall is a fine wardrobe of Nygoto spruce carved with the diamond and circle pattern common to Nygotian handiwork. Within are various changes of clothes, ranging from courtier's outfits to explorer's outfits. When not on a mission or in a dangerous situation, the Commander's cloak of resistance +1 is also usually found here.
On a shelf inside the wardrobe is a plain wooden box. Within are love letters written by the Commander to a Phylicia of Tolent. These espouse a great passion on the part of the Commander, but seem to have never been sent. The letters extend over a great many years. In addition there is a tied bundle of letters sealed with the Commander's signet ring and unopened. Each envelope is addressed to Renderuth, the previous House Priest, at the Indolle temple in Hanasfir in the Imperial Heartland. A parchment atop the bundle is written in another hand and states:
|
Esteemed Commander Varinoth of House Riverine in Dwillingir Far Province, we regret to inform you that your correspondences to Priest Renderuth cannot be delivered, as no such person is currently at residence in this temple. Perhaps he is stationed at the temple in Herrisfir. We commonly receive misguided correspondence, as the names of our locations are so similar. I suggest you re-send your messages to Herrisfir. As you can see, your messages have been unopened. --- Yours in Commerce, |
Should the letters be opened, they reveal the Commander's requests for personal advice regarding his unrequited love for Phylicia of Tolent.
F. Guest Chamber:
This chamber is used to house distinguished guests of the House, often an important client, an honoured merchant, or a visiting noble.
The door to the room can be locked from the inside by a wooden latch, but is usually only locked when occupied.
The walls are decorated with tapestries showing scenes of river barges passing famous Imperial monuments.
Within, a plush feather bed with fine satin sheets rests in the corner, with a footlocker at its feet. The footlocker has a key in its lock that can be used by the guest to lock up valuables.
A wardrobe sits along the north wall, made of pine and carved with edges and borders depicting barges floating on rivers.
A desk and chair sits in the corner opposite the bed. The desk has three unlocked drawers that contain candles, writing equipment, and wax for sealing envelopes.
G. Guest Chamber:
This chamber is used to house distinguished guests of the House, often an important client, an honoured merchant, or a visiting noble.
The door to the room can be locked from the inside by a wooden latch, but is usually only locked when occupied.
The walls are decorated with tapestries showing scenes of river barges passing famous Imperial monuments.
Within, a plush feather bed with fine satin sheets rests in the corner, with a footlocker at its feet. The footlocker has a key in its lock that can be used by the guest to lock up valuables.
A wardrobe sits along the south wall, made of pine and carved with edges and borders depicting barges floating on rivers.
A desk and chair sits in the corner opposite the bed. The desk has three unlocked drawers that contain candles, writing equipment, and wax for sealing envelopes.
H. Male Servants' Quarters:
The servants of the House are not slaves. Some are indentured and others are engaged in gainful employment as such.
The House employs four male servants. They dwell in this small room, which door bears no lock.
Within are two plain bunk beds accommodating four sleepers. Four footlockers are also here, each locked with the key on the person of each servant. These footlockers hold changes of clothing, personal effects, and some accumulated savings in coins.
I. Female Servants' Quarters:
The servants of the House are not slaves. Some are indentured and others are engaged in gainful employment as such.
The House employs four male servants. They dwell in this small room, which door bears no lock.
Within are two plain bunk beds accommodating four sleepers. Four footlockers are also here, each locked with the key on the person of each servant. These footlockers hold changes of clothing, personal effects, and some accumulated savings in coins.
J. Slaves' Quarters:
These are long time trusted house slaves, either the progeny of previous house slaves or purchased from proven docile slave lines. Most of these are female and of Thaneeri descent, though a few evidence mixed heritage and the likely breeding of slave with master. House Riverine treats its slaves well and they respond in kind.
The door to this chamber is barrable from the outside, which is typical for a slave quarters.
Within are three bunk beds with plain linens. As slaves are not allowed personal possessions, there are no footlockers here, though this does not mean that personal effects are not hidden in mattresses. Plain slave shifts hang from the walls on pegs, along with some plain cloaks.
K. Erricose's Quarters:
These rooms are designed for members of House Riverine who are in residence at the House. Usually, these involve nobles, relatives of nobles, or important traders.
The door to this room is locked by a dwarven-made key lock (DC 30), with the owner possessing the key.
This room belongs to Trader Erricose, a member in good standing who serves as the House Accountant. He keeps the inventories and ledgers of the House and manages the budgets and financing as well as paying taxes to the government and levying dues from House members.
A plush feather bed sits to the west, with fine satin linens and a locked footlocker at its foot. The footlocker is locked, with the key on Erricose, and is warded by a trap.
| * Glyph of Warding (Blast): CR 5; spell; spell trigger [anyone who does not utter the phrase "Indolle's Chin"]; no reset; spell effect (glyph of warding [blast], 9th-level cleric, Reflex save [DC 15] half damage, 4D8 sonic); multiple targets (all targets within 5 ft); Search (DC 28); Disable Device (DC 28). |
Note that the glyph, when activated, will cause a resounding BOOM! That will shake the entire House and alert all in the house to the problem.
Within the footlocker are ledgers and inventories and records, all mundane and some false. These are designed to fool thieves.
The footlocker has a false top and bottom (DC 30) cunningly crafted by dwarves. Within these false compartments are the true and valuable ledgers and records and inventories of the House, including inventories of the dock warehouses, trade treaties with the Thaneeri, details of trade with the Vardekii, future plans and schemes against House Mercur, analysis of commodities markets and futures, plans to corner certain markets, etc. all of these documents would be very valuable to another Merchant House.
However, the top document in the false top, which is folded, contains a Sepia Snake Sigil.
| * Sepia Snake Sigil: CR 4; spell; spell trigger; no reset; spell effect (sepia snake sigil, 7th-level wizard, Reflex save [DC 15] negates); Search (DC 28); Disable Device (DC 28). |
The top document in the false bottom, which is unfolded and plainly visible, contains Explosive Runes.
| * Explosive Runes: CR 5; spell; spell trigger; no reset; spell effect (explosive runes; 7th-level wizard, Reflex save only for those within 10 ft of reader [DC 15] half damage, 6D6 fire); multiple targets (all targets within 10 ft); Search (DC 28); Disable Device (DC 28 and triggers with an unsuccessful dispel magic or erase). |
If the runes are read within 10 ft of the footlocker, the explosion will likely destroy the contents of the footlocker.
An armoire to the north is made of pine and decorated with carved whorls and leaf motifs. Within are various outfits ranging from traveller's outfits to courtier outfits.
A desk sits in the corner opposite the bed. Along with candles, ink, and writing tools, the three desk drawers hold paper and envelopes and several blank ledgers.
The bottom drawer has a false bottom (DC 25) that holds a ledger. The ledger is made of 25 pages that are warded by 25 Secret Page spells. The ledger appears to show details of trade between Riverine and Nygoto traders. In actuality, however, it shows the details of several very secret mercantile plans and machinations on the part of both the House here in Dwillingir and on the part of House Riverine as a whole. This information would be extremely valuable to other houses.
L. Lady Alavara's Quarters:
These rooms are designed for members of House Riverine who are in residence at the House. Usually, these involve nobles, relatives of nobles, or important traders.
The door to this room is locked by a key lock, with the owner possessing the key.
This room belongs to Craftslady Alavara Comron, whose father was a respected member of House Riverine. Lady Alavara was given a permanent pension here in honour of her father, and she serves as mistress of the House, charged with supervising the slaves and servants and maintaining the House, ordering supplies, supervising meals, etc. She also arranges social functions and is popular with the elite society of Dwillingir.
The room is bedecked with silk wall hangings and embroidered tapestries, most showing a Morakki motif.
A plush feather bed sits to the west, with fine satin linens and a locked footlocker at its foot. The footlocker is locked, with the key on the Lady's person. Within the footlocker are foldout trays that hold a variety of gems and jewelry (assume 25 gems and 25 jewels ranging from 5 gp to 500 gp each and worth, in total, 5000 gp).
An armoire to the north is made of pine and decorated with carved images of pixies and elves dancing hand-to-hand in a chain. Within are various outfits ranging from traveller's outfits to courtier outfits to a few opulent a bejeweled noble's outfits. A make-up kit sits on a shelf. This is cosmetic make-up and is not usable as a disguise kit.
A desk sits in the corner opposite the bed. Along with candles, ink, and writing tools, the three desk drawers hold paper and envelopes. A silver mirror sits atop the desk, which also serves as a vanity.
In the northeast corner is an ornate silver and copper birdcage on a stand that holds her pet macaw, a bird with fiery red and bright green feathers. The bird will squawk and make a terrible racket should any but the Lady enter the chamber.
M. House Quarters:
These rooms are designed for members of House Riverine who are in residence at the House. Usually, these involve nobles, relatives of nobles, or important traders.
The door to this room is locked by a key lock, with the owner possessing the key.
This room is not occupied, reserved for future House members.
A plush feather bed sits to the west, with fine satin linens and a locked footlocker at its foot. The footlocker is locked, with the key in the lock. The footlocker is empty.
An armoire to the north is made of pine and decorated with carved images of hawks diving. The armoire is empty.
A desk sits in the corner opposite the bed. There are three drawers in the desk, one of which holds ink, a blotter, quills, sand, sheaves of parchment, and several envelopes.
N. Ardman Feruth's Quarters:
These rooms are designed for members of House Riverine who are in residence at the House. Usually, these involve nobles, relatives of nobles, or important traders.
The door to this room is locked by a key lock, with the owner possessing the key.
This room is owned by Ardman Feruth, who is the Master Caravaneer of the House. It is his duty to oversee the formation of caravans, to divine new routes, and to arrange for couriers and messages to be sent from this outpost to others. Although he is a Master Trader, his position is new to the house, and so he still retains his old quarters.
The room is decorated in tapestries that are all accurate maps of the Far Coast and the Imperial Heartland, done in stunningly beautiful detail, with caravan routes embroidered in copper, silver, gold, or platinum thread depending upon their profitability. The tapestries are quite valuable (perhaps 7500 gp for the lot) and are Ardman's prize possessions.
A plush feather bed sits to the west, with fine satin linens and a locked footlocker at its foot. The footlocker is locked, with the key on Ardman. Within are various maps of Therra, including some of Morakki lands, many with notes as to their danger and/or inhabitants and/or resources. There are also some coins and a few gems that the Caravaneer keeps stored here.
An armoire to the north is made of pine and decorated with carved images of wagons being pulled by oxen. The armoire contains a good many traveller's outfits from a variety of regions and cultures, all functional and few very ornate. A single set of fine clothing is here as well, and these show little signs of use.
A desk sits in the corner opposite the bed. There are three drawers in the desk, one of which holds ink, a blotter, quills, sand, sheaves of parchment, and several envelopes. A personal diary is kept in the bottom drawer, and it really contains nothing but some semi-interesting accounts of trade routes blazed by Ardman and the monsters he has fought and the cultures he has dealt with. Next to the diary is a potion of Cure Light Wounds at 1st level.
O. Sauna:
A favoured custom of the Antorians, this spa is composed of wooden steps that lead to a wooden deck some 2 ft above the stone floor. Trap doors in the decking allow hot coals to be placed beneath the decking, providing dry heat. Wooden benches line the walls, and a wooden rack holds towels and linens and shifts. In the centre of the decking is a large iron cauldron that also holds hot coals. Near to it is a wooden barrel of cool water and several wooden ladles, which may be sued to refreshment or to pour onto the coals in the cauldron to create steam.
Males and females who dwell on this floor are allowed to use the sauna, excepting servants and slaves of course. There is no lock on the door.
P. Men's Bath:
The door to this room is latchable from the inside.
This small chamber contains 2 copper tubs, shelves of soaps and unguents, and several racks with towels. Set to one side are several buckets and mops. Males may take a bath here, usually bathed by one of the female slaves.
Q. Women's Bath:
The door to this room is latchable from the inside.
This small chamber contains 2 copper tubs, shelves of soaps, perfumes and unguents, and several racks with towels. Set to one side are several buckets and mops. Females may take a bath here, usually bathed by one of the female slaves.
R. Storage:
This room is unlocked and is full of mundane items used by the House. Shelves reach from the floor to the ceiling, each about 1 ft 6 in deep. Rolling ladders allow access to the topmost shelves. Included here are:
· Blankets
· Candles
· Flint and Steel
· Ink
· Lamps
· Hooded Lanterns
· Small Steel Mirrors
· Oil
· Paper
· Parchment
· Sealing Wax
· Soap
· Chamber Pots
· Hammers and Nails
· Shifts
· Towels and Linens
· Mugs and Flasks
· Sewing Needles and Threads
· Cloaks
· Artisan's Outfits
· Waterskins
S. Water Store:
The door to this room is unlocked.
This room holds water for the sauna and baths as well as for emergencies. There are five large barrels of water here covered by wooden lids. Several empty wooden buckets hang from wooden pegs along the walls.
T. Terripin Antechamber:
This room serves as the antechamber for a suite of rooms belonging to Master Terripin and his family. Master Terripin is a well-regarded trader who is known for blazing new trails and negotiating deals with tough customers, like Thaneeri tribesmen or dour dwarves. His knack for finding his way around or through tough obstacles earned him the nickname "Ever-go". He has now attained the rank of Master Trader and lives here with his wife and two children.
The door to this chamber is locked by a key lock, the key being on the persons of both Master Terripin and his wife. Within a large rug is set upon the floor, decorated with vistas of endless rows of windswept sand dunes and a cloudless blue sky. This rug is surrounded by a plush couch and a sitting chair, both embroidered with Morakki designs. Several oil paintings of desert scenes, including one of a blue-skinned djinni in mid transformation to a whirlwind hang from the walls.
The door to the west leads to the Children's' Room and is unlocked. The door to the north leads to the study and is also unlocked.
U. Children's Room:
This room houses the Terripins' two children. The door leading to the Antechamber is unlocked.
Within is a bunk bed with posts carved into the shapes of smiling djinni and whirlwinds. At the foot of the bed is a large double trunk, with two pullout drawers. These are unlocked and each compartment holds one of the child's personal effects, including reading primers, dolls, charcoal pencils, some costume jewelry and wooden holy symbols to Indolle, etc.
A wardrobe carved with the happy and sad masks of the theatre stands along the south wall, it being divided within into two partitioned sections, each holding clothes for one of the children.
Next to the wardrobe is a child's desk, with writing equipment, paper, and several practice books set upon it.
Along the north wall is a large wooden bin, the toy chest. Within is an amazingly neatly stacked array of toys of all sorts, from dolls to wooden figurines to wicker balls full of dried seeds to small instruments and toy blocks. Interestingly, the toy chest is magical, imbued with a cantrip that causes any toy placed within the chest to always revert to its pre-ordained neatly arranged spot. In addition, the chest can be commanded to retrieve any attuned toys within 10 ft of it by simply clapping one's hands in its presence and yelling "alakazam!"
When so done, a small whirlwind emerges from the chest and whips around the room in a 10 ft radius scooping up attuned toys and putting them into the chest in its pre-ordained spot. A toy is attuned to the chest by being placed in it overnight. Only toys may be so attuned in this manner. Terripin tells his children that a young djinni child is bound to the chest and the child plays with the toys at night when the chest is closed and the children are asleep. The djinni child is so grateful for being able to play with the toys that he casts the magic that cleans them up.
V. Terripin Study:
This small chamber has two doors, one to the northwest that leads to the Terripin Bedroom and is barrable from the other side, and one to the south which has no lock and leads to the Antechamber.
Within this study is an ornate writing desk and chair, both made of rare Morakki woods blended together possibly by magic. The molding of the woodwork suggests lava or flaming liquid of some kind, and the piece is obviously quite valuable and distinct.
The desk has four drawers, but these hold naught but writing equipment, paper, and other mundane items. Atop the desk sits a merchant's scale and a magnifying glass.
Along the east wall is a large shelf unit, stretching from floor to ceiling, with a step stool set at its base. The shelves are covered with books and tomes for the most part, though a few scrolls are rolled up and set thereupon as well.
Most of the works deal with accounts of travel through many lands, some of ancient times and some predating the War of the Gem, others clearly authored during the New Age. Quite a few deal with Terripin's passion, the great Wylag Deserts of the Far East, and some tell tales of exotic sultans and desert sheiks and bargains with djinn of all kinds. Others are accounts of merchants travelling that land, and at least two tomes deal with accounts of the journey the Heroes of the Gem made through the Wylag Desert, including their fight with two blue dragons and their plundering of a long dead sultan's tomb.
W. Terripin Bedroom:
The door to this room is barrable by a wooden latch from this side, and Terripin and his wife usually do so when the room is occupied so as to have privacy from the children.
A plush feather bed, with high wooden posts that support a gossamer canopy dominates the western part of the chamber. Gold leaf butterflies are interwoven into the canopy, giving the effect of a glittering array of butterflies escorting the sleepers to pleasant dreams.
At the foot of the bed is a large metal chest which is locked by a well-made lock (DC 30). The key to the chest is possessed by both Terripin and his wife.
Within are velvet trays filled with various gems and jewelry, all well organized. In fact, these are all fake, glass gems and painted brass jewelry, designed to distract thieves. A false bottom in the chest (DC 25) is warded by a Glyph of Warding, though it is a non-lethal one due to the potential for mishap by the children.
| * Glyph of Warding (Spell): CR 2; spell; spell trigger [anyone who is not Master Terripin or his wife]; no reset; spell effect (glyph of warding [spell], 5th-level cleric, Will save [DC 13] negates, cause fear spell); Search (DC 28); Disable Device (DC 28). |
Within the false bottom are thin trays holding D100 gems and D50 pieces of jewelry.
The gems vary in type and value as Terripin expends them or acquires new ones. DMs may roll on Table 7-5 of the DMG (page 172) to determine the value.
The jewelry is mostly women's, with a few for Terripin himself. The value of each jewel may be determined by rolling D100 divided by 2 and consulting Table 7-6 of the DMG (page 172).
Two wardrobes stand along the south wall. They are each carved to resemble a human figure standing along the outside edge of each and reaching an arm along the top of the wardrobe with a hand reaching in a clasp towards the inside of each. The two wardrobes have then been placed so that the reaching hands clasp each other. The figure on the western wardrobe is that of a handsome man, the one on the eastern wardrobe of a beautiful maiden. The figures identify which wardrobe belongs to which occupant.
The male wardrobe holds an amazing variety of clothes, from functional travelling outfits to rich noble's garments fit for the Imperial Court.
The female wardrobe holds a mirror along one side of its inside, and a small shelf holds cosmetics of all sorts. The rest of the space is taken with many gowns and dresses, most stunningly beautiful and quite expensive. A few travelling shawls and cloaks are present as well, but the whole belies someone who enjoys "putting on the Ritz".
X. Library:
The door to this room is unlocked. Its walls are covered with shelves that span from floor to ceiling. Ladders on wheels are attached to each shelf to allow access to all parts of the shelving.
The shelves are crammed full of tomes, books, manuals, charts, scrolls, etc. None of this is of any sort of magical nature, nor does any of it concern arcane of any sort. A fair number are merely stories, lore, poems, songs, and entertainment. Others are tracts describing histories or old lands. Some are primers for common languages such as Elvish, Dwarvish, and Morakki.
A fair number of maps are here as well, some general overviews of lands and others of specific locations. A few of these date back to ancient times and show various lands before conquest by the Deceiver.
In addition to the shelves, a sturdy wooden table and two functional wooden chairs sit in the centre of the room. The braziers herein are screened, and a single oil lamp hangs from the ceiling, but it has mirrors built into it that magnify and throw the light to the shelves and down onto the table.
Y. Neringel's Living Room:
Neringel is a canny trader who bears the rank of Trader of the House. He has earned his suite by dint of negotiating trade with various Thaneeri clans, including the Vardekii, and he is now trying to arrange for a direct trade route to the Ice People. He plans, soon, to conduct an initial mission to the Far North to establish contact and see if the Ice People would be willing to trade directly with Imperials.
The door to this chamber is locked, whether Neringel is present or not, and is openable by a key lock which key is in Neringel's possession. The door to the Bedroom is usually unlocked but can be latched from the inside.
Within two large couches instantly call to the eye, for they are covered in plush winter wolf furs with the heads forming the arms of each couch. A low wooden table sits before the couches, atop a massive polar bear fur rug splayed out with the face growling towards the door to Neringel's Bedroom.
Set upon the table are several books dealing with Queequeg's exploits and the Ice People borrowed from the Library, as well as some charts or maps of the area from Dwillingir and northern far Coast to the lands of the Ice People. Various proposed routes and notations of obstacles have been annotated on the maps by Neringel. A pen and quill set sit nearby.
Z. Neringel's Bedroom:
The door to this room is wooden, with a latch on this side to ensure privacy.
Within is a large high bed covered in winter wolf furs. At its foot is a large chest that is locked with a cunningly wrought lock (DC 30). Near the bed is a plain armoire that holds quite a few sets of clothing, most rugged and a great many suited for cold weather.
Within the chest are personal effects, mostly various trophies taken from journeys to the Thaneeri lands, including tusks, carved ivory, a few pieces of semi-precious Thaneeri jewelry, and a copper armband with Thaneeri runes that evidence the trade of the slave woman Ghani of the Coromos Clan to Neringel in exchange for 10 oxen. A pouch set in the chest holds 45 pp, 160 gp, and 34 sp. A small wooden box holds 4 potions of Endure Elements at 1st level.
AA. Hallway:
This small hallway allows access to two suites. The hallway is lit with oil lamps set into small crèches in the walls. At the end of the hall is the stuffed head of a remorhaz, leering fiercely down the hallway and likely to give the unwary an initial fright. This oddity was purchased by Neringel and set here.
The door to the Long Hallway is unlocked. The two flanking doorways to the suites are wooden and are set with key locks, which keys are in the possession of their owners and are usually locked.
AB. Lady Emith's Living Room:
Lady Emith serves as the official House ambassadress to the Imperator of the Perastor of Dwillingir and as liaison to the Lord Mayor of the town. She is well versed in the social graces and often competes with Lady Terripin in matters such as social climbing, expensive gowns and jewelry, and other feminine issues.
The door to this room from the Hallway is wooden and locked with a key lock, with the key being on the person of Lady Emith. The door to the Lady's Bedroom is wooden and bears no lock but may be latched from the other side for privacy.
The room is designed to entertain in, and Lady Emith does hold soirees here from time to time. An expensive crystal chandelier hangs from the ceiling over a very expensive Gerilong rug showing scenes of coastal fishing on the Oto Sea.
The walls are decorated with small tapestries showing various rural scenes as well as oil paintings of both soldiers and farmers.
A massive couch sits along the south wall, long enough to hold 6 persons comfortably, while a smaller love seat sits along the east wall. Both of these pieces are antique woods carved in a style that dates at least 100 years before the New Age, though the upholstery is clearly new and made of fine weave.
Shelves in the northwest corner hold various bottles of wine and liquor as well as glasses with fluted stems. Several censors hang from chains in the room's corners, with blocks of expensive and mildly intoxicating incense set within them.
AC. Lady Emith's Bedroom:
The door to this chamber is wooden, with no lock, but a wooden latch can be closed from this side to ensure privacy.
Within is a large bed with black satin coverings. A four-post canopy of black lace rises above the bed, its curtains falling to the floor around it.
At the foot of the bed is a large wooden trunk with iron reinforcements. The trunk is locked, with the key on the Lady's person.
Next to the bed is an ornate wardrobe carved with cherubs shooting heart-shaped bows at lovely nude ladies. Within are a variety of expensive gowns and lady's clothing, some of it with golden threading or precious stones.
To the north sits a large desk and chair. The desk holds large amounts of paper and envelopes, illustrating the Lady's proclivity to correspond with friends, contacts, and acquaintances.
The trunk holds many trays and pegs filled with jewelry of all kinds, from combs and mirrors to bracelets and earrings and anklets. At least 250 pieces are here, worth from 10 gp to 1000 gp each (more of the former than the latter to be sure). Also, at the bottom of the trunk, are reams of letters from dignitaries and suitors, many quite explicit. Whether Lady Emith retains these for fond remembrance or latter blackmail is known only to her.
AD. Veribor's Chamber:
Veribor is the head of security and spymaster for House Riverine in Dwillingir. He holds the post of House Enforcer. It is his job to learn of rival House schemes, to find and remove or turn rival agents or informers, to gain incriminating evidence on local officials for later House use, to run background checks on House members, etc.
The door to this chamber from the Long Hallway is locked by a very complex dwarven-made lock (DC 35). In addition, it is warded by a poison needle trap.
| * Poisoned Needle Trap: CR 4; mechanical; touch trigger; repair reset; lock bypass (Open Lock [DC 30]); Atk +17 melee (1 plus poison, needle); poison (eyeblast, Fortitude save [DC 22] blindness); Search (DC 22); Disable Device (DC 20). |
The door to Veribor's Bedroom is reinforced wood and is also warded by a cunningly made dwarven lock (DC 35). This, too, has a poisoned needle trap.
| * Poisoned Needle Trap: CR 4; mechanical; touch trigger; repair reset; lock bypass (Open Lock [DC 30]); Atk +17 melee (1 plus poison, needle); poison (eyeblast, Fortitude save [DC 22] blindness); Search (DC 22); Disable Device (DC 20). |
The key to both of these locks is on Veribor's person.
Within the chamber is a large, plain wooden table and four wooden chairs, obviously a conference chamber of some sort. On the table, at its very centre, is a small (2 ft tall) silver statuette of a maiden holding aloft a pearl in both hands. This pearl is enchanted and emanates a soft pink glow.
|
* Pearl of Privacy: This pearl continually radiates a Detect Scrying spell. Caster Level: 7th, Prerequisites: Craft Wondrous Item, Detect Scrying, Market Price: 11000 gp. |
AE. Veribor's Bedroom:
The door to this chamber from Veribor's Chamber is locked and trapped. Refer to the text of Veribor's Chamber for details. The door to the north is wood and unlocked.
Within is an amazingly plain room. A full-length mirror stands along the western portion of the north wall, and a shelf next to it holds four disguise kits. A bed rests in the corner, with plain white sheets and it is always trimmed and made when not in use. Next to the bed is an iron chest with three locks on its face.
The entire chest is a trap designed to foil rival spies and thieves. Each "lock" is well made (DC 30) but false and the chest has no way to actually open (an Open Locks check that exceeds the DC by 5 or more will reveal this). The chest is actually iron, with a 1 inch space behind the iron to sound somewhat hollow if tapped, and past the space is a block of lead. The entire thing weighs over 500 pounds!
Each lock is trapped by a single trap. If any Open Locks attempt fails or if all three locks are "opened", the trap will spring.
| * Burnt Othur Fumes Vapour Trap: CR 9; mechanical; touch trigger; repair reset; gas; never-miss; onset delay 91 round); poison (burnt othur fumes, Fortitude save [DC 18] resists, 1 Con [permanent]/3D6 Con); multiple targets (all targets in the 10 ft by 10 ft room); Search (DC 25); Disable Device (DC 20). |
Veribor's real treasure is located inside his bed accessed by a well-concealed slit in the middle of the bottom of the bed (Search DC 25 if the bed is flipped over or viewed from below). Within is a lead-lined wooden box measuring some 2 ft long by 1 ft wide by 1 ft tall. The box has a combination lock with four tumblers, each numbered 0-9. The combination is 5-6-3-9. A successful Open Locks check (DC 30) can crack the combination. However, once the lock is opened, but before the lid is raised, the combination must then be turned to 5-6-3-0 or a dart trap will fire out at the opener.
| * Poisoned Dart Trap: CR 2; mechanical; touch trigger; manual reset, Atk +8 ranged (1D4 plus poison, dart); poison (blue whinnis, Fortitude save [DC 14] resists, 1 Con/unconsciousness); Search (DC 22); Disable Device (DC 17). |
Within the box, one half holds various secret spy documents. These detail privileged backgrounds and security checks on various House members (including possibly the PCs), names and contact information for Riverine spies in other Households, reports on potential rival House sympathizers within Riverine, secret communiqués from the House Assassins in the Heartland, etc.
The other half holds 24 crystal vials, each etched with Veribor's personal runes identifying the contents. These vials hold:
4 potions of Detect Thoughts at 3rd level
6 doses of blue whinnis (Fortitude save [DC 14] resists, 1 Con/Unconsciousness)
2 doses of othur powder (which needs to be burnt and the fumes collected to be useful) (Fortitude save [DC 18] resists, 1 Con [permanent]/3D6 Con)
3 potions of Disguise Self at 2nd level
4 doses of poison antidote (give a +4 to Fortitude saves against poisons for 5 minutes)
2 potions of Spider Climb at 3rd level
3 vials of dark reaver powder (Fortitude save [DC 18] resists, 2D6 Con/1D6 Con + 1D6 Str)
The headboard of the bed can flip out when a catch is released (DC 25) which forms a desk. Within are compartments for quills, inks, and paper. In addition, there are two vials of invisible ink, two vials of invisible ink revealer, a codebook with keys for several House codes and pages of false codes, and a masterwork dagger.
AF. Spy Room:
The door to this small room from Veribor's Bedroom is wooden and unlocked. This small room contains only a small stool, a notation book and charcoal pencil, and a secret observation slit that looks down into the Grand Foyer. The acoustics of the Foyer also allow even whispers to be carried up to this room.
Refer to the description of the Grand Foyer for DCs to detect the slit. Barnabus often keeps guests waiting here while Veribor eavesdrops on conversations.
THIRD LEVEL
This level houses the upper echelon of the House Membership.
A. Statuesque Chamber:
All of the doors leading from this chamber are wood. Refer to the individual room descriptions for further description regarding the doors and their locks or lack thereof.
This large chamber is done entirely in white marble flecked through with silver and golden veins. The ceiling is vaulted into three domes that line up over a central planter of marble some 4 ft high. The apex of the three domes over the planter bears a large crystal lens that diffuses sunlight from the roof skylight to the plants here.
This planter is filled with dirt and plants, mainly ferns and small palms, with some colourful flowers dotting here and there. Sprouting from the planter are five statues. These are the work of a famous New Age sculptor popular in the Empire and display:
· A woman swaddling and
suckling a baby
· A legionnaire thrusting with a gladius
· A large worm swallowing a ship whole
· An elven maiden shooting an arrow with a gem for its
tip
· A hoplite skewering a marilith with a flaming spear
Several plush couches are set against the walls, and to the south is a marble platform that can double as a stage for performers, orators, or musicians.
This room is the sight of grand House parties, when the couches are cleared away and music is played from the stage and sometimes from the organ in the Organ Hallway.
B. Monstrous Hallway:
The door at the far end of this hallway is wooden and locked with a key lock, with the key in the possession of the owner. The door is usually locked.
This wide hallway is bedecked with very large, well-rendered oil paintings of horrific monsters.
There are ten such paintings:
· A beholder drooling as
it levitates over a field of bones
· A green dragon wrapped around a roc and breathing gas
into the bird's face
· A remorhaz with glowing glands bursting up through a
snow bank
· Several ettercaps enmeshing something humanoid in webbing
and beginning to suck its blood
· A cleric of Indolle turning ghouls emerging from fresh
grave earth
· Thaneeri barbarians with too-large axes fighting slavering
yetis, with one yeti in the act of pulling a barbarian's arm out
of its socket in a spray of blood
· A painting of a mind flayer with 5 tentacles and 5 fingers
against a mauve background
· A flying manticore flinging spikes through several archers
on a curtain wall
· A balor in a stone chamber chopping the head off of a
priest with a lightning bladed sword
· A cockatrice whose whip tail is touching a fleeing woman
whose upper half is stone
C. Harimus Aluvium's Chamber:
Harimus is a noble from the Heartland and a high-ranking member of House Riverine, with the title of Master Trader. However, he is more a politician than merchant and is effectively the representative of the House Master of the entire Riverine House. The Current House Master makes certain that he has a loyal person headquartered at every important outpost, designated to report to the Master directly from time to time. Thus, although Harimus owes technical allegiance to Barnabus, he really is here to observe the outpost and report to the House Master.
Barnabus is well aware of Harimus' allegiance, but does not begrudge him his duties and Harimus is discrete enough not to report every little indiscretion to his superiors. Harimus' noble heritage also allows him to move in erudite circles and rub elbows with the Imperial hierarchy in Dwillingir, which can work to Barnabus' advantage.
The door to this room is a wooden one with a key lock, the key being on Harimus' person and one on the person of his trusted consort.
The door to the Private Chamber is wooden and can be secured with a metal latch for privacy from the other side.
The room itself is well furnished with expensive items. Two couches sit against the walls, these being velvet with gold embroidery in the shape of falling leaves. A small table stands between them in the corner, and set upon it is a hookah with 6 nozzles clipped to it. A box nearby holds several mildly intoxicating and several mildly aphrodisiac herbs for the hookah.
Flanking the entryway door are two statues of constrictor snakes winding their way up a stone tree branch. Each snake has rubies for eyes (worth 500 gp per eye). Next to the Private Chamber door is a finely woven tapestry hanging from a snake shaped rod that portrays a warrior battling a many-headed hydra.
In the middle of the chamber is a large rug imported from Onlor and woven with bucolic scenes with little halflings engaged in agricultural activities.
D. Harimus' Private Chamber:
Both of the doors leading into this room are wooden and securable by a metal latch for privacy. The western door latches from this side, while the eastern door latches from the other side.
This chamber is where the Harimus and his consort dine, and Harimus frequently has guests over to dine with him. In fact, it is considered something of a rite of passage for a member of the House to be invited to dine with Harimus.
The room is dominated by an ornately carved wooden dining table, which legs are fashioned to represent dwarves swinging pickaxes and wielding shovels. Six similarly carved chairs flank the table. Hovering over the table is a candle wheel secured by chains. The wheel is made of copper and fashioned like a ship's wheel. A dozen golden holders hold a dozen candles. Six ornate place settings with silverware, porcelain dishes, and crystal goblets are set at each sitting.
Three statues stand in three corners of the room. These are of elderly men in togas holding batons and wearing laurel wreaths and are long-dead elders of the noble line of Aluvium.
The Aluvium servant sleeps on a pallet underneath the table, along with a small sack holding her personal belongings.
E. Harimus' Bedroom:
The door to this room is wooden and securable from this side by a metal latch.
Within is a double bed bedecked in satin sheets displaying the emblem of the Aluviums. Along the south wall is a silver mirror bordered by gold figures of snakes entwined around leafy branches.
Flanking the bed are two wardrobes. Each is carved with serpentine figures swirling across the front face of each door. The southern wardrobe holds the clothing and outfits of Harimus. There are a few travelling outfits and a great many noble outfits of varying cost, including a few fabulously expensive outfits.
The northern wardrobe contains the consort's outfits, including some travelling outfits, a few noble outfits, and a good many sexy, revealing outfits.
In the northwest corner sits a fine desk and chair. The desk contains writing equipment, sealing wax, and some correspondences between Harimus and the House Master as well as some half-written reports of recent events affecting the Riverine outpost in Dwillingir.
In the southwest corner of the room is a large cage with thick iron bars and a door with a metal latch. Within is coiled a large constrictor snake. A tree branch has been set vertically within the cage and the snake is usually wrapped around it. A nearby smaller cage holds rats and frogs to feed to the snake. The snake is tame only to the touch of Harimus, who can handle it, but it will bite and attack anyone else if Harimus is not holding it.
|
* Constrictor Snake: CR 2; Medium-sized animal; HD 3D8+3; hp 19; Init +3; Spd 20 ft, climb 20 ft, swim 20 ft; AC 15 (touch 13, flat-footed 12); Atk +5 melee (1D3+4, bite); SA improved grab, constrict 1D3+4; SQ scent; AL N; SV Fort +4, Ref +6, Will +2; Str 17, Dex 17, Con 13, Int 1, Wis 12, Cha 2. Length 6 ft. Skills and Feats: Balance +11, Climb +14, Hide +11, Listen +9. Spot +9. Special Attacks: Improved Grab (Ex): If the snake succeeds with a bite attack it can constrict. Constrict (Ex): deals constriction damage with a successful grapple check against medium-sized or smaller creatures. Special Qualities: Scent (Ex): Detect opponents by smell 30 ft away, 60 ft if opponent is upwind and 15 ft if downwind. May track by scent using Wisdom checks. |
F. Organ Hallway:
The double doors leading into this hallway from the Statuesque Chamber are wooden, inset with golden musical notes. They are not locked.
The two flanking doors are of wood and both have key locks with the keys in the possession of the owners. The southern door has a musical chime attached to it (refer to Balimus' Antechamber for details).
At the end of the hallway is a large wooden organ, with reed pipes sticking up against the far wall. There is no seat, only two rows of keys and many foot stops. Balimus knows how to play the thing and often does when parties are held in the Statuesque Chamber or to annoy Hammunil.
G. Balimus' Antechamber:
Balimus Harmonium is another high-ranking member of the House, with the title of Master Crafter. He is an expert crafter of instruments and a passing good musician, though he only plays songs authored by others and cannot sing very well at all. His family specializes in instrument crafting and has done so for centuries, and Harmonium instruments are demanded throughout the Imperium and the rest of the West.
The door to this room from the Organ Hallway is wooden and locked with a key lock, the key for which is in the possession of Master Balimus. The lock is not trapped per se, but whenever the key is turned (or if the lock is successfully picked) a small musical chime rings out. This is a mechanical function and can be Searched for (DC 25) and Disabled (DC 20).
The door to the east is wooden and can be latched from the other side for privacy, though it is rarely so engaged.
Within the chamber, along the west wall is a large table that bears a wooden instrument rack that displays several fine instruments. All are masterworks and though values are given, these instruments are not for sale:
· A fiddle with mother-of-pearl
inlays (2000 gp)
· A psaltery of ebony with golden trim (450 gp)
· A shawm with the design of a coiled wyrm snaking down
its length in inlaid silver (500 gp)
· An oak lute with pearl crossbar and a polished turtle
shell body (250 gp)
· A lap-harp made of bronzewood studded with flecks of
silver and inset with ten deep blue topaz (780 gp)
· A silver flute carved to resemble a tree branch with
leaves serving as its stops (375 gp)
Two chairs sit next to the display table, while a plush couch that shows some signs of wear and tear stands against the south wall.
In the southwest corner between the couch and the table is a beautifully rendered statue of Ringkol, Goddess of Music. She is swirling in a graceful dance and robes licked with flames swirl in her wake. In her hands she holds a real harp, crafted of spruce and oak and carved to resemble dancing maidens along both sides. A close look shows that each dancing maiden carries a harp and each of those harps seems to have barely distinguishable dancing maidens carved on them. The detail is painstaking and awesome. The harp is a masterwork and can be easily removed from the statue's grasp and played. It is the treasure of Balimus and worth at least 15000 gp, though it is so distinct that selling it would be difficult.
H. Balimus' Workroom:
Here is where Balimus crafts his amazing instruments. Both doors in this chamber are wooden and each is latchable by a wooden latch. The door to the west latches from this side, while the door to the east latches from the other side. The eastern door is usually latched shut when Balimus is sleeping or entertaining an overnight guest.
The floor of the room is usually cluttered with sawdust and scraps of wood, bits of string, and other cast-offs of the instrument-making process.
To the north is a large worktable with a single chair. Various instruments of all sorts are in various states of assembly or disassembly or repair at all times.
To the south are wooden shelves holding spare parts, pieces of wood, and a bewildering variety of tools, many of them masterworks in their own right and some of them sheathed in leather casings as their unique designs are Harmonium family secrets.
I. Balimus' Bedroom:
The wooden door to this room may be secured by a wooden latch on this side of it.
Within is Balimus' bedchamber, consisting of a feather bed with satin sheets with musical notes embroidered upon them. Next to the bed is an armoire carved with tritons blowing conch horns from curling waves. Within are outfits, most of them urbane in design and of the best material.
In the southeast corner of the room is a writing desk and chair, the desk containing writing equipment and parchment as well as personal effects.
At the foot of the bed is a chest with a key lock, its key in Balimus' possession. It contains some personal items, several songbooks, and notes for future designs of instruments and materials needed. Also here is the start of a book being written by Balimus himself on instruments of non-human species. The book seems to intend to survey some rather dangerous species, such as orcs and ogres, but as of now the work is barely started. Several tied sacks hold Balimus' funds including 250 cp, 130 sp, 475 gp, and 37 pp.
J. Taymurris' Hall:
This grand hall serves to show off some of Taymurris' works. The hall is of marble flooring, veined with black onyx, as are the walls. To the north is a single door at the far end of the hall and a massive mural.
The door is wooden and locked with a key lock which keys are in the possession of Taymurris and his wife.
The mural is an astonishingly good rendering of the final assault on Mordasht by the armies of the Free Folk at the end of the last age. The scene shows a blood-red twilight sky. Looming in the background is mighty Mordasht itself, all of iron and wicked stone spires. In the foreground, at the crest of a slope, Jerrgobe the White holds a blazing staff and is flanked by Sir Gangerholt of Beregos wielding his Holy Avenger and Sir Cromwell wielding his glowing bastard sword. Behind them, solars and aasimons and elves and dwarves and human soldiers advance in a never-ending column up the slope. These are faced by giants and demons locked in combat with the lead trio and a never-ending horde of malefic monsters charging down the slope behind the lead evil warriors. In the air, dragons of metal war with dragons of colour and, high above, Bahamut himself wrestles with Tiamat.
The painting is stunning in its breadth and scope but also in its painstaking detail, the kind of painting where one could gaze at it for hours and find new minute details to admire.
The painting is signed with a flourishing "Taymurris the Great".
Along the opposite wall are eight sculptures set upon marble pedestals. All bear metal plaques telling their name and signed "Taymurris the Great". The statues are incredibly well done and life-like, if not life-sized.
· A statue of a dwarven
miner swinging a pickaxe into a stalagmite entitled The Miner.
· A statue of a beautiful nude woman bathing in a waterfall
entitled The Fossergrim's Paramour.
· A statue of a dragon baby popping out of an egg entitled
The Broodling.
· A statue of a wave breaking on the rocks entitled Wave
Study.
· A statue of flames licking up an ornate totem pole or
column of some sort entitled The Burning Cuinilot.
· A statue of a mind flayer sucking the brains out of a
horrified human entitled Khenni's Sacrifice.
· A statue of a nude man and woman in the throes of entwined
passion entitled The Reverie of Mustiglior.
· A statue of a furry rhinoceros with spears stuck in its
hide and frothing at the mouth entitled Ice Land Fury.
K. Taymurris' Common Room:
The door to the south is wooden and locked with a key lock. The keys are in the possession of Taymurris and his wife.
The door to the northeast is wooden and unlocked.
Within is the common chamber of the artist Taymurris and his wife and child. Taymurris is a renowned artist, creating on canvas and with stone, and he has attained the rank of Master Craftsman within House Riverine. He and his family moved here recently in order for Taymurris to be inspired by life on the frontier.
The room contains a plush divan set along the north wall under a fresco of a vineyard being worked by slaves in togas. South of the divan is a low wooden table and next to that a plush comfortable chair.
There are five statues in the room, all resting on the floor on small bases. From the southwest and proceeding clockwise, these are:
· A maiden in a toga with
an urn with liquid pouring out
· A bearded hunter with bow in one hand and a brace of
rabbits in the other
· A robed merchant holding a sack of coins in one hand
and gesturing at something with his other
· A bearded wizard in the midst of a great wind casting
some mighty spell
· An oak tree with detailed leaves and small animals nesting
within its boughs
In the southeast hangs an oil painting framed in an elaborate silver frame. The painting shows a pillared temple set on a sea cliff. It is a beautiful sunset but on the sparkling waters an invasion fleet sails towards the land.
L. Taymurris' Workshop:
All three doors in this room are wooden, with the door to the northeast having a wooden latch on the other side for privacy.
This is where Taymurris creates his masterpieces. Two long wooden worktables flank the room. These have innumerable craft items upon them, including tools for building and carving frames, paints of all kinds, thinners, a bewildering array of brushes, rolls of canvas, easels, palettes, hammers, chisels, charcoal pencils and rolls of parchments, rulers, levels, bevels, etc. Scraps of stone dot the floor and much of the room is paint spattered. Half finished blocks of stone are here, as well as some untouched rectangular blocks awaiting rendition.
M. Taymurris' Bedroom:
The door to this room is wooden with a wooden latch on this side to allow privacy.
Within is a plain double feathered bed with linen sheets. A wardrobe sits nearby, it of plain pine and holding half male garments and half female garments, mostly work clothes for him and fashionable but not ostentatious clothing for her.
Flanking the bed are two chests. The northern chest belongs to Taymurris and the southern to his wife. Each has a key to his or her own chest.
Within Taymurris' chest are sketches in charcoal pencil of future paintings or statues, secret recipes for his paints, and a pouch holding 64 cp, 27 sp, 110 gp, and 34 pp.
Within the wife's chest are a dozen pieces of women's jewelry worth 4D20 gp each, a pouch holding 24 pearls worth 100 gp each, and a rolled up painting of the wife, younger and nude with the following written on the back:
| To the fair Dulcinia, a goddess of beauty and my one-day bride…Taymurris. |
N. Nursery:
The door to this room is wooden with no lock. Within is the nursery for the Taymurris' only child, a male babe of two years. The babe is attended by a nanny.
There are two beds in the room, both along the east wall. The northernmost is an actual bed
O. Hammunil's Parlor:
Hammunil was a veteran soldier who fought against the Thaneeri whenever the legions were called to quell an uprising or to launch punitive actions against the barbarians. As he grew older, Hammunil retired with a grant of land near Far Dereth which he still holds and which is run by his sons and daughters. Hammunil, however, was still eager for adventure and as he was intimate with the ways of the Thaneeri, he engaged in slave trade as a broker.
Over the course of many years he made a good deal of money, and he still presides over the regular slave markets held in Dwillingir. He has also fallen into worship of Asmodeus, one of the Deceiver's Maugs who is now in Slumber.
The door to this parlor from the south is made of wood and warded by a key lock, with the key on the person of Hammunil.
The door to the northeast is wood and is latchable from the other side with a wooden latch.
Within the chamber, a long aqua carpet runs the length from north to south, this having pearls embroidered into it and bits of shells and woven with scenes of tritons copulating with beautiful mermaids.
Two plush divans flank the carpet, while at the northern end is a low table and two plush chairs. The ceiling is done in a mosaic of polished and semi-precious stones with a scene depicting sea elves battling sahuagin.
P. Hammunil's Bedroom:
The doors leading from this room are all wooden. The door to the west, leading to the Parlor, is latchable from this side with a wooden latch. The door to the southwest leads to the Slave Quarters, and it is lockable from this side with a metal latch. These doors are usually locked when Hammunil is present.
The door to the southeast leads to the Recreation Room. This door is locked with a well-made key lock (DC 35), which key is on Hammunil's person.
The room contains a large plush feather bed with fine satin sheets of dark purple and black. A canopy covers the bed, hanging from its high posts, and black veils descend to the floor, providing privacy if desired.
Two chests sit at the foot of the bed, both locked (DC 25) with the keys on Hammunil's person.
Next to the bed is an elaborate armoire carved with scenes of sea serpents entwining or eating ships. Some of the serpents are done in turquoise or aqua. Within are a variety of outfits, most well to do courtier or noble outfits and a few well-made traveller's outfits.
Along the north wall is a shelf unit of wood holding a variety of mementos and trophies from bygone years. These include Thaneeri battle axes, copper bracers of Thaneeri design, a trio of skulls, a wooden shield with a boss with the fading painting of a rearing cave bear upon it, various pieces of Thaneeri jewelry (a dozen such pieces valued at 10-100 gp each), and a stuffed wolf cub.
Under the bed, on the north side, are brackets holding a light crossbow that is loaded with a bolt and ready to fire. A case is bracketed next to it holding 19 more bolts and a dagger is sheathed to the outside of the case.
The two chests hold records and pedigrees of slaves, including many that have long since been sold or died off. Were someone to very closely investigate these pedigrees, it would become apparent that Hammunil's claims that these slaves were birthed from other slaves are often wrong. In addition, some of the records indicate that slaves formerly owned by Hammunil were sold to persons, but in reality these slaves were never sold to such persons (usually distant folk or folk passing through). These slaves were actually sacrificed to Asmodeus by Hammunil or his master.
In addition to the records are bills of sales and letters of credit from various worthies who have purchased slaves.
Each chest also holds sacks containing some of the wealth of Hammunil.
Chest #1 contains 540 cp, 239 sp, 460 gp, and 100 pp.
Chest #2 contains 160 cp, 345 sp, 930 gp, and 27 pp.
Finally, chest #1 contains a secret bottom (search DC 30) that contains an unholy symbol to Asmodeus, a satin robe of red with darker red bloodstains upon it and a symbol of a claw gripping a ruby-tipped rod amidst an inverted pentagram, and a curved knife consecrated to Asmodeus (it radiates a faint evil aura) and set with a large (5000 gp) ruby in its pommel. The ruby holds a very minor spirit of a devil within it and, when the knife is used to draw blood, the ruby laughs with a faint laugh.
Q. Slaves' Quarters:
The door to this room is wooden and barrable from the other side by a metal latch, and when slaves are present Hammunil keeps the door latched.
Within dwells Hammunil's current slaves, usually beautiful young Thaneeri maidens.
The room contains only two plain beds with linen coverings. Several changes of clothes are folded up at the foot of the beds.
R. Recreation Room:
The door to this room is wooden with a cunningly made key lock (DC 35) wh8ch key is on Hammunil's person.
Here is, ostensibly, Hammunil's playroom, where he conducts his dalliances with his beautiful slave girls. The room certainly bears this out.
In the center of the room, a wooden frame 3 ft tall has been attached to the floor in a square. Within are hundreds of pillows of various sizes and shapes and colours, forming a massive area to "play" in.
Along the south wall to the west is a rack holding a leather whip, manacles, leather hoods, and other devices of sexual bondage. None of these are particularly sinister looking, even the whip is small and soft with tassels instead of leather tips. A rope ties to one end of the rack. This rope rises to a hook in the center of the ceiling and ends in two leather cuffs. Clearly, a lover can have her wrists shackled and then the rope pulled up so that she is held captive to her paramour's whims. Two ankle cuffs on long adjustable straps attached to the floor allow for the feet to also be restrained and the captive to be held spread-eagled if desired.
Along the north wall, to the west, are shelves full of unguents and exotic skin oils and lotions. In addition there are boxes of rare aphrodisiacs and several blocks of rare incense, both intoxicating and aphrodisiac, near to a metal incense burner. Also on the shelves are a water pipe with four stems and several pouches of baccaran and mordayn vapour.
| * Baccaran (drug [mild hallucinogenic]): ingested DC 14, low addiction, initial effect: 1D4 Strength damage, secondary effect: 1D4+1 enhancement bonus to Wisdom for 1D10+15 minutes, side effects: -4 circumstance penalty against illusions for 2D4 hours, overdose: more than 1 dose in a 24 hour period causes 2D6 damage and the side effect is doubled. |
| * Mordayn Vapour (drug): inhaled DC 17, high addiction, initial effect: exotic visions of beauty for D20+10 minutes during which the user has a 50% chance to lose any action attempted, secondary effect: 1D4 constitution damage and 1D4 Wisdom damage, side effects: when the dose wears off the user must succeed a Will save (DC 17) or be compulsed for 1D4 hours to repeat the dose, overdose: two doses in the space of an hour is a deadly poison (ingested DC 17, 1D10 Con/1D10 Con). |
To the southeast is a stone block about 3 ft tall by 2 ft wide by 5 ft long. The block is carved with figures of nude sea nymphs seducing human sailors and dragging them into the blissful depths. On the wall above the block is a tapestry of an orgy in what appears to be a temple of Mustiglior.
There is a secret catch on the stone block (Search DC 35) that, if worked, causes the stone block's front and back faces to pivot inside out, exposing new carvings of baatezu of all sorts performing perverted and lewd acts upon helpless females, young and old. Meanwhile, the top of the block also pivots, revealing a human-sized indentation that is red with the rust colour of old bloodstains.
The tapestry can be turned around, revealing a stunning weave of Asmodeus himself holding his ruby wand in one hand and a skull in the other.
S. Agonnus' Salon:
The door to this room is wooden and locked by a key lock (DC 25), the key being in the possession of Agonnus Filial, a master furrier of House Riverine. Agonnus is a big bear of a man who dresses in expensive fur clothing and a fur cape. He is very outgoing and jovial and loves to give people big bear hugs and talks and laughs loudly.
The two doors to the east are both wooden and unlocked, though the door leading to the bedroom can be barred from the bedroom side for privacy.
There are rumours that Agonnus is actually a werebear, some of these claim he was born a lycanthrope, others that he was bitten by a werebear in his early wandering days. Agonnus himself just laughs at such suggestions. He is fond of strong drink, though he rarely is intoxicated, and loves a good jest as long as it is at no one's great expense.
This room is his salon, and stands as a showcase for his craft. A huge fur rug is splayed out along the floor of the room, and it is from a massive chimera, as evidenced by the three heads. A great rent is sliced down the spine of the beast's pelt, and that is where Agonnus, clutching the back of the great beast, slashed and slew it.
A fur couch rests along the south wall, made of polar bear, though it is now a dingy grayish white in colour.
Along the north wall are two stuffed beasts, a rearing manticore stands in the northwest corner, and it seems to be about to leap upon a stuffed dire elk right next to it. Both of these are very lifelike and are excellent examples of the taxidermist's art.
The walls are covered with pelts of various sorts, including beaver, mink, wolf, bear, etc.
T. Fur Room:
This small room's wooden door has no lock. Within Agonnus stores his furs and pelts. These are generally in tied bundles, though a table in the centre of the room holds loose pelts.
Also on the table are various tools of the trade, including shears, needles and thread, combs and fur brushes, various skinning knives, etc.
The usual combined value of the furs in the storeroom is 5D10x100 gp.
U. Agonnus' Bedroom:
The wooden door to this room bears no lock, but is barrable from this side to give Agonnus privacy. Within is a plush feather bed with fine fur coverings, a wooden wardrobe of plain design holding various clothing sized for a large man, much of it fur and some of it quite expensive.
A table and a couple of wooden chairs sit in the southeastern corner of the room, and on the table is a ledger showing various fur trades, as well as writing equipment and an oil lamp.
At the foot of the bed is a sturdy iron chest. This chest is locked (DC 30) with the key in Agonnus' possession. Within is a folded up pelt that seems to glisten in the ambient light. This is the fur of a lammasu, and Agonnus is intending to make something very special out of it once he gets an inspiration.
Also within the chest are several pouches holding 500 cp, 410 sp, 600 gp, and 45 pp.
Finally, rolled up in fur rags, are three potions of Cure Moderate Wounds at 3rd level.
FOURTH LEVEL

This level houses Barnabus, Abrinda, and their two servants, Wallicia and Thullis. It is also where Barnabus entertains and houses the most important of guests, usually those who outrank him within the House or extremely important Imperial guests.
A. Skylight Chamber:
This chamber is dominated by a crystalline skylight set into the roof which is designed to focus sunlight into a curtain of prismatic light that then strikes a prism set into the floor. This light then emerges into the Statuesque Room of the 3rd level.
The location of the skylight on the roof and the crystal on the floor coincide with the long hash-marked rectangle indicated on the map.
A set of stone stairs rises from the 3rd level into this room, and five strong wooden doors allow egress from the chamber. Refer to their individual descriptions to determine which, if any, are locked.
The secret door to the south, leading to the Escape Passageway, is well constructed, requiring a Search check (DC 30 to find and another search check (DC 30) to locate the hidden switch that opens the door from this side.
A great many-layered curtain of Gerilongi silk hangs to the northwest, being made of layers of diaphanous pinks, oranges, and lavenders that tend to sway in the ambient air currents.
A great Morakki rug, made from fine Gerilongi silk and displaying an amazing northern landscape of majestic, snow-covered peaks glistening in a brilliant dawn sunrise, dominates most of the floor to the northwest, and there are two plush, expensively designed divans set against the northern wall.
Next to the divans is a huge mirror, measuring some 15 feet wide by 8 feet tall that is bounded by ornate silver and gold work and studded with some twenty precious stones. The whole is worth at least 15000 gp, and the edges of the mirror are beveled so as to throw small rainbows into a halo around the mirror when the light is proper.
Two plush chairs sit to the far south, these being made of teak and displaying amazing handiwork with arms that are carved to resemble roaring lions' heads.
B. Master's Hallway:
The door to this room from the Skylight Chamber is usually not locked, though it can be barred from the inside.
The hallway is done in marble, with frescoes of caravans traveling exotic landscapes as backdrops.
The door to the west is a good wooden door and is usually unlocked, though barrable from the other side.
The double doors to the south are of fine teak, and carved to resemble a long caravan coming right at the viewer. There is one such on each door face. These doors are strong wooden doors and are both barrable from the other side and bear a strong, well-made key lock (DC 35), the keys to which ire on the persons of Barnabus and Abrinda. A rope sprouts from the wall to the east of the double doors, and if pulled, this rings a soft chime inside the Master Salon.
The double doors are usually only barred when Barnabus and/or Abrinda are present in the room.
C. Master Salon:
This room serves as the private salon of the Trade Lord and his wife. The double doors to the north are strong wooden doors made of teak. They are barrable from this side and have a key lock (DC 35), which keys are on Abrinda and Barnabus.
The door to the Master Bedchamber is strong wooden and barrable from the other side. It is usually so barred when the bedchamber is being used.
To the east of the double doors, a rope emerges from the Master hallway and is attached to chimes. These will ring if the rope is pulled from the master hallway, and the chiming is soft, but can be heard form here and from the master Bedchamber.
The room itself is dominated by a great maroon carpet of thick weave and plush fibre that bears ornate geometric patterns upon its face.
Along the east wall, four statues, each between 5-6 feet tall, stand on round bases. The statues are made of marble and are, from north to south:
· A naiad or other water
fey nude and emerging from a spray of water.
· A griffon wrestling with a giant snake with a head at
each end of its body.
· A wolf with snout upraised howling at a moon.
· A tree with tiny carved elves and pixies cavorting amongst
its leaves and branches.
Each of these was carved by a different master sculptor and is gifts from various Emperors, whose name and date of gifting are chiseled into the bases.
Along the west wall are two plush couches and a vanity with a standing mirror set upon it. Drawers in the vanity hold various items of make-up, perfumes, paints, etc. A cushioned chair sits adjacent to the vanity.
Along the south wall are two massive wardrobes, though the western one is even larger than the eastern.
Both are locked, though the locks are not complex (DC 20) and each person bears the key to his or her own wardrobe.
The wardrobes themselves are of fairly plain design, though made of mahogany with cedar interiors.
The western wardrobe belongs to Abrinda. Within are an amazing variety of womanly outfits, most genteel and flattering to Abrinda's curvaceous figure. There are formal gowns, presenting gowns, furs robes and capes, cloaks, shawls, hats, boots, slippers, belts, and every other sort of fine clothing a lady could like.
Tucked up on a shelf, pushed out of sight, is a leather bullwhip studded with sharp crystals that glow with a slight inner flame. This is a +1 fleshgrinding nagaika (refer to Masters of the Wild for nagaikas and the Book of Vile Darkness for fleshgrinding) which is the favoured weapon of Abrinda. Next to that is Harrowheart (a +2 rapier that does x3 damage on a critical hit against creatures of good alignment; refer to the Book of Vile Darkness).
The eastern wardrobe contains Barnabus' clothing, which ranges from fabulously elegant to practical travel garb.
Set atop a shelf in the wardrobe is a disguise kit with 8 uses left. It does not look like it has been used for some time.
D. Master Bedchamber:
This room is accessed via a strong wooden door which is barrable from this side. Within is the bedchamber of Abrinda and Barnabus. A large, plush canopied mahogany bed with silk veils surrounding it dominates the chamber, and the bed is high enough to warrant footstools on either side to climb it.
The bedposts are carved to resemble trees shedding their autumn leaves.
Nearby are small tables holding washbasins and towels, and a wooden valet holding bedclothes.
An Alarm spell has been cast upon this chamber, and it has been cast in conjunction with a Permanency spell, both cast at 12th level. The Alarm spell is audible and keyed to the password "Enirevir Secure".
Under the bed is a light crossbow loaded with a silvered bolt and a case of 19 silvered crossbow bolts.
E. Warded Hallway
The western door to this hallway is a strong wooden door that is locked (DC 25) with keys on both servants and Barnabus and Abrinda.
The door to the south is also a strong wooden door and is not locked, though it may be barred from the other side.
At the far end of the hallway is a 2 foot diameter stone column. This is actually a caryatid column. It does not radiate magic and True Seeing does not reveal its humanoid form. Careful examination of the column (search check DC 25) reveals very faint and distorted lines that make the pillar resemble a woman with a sword. Anyone who successfully makes a Knowledge (architecture and engineering) check (DC 12) notes that the column serves no structural purpose since it bears none of the ceiling's weight. A close examination of the top of the column (Search check DC 15) or a keen eye (Spot check DC 20) shows that the column is not cemented or joined to the ceiling. Dwarves and other creatures with stonecunning receive a free Search check as though actively looking when they pass within 10 feet of a caryatid column.
The column is instructed as follows:
1. Attack anyone who enters this
hallway without displaying the key to the western doorway.
2. Attack anyone who attacks or harms you.
3. Attack anyone whom I (Barnabus) point to and say "Caryatid
Attack".
4. Guard entrance into the Conference Chamber and prevent anyone
who does not show the key to the western door from entering that
room.
|
* Caryatid Column: CR 6; Medium-sized construct; HD 6D10+20; hp 55; Init +3; Spd 30 ft; AC 22 (touch 13, flat-footed 19); Atk +12 melee (1D10+9, +2 bastard sword [two-handed]) or +12 melee (1D10+7, +2 bastard sword {one-handed] and +4 melee (1D4+2, slam) or +9 melee (1D4+7 [x2], slams); SQ break weapon, column form, construct traits, hardness 8, magic weapon, darkvision 60 ft; AL N; SV Fort +2, Ref +5, Will -3; Str 20, Dex 16, Con -, Int 6, Wis 1, Cha 1. Height 6 ft 3 in. Skills and Feats: Diplomacy -3, Sense Motive +4; Exotic Weapon (bastard sword), Improved Sunder, Power Attack, Weapon Focus (bastard sword). Special Qualities: Break Weapon (Su): Whenever a creature strikes a caryatid column with a melee weapon, the weapon must succeed on a Fortitude save (DC 13) or break and become useless, dealing no damage to the caryatid column. As usual, magic weapons use either the wielder's save bonus or its own, whichever is better. Nonmagic ranged weapons automatically shatter. Magic ranged weapons receive a Fortitude save (DC 13) to resist this effect. Column Form (Ex): When at rest, a caryatid column takes the form of a simple column of stone 2 feet in diameter and as high as the ceiling (up to 25 feet tall). Unless commanded otherwise, it remains in this form until attacked and may even be climbed (DC 15). The caryatid column does not radiate magic and True Seeing does not reveal its humanoid form. Careful examination of the column (search check DC 25) reveals very faint and distorted lines that make the pillar resemble a woman with a sword. Anyone who successfully makes a Knowledge (architecture and engineering) check (DC 12) notes that the column serves no structural purpose since it bears none of the ceiling's weight. A close examination of the top of the column (Search check DC 15) or a keen eye (Spot check DC 20) shows that the column is not cemented or joined to the ceiling. Dwarves and other creatures with stonecunning receive a free Search check as though actively looking when they pass within 10 feet of a caryatid column. Changing forms is a free action and a caryatid column can change once per round. Construct Traits: Immune to mind-affecting effects, immune to poison, sleep, stunning, paralysis, disease, death effects, necromantic effects, and any effect which requires a Fortitude save unless it also works on objects. The creature is nor subject to critical hits, subdual damage, ability damage, ability drain, energy drain, or death from massive damage. It cannot heal itself but can be healed through repair. Magic Weapon: The weapon borne by the column functions as a normal magic weapon except that once out of the hands of the column it reverts to stone and becomes a nonmagical object until once again in the column's hands. The column can stow the sword by pressing it against its side, whereupon the weapon merges with the column's body and can be retrieved the same way a weapon is drawn. |
F. Conference Chamber:
The door to this chamber from the Warded Hallway is a strong wooden door barrable from this side.
Within the chamber are a long wooden table and two wooden chairs. The south, west, and east walls are covered with bookshelves holding scrolls, books, and charts and maps of various types.
This room serves as a private conference chamber for Barnabus, for secret meetings or high-level conferences and private interviews. The items on the shelves are, for the most part, histories, geographies, maps, and other useful texts for planning caravans and other profitable schemes. There are also primers in various languages, notes on climates all over Therra, and several books of heraldry, both in the Empire and throughout Therra.
Both secret doors in the chamber are hidden behind sections of bookshelves that pivot out when a certain false book is pulled. It requires a Search check to find each secret door (DC 30) and another to find the switch (DC 20).
G. Office:
The door to this room is a strong wooden door that is securable by a wooden latch. The latch is not meant to bar intruders but merely to ensure privacy.
Within is a fancy office. The walls are of green marble with silvered striations.
A large well-polished mahogany desk sits to the east, behind which sits a plush leather chair. Before the desk, two chairs sit on a thick red carpet.
Upon the desk are a writing set, rolls of vellum, a paperweight made of lead shaped like a squatting dwarf with a waraxe, and a couple of ledgers and notebooks.
Flanking the desk are tall wooden shelves holding various books, ledgers, and records of the House. Included are personnel records, including the dates of hire and terms of hire of all house members and employees and agents.
H. Servants' Hallway:
The western door of this hallway is a strong wooden door with no lock. The hallway itself contains three doors along its north wall. All of these are good wooden doors, each locked via a key lock (DC 25). The door to the storeroom is openable by keys in the possession of both servants. The doors to the servant quarters are each locked by keys held by each servant.
I. Storeroom:
The good wooden door leading to this room is locked (DC 25), with the keys in the possession of both servants. Within are various stores and supplies peculiar to the needs of this level. They include perfumes and unguents, extra carpets of expensive make, candles, lanterns, lamp oil, rags, linens, cleaning mixes and polishes, soaps, etc.
J. Thullis' Chamber:
This chamber serves as the living quarters for Thullis, Barnabus' manservant. The good wooden door to this chamber is locked by a key lock (DC 25) which key is on Thullis' person.
Within is a plain servant's quarters, including a feather bed, a plain wardrobe with clothing ranging from plain, functional clothing to formal servant's attire, and a desk and chair. Upon the desk is a small hand mirror and grooming equipment (razor, comb, scissors, etc.).
At the foot of the bed is a locked wooden trunk, (DC 20, key on Thullis) which holds a pouch with 340 sp, 220 gp along with various personal effects.
K. Wallicia's Chamber:
This chamber serves as the living quarters for Wallicia, Abrinda's handmaiden. The good wooden door to this chamber is locked by a key lock (DC 25) which key is on Wallicia's person.
Within is a plain servant's quarters, including a feather bed, a plain wardrobe with clothing ranging from plain, functional clothing to formal servant's attire, and a desk and chair. Upon the desk are a small hand mirror and make-up and grooming equipment (lipstick, blush, powder, comb, scissors, etc.).
At the foot of the bed is a locked wooden trunk, (DC 20, key on Wallicia) which holds a pouch with 240 sp, 120 gp along with various personal effects.
L. Escape Passageway:
The secret door to the north is apparent from this side and opens by twisting an obvious handle. Similarly, the secret door to the southeast is not concealed from this side and opens via an obvious handle.
This passageway shows little sign of recent usage, as dust covers the floor. Halfway along the western wall is a wooden rack holding 3 vials. These are potions of Invisibility at 3rd level.
M. Hidden Treasury:
The secret door to this room is obvious from this side and has a handle by which to open it.
This room serves as the private treasury of Barnabus. While the Mundane Treasury of the House resides on the below ground level, this that treasury represents the accounts of the House, while this is Barnabus' (and Abrinda's) personal wealth.
Within are 3 large iron chests. Each of these is locked by a combination lock consisting of 3 tumblers numbered 0 through 9. When the tumblers are set, then a catch must be activated. The catch is obvious and set just below the tumblers. There is no way to actually pick the locks of these chests, since they have no lock to pick. However, those trained in the Pick Locks skill can attempt to finesse the combination locks (DC 35).
The combination for each chest is listed in parentheses below. In addition, each chest is warded by a trap. Each of these traps is set off if the wrong combination is selected and the switch activated.
Chest #1 (5-3-7):
| * Ghoul Touch Trap: CR 3; magic device; tough trigger; automatic reset (each time the switch is thrown); spell effect (ghoul touch, 3rd level wizard, Fortitude [DC 13] negates); Search (DC 27); Disable Device (DC 27). |
Contains 3500 cp, 1400 sp, 400 gp, and D100 gems worth from 10-100 gp each.
Chest #2 (1-8-3):
| * Melf's Acid Arrow Trap: CR 3; magic device; touch trigger; automatic reset (each time the switch is thrown); Atk +2 ranged touch; spell effect (Melf's acid arrow, 3rd level wizard, 2D4 acid/round for 2 rounds); search (DC 27); Disable Device (DC 27). |
Contains 1000 cp, 700 sp, 1400 gp, 130 pp, and a box with 10 small diamonds worth 1500 gp each.
Chest #3 (1-4-5):
| * Poisoned Dart Trap: CR 4; mechanical; touch trigger; manual reset; Atk +15 ranged (1D4+4 plus poison, dart); multiple targets 91 dart per target in a 10 ft by 10 ft area); poison (small centipede poison, Fortitude save [DC 11] resists, 1D2 Dex/1D2 Dex); Search (DC 21); Disable Device (DC 22). |
Contains 600 cp, 800 sp, 2100 gp, and 1400 pp.
N. Bathroom:
Both doors leading into this room are good wooden doors that can be barred from this side for privacy.
Along the west wall are two stalls, each with curtains closing them off, which contain a sit down toilet.
Along the south wall are two pedestals with large washbasins, a towel rack with fine towels, and two mirrors set on the walls above the pedestals.
O. Harem:
The door to the south of this room is a good wooden door that can be barred form the Bathroom side. A set of multilayered and multi-coloured curtains blocks the way to the east.
This room was often used as a harem room where Trade Lords would indulge in pretty Thaneeri slaves and other consorts and concubines.
The room's floor is white marble shot through with black and silver veins. Flecks of gold dust have been inlaid into the floor.
Dominating the room is a stepped pool. Three two-foot high steps lead up to a rectangular pool. The bottom of the pool is 5 feet deep.
The west side of the bottom step opens up to reveal a 1-foot tall space beneath the pool. Nearby is a metal bin with a wood fire simmering below it. The bin is full of hot coals. Several long-handled scoops are available to take coals out of the bin and slide them into the foot high recess beneath the pool bottom. This allows the pool to be heated, and the servants see that it is generally warm at all times.
Several large buckets on wheel are also here, to bring water up to the pool.
Several fine towels hang on a rack nearby, and potted plants line the walls, which are of blue tiles showing bare-breasted mermaids cavorting with human males under the sea.
Shelves hold various bath oils and body unguents, while pegs set into the wall hold some luxurious bathrobes.
P. Honoured Guest Room:
The strong wooden door to this room can be barred from this side.
This room is reserved for the most elite of guests of the House. The floor is done in polished tiles and the wall is bedecked with well made tapestries showing pastoral scenes. The ceiling is done up in light blue tiles.
The bed, along the south wall, is plush with find silk sheets and a canopy held up by four posts shaped like whirlwinds.
Nearby is an ornate teak wardrobe that is empty. Along the west wall is a long wooden table and a plain chair.
In the northeast corner is a life-sized statue of a dryad emerging from a tree. The dryad's eyes are made of two large jades (300 gp each).
Hanging above the statue, suspended from a chain, is an ornate oil lamp shaped like a roaring lion. When it is lit, the lion's eyes are aflame.