Return to the Therran Scenario Page
Summary:
The PCs must stop a demon from gaining powerful magic
Assumptions:
The PCs are members of or affiliated with House Riverine in the Far Coast. This scenario follows on the heels of the scenario "Here Comes the Flood".
Location:
Dwillingir, Far Coast
Historical Date:
NS 37 winter.
DM's Introduction:
The Tower of the Mage has been just outside the walls of Dwilingir for over 175 years. It was built in the year 5371 AD by a young conjurer of some repute named Hagistre. Hagistre had made quite a name for himself in the Brotherhood of the Rose, a conjurer's guild headquartered in the Vosh-Gerr region. Even at the early age of 30, Hagistre was already considered a master conjurer, knowledgeable about the various planes of existence and able to summon and master an amazing variety of fiends and extraplanar entities. Indeed, the wizard was known for his insatiable appetite for knowledge and esoteric lore.
However, Hagistre became bored with study of the planes. In his explorations, he came across tantalizing hints of something that might exist beyond the planes, even beyond the seas of chaos that lap at the outer shores of existence. Obsessed with this knowledge, and thinking it worthy of his intellect, he began to explore what he came to call the Outre Realm or the Far Realm. It is a realm where chaos itself originates, a realm of twisted possibilities and outrageous notions rejected by the cosmos. Study of this strange realm proceeded slowly, and Hagistre was continually bothered by the demands of his guild, civilization in general, and worried that rival mages would try to seize upon his work and take the glory of its initial explorations for themselves.
And so the wizard determined to find a place where he could conduct his work in peace. A place near enough to some semblance of civilization, so that he could dwell in a place of law and order and not subject to the dangers of the wilderness, and also a place where he could procure materials both exotic and mundane when necessary, but still a place removed from the prying eyes of nobles and mages. Eventually, Hagistre determined that Dwillingir was the place that met his needs. The mage came to the Far Coast and by means both fair and not so fair managed to purchase a small hillock of land just outside of the town for his own. His tower was built quickly (some say too quickly) and the mage then began to conduct his exploration of the Far Realm.
At first Hagistre emerged from his tower from time to time, to do shopping, order supplies, or to simply parley with other local wizards. But eventually, his obsession with his task, and his growing, almost paranoid jealousy of his explorations coupled with the suspicions of the townsfolk prompted the wizard to step forth from his tower less and less often, until he finally simply stopped leaving altogether.
Since then, the tower has been the subject of many rumours and innuendos. From time to time strange shapes are seen landing on the top of the tower at night. At other times, strange lights are seen coming from the tower, despite the lack of windows. Even earth tremors and other possibly natural phenomenon are attributed to the owner of the tower. Indeed, the owner himself is subject to rumour. Normal humans do not live for over 200 years. Some townsfolk speculate that the wizard (few remember his name) died long ago. Others agree but believe an apprentice now dwells there, having carried on the will of his master, or perhaps several in a line of apprentices. Others think the wizard is not human. Perhaps a long lived elf or half elf or even an outsider of some sort.
Hagistre is certainly no longer human. He is an alienist of great power, perhaps the most accomplished alienist in all of Therra. Certainly others have tried to tap and explore the mad washings of the Far Realms, but he has transcended time and his own body in his metaphysical journeys of exploration and discovery. To this date, Hagistre has managed to evade the fate destined eventually for such a high level alienist. The powers of the Far Realm have not come for him...yet. And so, he has managed to stay alive and living even after all of these years.
Now that is about the change, for some years ago the PCs managed to access his tower and performed several tasks for him in order that he might help them decipher strange items found in some documents. These tasks involved procuring a powerful scrying crystal from the ruins of Orcus' dungeon, and obtaining vials of blood from a pseudonatural green dragon. Using these items, Hagistre was able to build a mystic telescope with which he could peer into the Outre Realms.
Alas, looking upon a place that no mortal eyes were meant to gaze has consequences, for in piercing the veils that hid the Outre Realms, Hagistre weakened the barriers of space and time and now the Outre Realms has begun to intrude upon the multiverse, and more specifically the Material Plane.
The first manifestation of that intrusion was a spectacular one, with Hagistre's entire tower exploding, raining chunks of masonry and blobs of Far Realms muck onto Dwillingir. The PCs, entertaining an important Imperial Senator, managed to save the Senator's life. They then arrived at the ruins of the tower, where they saw Hagistre plead with the PCs to keep the Far Realms creatures from attacking him before he could complete a ritual that he hoped would seal the breach. The PCs bravely held off the strange creatures until Hagistre broke his staff and used the released energy to seal the rift in an explosion that may have slain the mage. In any event, the breach was apparenty sealed and the Tower of the Mage was gone. Much of Dwillingir has sustained damage from the explosion (remember, the Tower was much much bigger on the inside than without), although all of the rampaging beasts have been destroyed.
Now, a week later, a construct servant of Hagistre arrives bearing what amounts to an inheritance for the PCs. Unbeknownst to them, the construct is under the possession of a demon that has been warped by the influence of the Far Realms and seeks to use the PCs to guide it to Hagistre's hidden treasury, there to slay the PCs and claim the prizes as its own.
The Demon: Graz'urb'narg is a nalfeshnee tanar'ri with the ability to go incorporeal and possess creatures and objects (refer to pages 21-26 of the Fiendish Codex I - Hordes of the Abyss). This demon was one who hated Hagistre immensely due to the mage continually binding him (via greater planar binding spells) and so he has taken a longstanding but cautious interest in Hagistre over many years. Recently, the demon learned of some malign influence encroaching upon the multiverse. His own divinations and investigations turned up the name of the hated Hagistre, and warned of some impending doom. Wanting to be present to watch the mage's demise and to make sure doom did, indeed, befall his archnemesis, Graz'urb'narg came to Therra with magical help and managed to possess Jeves, Hagistre's construct doorman. From there he was able to penetrate the inner sanctum of the archmage, travelling from Jeves to Jevris, all the while unnoticed by the archmage, who was now completely distracted by the danger he was bringing to Therra.
As Hagistre saw his doom approaching, he instructed Jevris to take a sealed wooden box and hide in a nearby cave. Jevris was under instruction not to open the box, but to instead, if he was not contacted by Hagistre for 7 days, to bring the box to Argus in Dwillingir (or if Argus is not available then another of the members of House Riverine who aided him previously). Jevris was instructed to lead Argus to a specific location where he was to assist Argus in bypassing certain wards. Hagistre advised Jervis how to bypass the wards and the demon thereby learned these facts as well. Graz'urb'narg figured, rightly, that Hagistre has given Jevris the means by which Argus would inherit some cache of magic should he perish.
Knowing such a place might be warded against fiends, and believing that Jevris might not be capable of reaching the cache on his own, the demon intends to continue to possess Jevris and ride along with the PCs. To this end, the demon will begin to transform Jevris into a nalfeshnee. This process is detailed in the scenario below, but until the final moment the transformation will be hidden by the construct's kaftan robe. Once they pierce whatever wards Hagistre has set and reach the cache, he will reveal his true form and finish them.
The nalfeshnee, as long as it rides inside of the soul of Jevris, can hide from detection magic. Its Hide check is equal to its Hide skill plus Int bonus. This is compared against a DC of 10 + level of the spell trying to detect the demon + the caster's ability modifier. The demon has been controlling Jevris for many days, such that he now only needs to make a control check 2/day. The check only fails if Jevris rolls a 20 on his save, so chances are the PCs will never see Jevris break control. If a 20 is rolled (checks are made at noon and midnight) then the PCs will note something is wrong with Jevris for 1 round. He might suddenly say "My stars...what's going on?" or something in that vein. Unless three consecutive 20's are rolled in 3 rounds before the nalfeshnee can regain control, then that is all that will happen. If three consecutive 20's are rolled, then Jevris will be free of control for 24 hours and will certainly be able to communicate his possession to the PCs. In this case the demon will attempt the final transformation immediately (see below) and the fight will happen early.
The Transformation: The demon has already begun to transform Jevris. In fact, 3/4ths of the construct has already been transformed. The demon has only to perform the final transformation to burst the bounds of Jevris and manifest as Graz'urb'narg. Currently, this transformation has manifest in the form of a somewhat bloated torso with sagging breasts, coarse brown fur (instead of tiger striped fur) on arms and legs, clawed hands, and tiny vestigal feathered wings on his back. None of these transformations has any game effect. Jevris always wore fancy white gloves and a voluminous kaftan anyways, which would hide his appearance. This, coupled with the demon's Disguise skill should serve to keep the transformation hidden. Nevertheless, if something is noticed, the demon-controlled Jevris will be nonplussed, simply remarking that the changed wrought on his body were a result of continuing experimentation by his master. Given the nalfeshnee's prodigous Bluff skill, this should likely be sufficient, especially since its Hide skill will serve to counter any divinations.
If the changes are observed, allow a DC 25 Knowledge (planes) check to reveal that the changed features resemble those of a Medium sized nalfeshnee. If this is remarked upon, the demon-controlled Jevris will nod sadly and say that his master was not terribly choosy about what features he attempted to snap into place on his poor old body, and that he fervetly hopes one day to have his regal tiger fur back...although wings would be quite nice if made big enough to be functional.
The final transformation merely takes a standard action. The transformation completes unless Jevris rolls a 20 for his save. If it fails, an attempt can be made each round until it occurs. The transformation attempt will involve some physical spasms and vocal grunting such that the PCs may see something strange is happening. If Jevris rolls his 20, then he can make an additional save to communicate what is happening to the PCs, giving them a round to prepare. However, that save also requires a 20!
Once the final transformation is successful, there will be groaning and gyrating for 3 seconds and then with the sound of rending fur and bending metal, Jevris will grow to Large size and his wings will emerge from his torn kaftan and his tiger head will be replaced by a horrific boar's head and the nalfeshnee will emerge.
Part One - The Emissary
Precisely one week after Hagistre enacted the ritual of sealing, Argus will get a visit at his shop from Jevris, the construct manservant and major domo of Hagistre. Jevris appears like a humanoid tiger (but note his demonic transformation as descriibed above), so that he might be mistaken for a rakshasa, unless someone is smart enough to ask about the configuration of his hands (since rakshasa have their hands placed backwards with the palms on the outside). Jevris is very polite and never gets rattled and takes his duties very seriously.
| JEVRIS CR 2 LN Medium construct Init +0; Senses darkvision 60 ft, low-light vision; Listen -2, Spot -2 Languages Common, High Imperial AC 14, touch 10, flat-footed 14; Combat Expertise hp 37 (3 HD) Fort +1, Ref +1, Will -1 Spd 30 ft (6 squares) Melee slam +5 (1D6+4) Space 5 ft; Reach 5 ft Base Atk +2; Grp +5 Combat Gear wand of repair serious damage (CL 5, 20 charges) Abilities Str 16, Dex 10, Con -, Int 13, Wis 6, Cha 12 SQ construct traits Feats Combat Expertise, Skill Focus (profession [butler]) Skills Diplomacy +7, Knowledge (arcana) +7, Profession (butler) +7 Possessions combat gear plus expensive kaftan robe, whisk broom, handkerchief |
Jervis will knock on Argus' door and explain that he has a message to deliver from his master, the great and presumably late Hagistre the Archmage. Jevris will then hand to Argus a long wooden box, perhaps 1 ft by 1 ft by 3 ft made of polished black wood and bearing a rune-engraved clasp of silver. Jevris will say that the box is meant for Argus and it is safe for Argus (and only Argus) to open it.
Within is padded in black velvet. Cushioned in the velvet is a gnarled wooden rod or sceptre made of the same wood as the box. The sceptre bears runes all along its length and is topped by a large chunk of amber. Rolled around the handle of the object is a small scroll.
The scroll is written in Hagistre's own hand and reads:
|
Dearest Argus, If my manservent Jevris has given this to you then know that I am presumed dead. I had instructed him to seek you out should he not hear from me in seven days. Presumably that duration has now passed. I foresaw my doom, but only too late to save myself. I have many regrets. Some things are not meant for mortal eyes...even those of a mortal with aspirations of something transcendant. I fear that I have brought doom not only upon myself, but to Dwillingir and perhaps far beyond. Be that as it may, I direct you to take possession of my tower and everything within it. There is too much to instruct you in such a short period of time, but Jevris and Jeves can assist you and should you proceed patiently and cautiously, you might survive to become its familiar master. Beyond that, there is a location where I have hidden some items of power separate from my Tower. As any good mage does, he prepares a bolt hole away from his abode, so that should his lair be compromised, he can carry on. I suppose many good mages also place a clone in such a location, but my intense studies in conjuration left me no time to master necromantic magic. I suppose it is too late to regret that choice... No matter. Jevris here has certain instructions that will guide you to and help you to access my cache. Mind you, he cannot do it alone. That requires the rod included with these instructions, which must be wielded by one well versed in arcane magic. There are wards and guardians there that you will not be able to bypass even with the rod. This cache was meant for me to access, not others. But I trust you and your companions will be more than capable if you are careful. |
Jevris will confirm that he is capable of leading the PCs to the site and has certain instructions that can aid them once there. He does not have any instructions regarding the rod, but feels confident his master would not have given it to Argus if he did not feel Argus wouldn't be able to figure out how and when to use it.
While there is no rush, Jevris will tell the PCs that it might not do to wait too long before heading out, as once word gets out that his master is missing or worse, many of his old friends, rivals, apprentices, and enemies may come looking for loot.
The Rod: The rod given to Argus by Jevris radiates strong abjuration and conjuration magic. Its functions are hidden, such that any magic or means to analyze or identify its dweomer merely imparts the fact that it is used to open the ways and bypass certain wards of a place. The rod cannot be easily destroyed, as it has strong and permanent enchantments laid upon it by Hagistre. Assume anything that cannot destroy an artifact cannot destroy the rod. Only an arcane spellcaster can use the rod. Each use requires the wielder to empower the rod with a prepared arcane spell. This means even sorcerers cannot normally use the rod unless they took the Arcane Preperation feat or some similar means to prepare arcane spells. Such spells cannot come from magic items (including scrolls). Spell-like abilities will not cause the rod to function.
What level of spell needs to be sacrificed depends on the what is done with the rod. The wielder of the rod need touch the rod to a specific spot and will then know what level spell is required. In all cases a higher level spell can be given up.
Absolutely none of the rod's powers functions outside of the entrance into the cache or within the cache itself.
Part Two - To the Site
The site of the cache is known to Jevris, who can communicate its location to the PCs. It is just off the road that runs from Wayward to Hammon's Creche, south about 5 miles into the Feyindir Forest. Refer to the Regional Map of the Far Coast for details. Jevris knows how to spot certain landmarks that will lead him from the road to the hidden site.
The journey to the site should be fairly uneventful for worthies of the renown and power of the PCs. Many of the travelers on the road will know of the PCs unless they are travelling in disguise and will acknowledge them in a friendly and deferential manner.
About halfway along the road through the northern tip of the forest, Jevris will stop and examine a lightning struck tree stump and then crouch to site along its cloven top towards a large, moss-covered boulder. This will set him going from one fairly subtle landmark to another for the 5 mile journey generally southward into the forest.
Finally, Jevris will stop before a large moss-bedecked boulder that stands nearly 9 ft tall and roughly 6 ft around. Here he will instruct the wielder of the rod to touch the boulder. Activating the rod in this manner will require a 1st level spell to empower the effect. Once so empowered, the amber at the head of the rod will glow and, upon touching the boulder, the interior of the boulder will phase away, so that all that is left is an archway 9 ft tall and 6 ft wide. Within the archway swirls a mauve mist.
This is a magic portal to the demiplane where Hagistre stored his cache. There is no way to activate or otherwise crash the gate without the rod because the gate is not physically present until the rod is used. The portal itself resides on another plane and only manifests by using the rod. Otherwise, the boulder is merely a boulder (and, should the boulder be moved or destroyed, the portal would persist and still be summoned, appearing as a mist without any archway to border it). The portal is one-way and once entered, one cannot use it to return. The portal will remain open for 1 minute, after which it will phase away and require another empowerment and use of the rod to summon it once again.
Part Three - The Cache Beyond
Beyond the portal is Hagistre's demiplane. This demiplane is pinched off from the Ethereal Plane, and as such, has no access to the Astral Plane. This means almost every sort of teleportation magic will not function within, including such spells as teleport, dimension door, benign transposition, etc. While pinched off from the Ethereal Plane, the demiplane is no longer connected to that plane either, and so no form of ethereal travel will function here either. Summoning spells, which do not require travel through specific planes, do function within the demiplane.
The demiplane takes the form of a small "dungeon". The walls of the dungeon are the walls of the demiplane, and because of this, they are not actually stone (though they look and feel and sound like stone) and cannot be chipped or broken or passed through by any means whatsoever. No spells that function on stone works on these walls, and they are, in fact, immune to all but epic magics.
Unless otherwise stated, walls appear like superior masonry (Climb DC 25) and floors are smooth stone floors. Passages are 10 ft tall. The entire place is suffused with a soft glow, which is treated like shadowy illumination (all creatures have concealment and can make Hide checks to hide from sight).
None of the wards in the cache can be dispelled or supressed by any non-epic means of dispel magic. They can be, possibly, brought down by other means (e.g. wall of force by a disintegrate spell).
When the PCs arrive, Jevris will inform the PCs that he was designed to be the master of the household and not a warrior. He has very little in the way of combat ability, no magic whatsoever, and is rather fragily constructed. However, he is still needed to guide the PCs and bypass some wards. Therefore, he urges the PC to defend him as best as they can and to excuse his lack of manners in no pulling his own weight in the trials to come. He will then produce his magic wand and describe its function, apologizing that it is of no use in healing "meatbags". He will give the wand to Argus or another PC capable of using it.
|
|
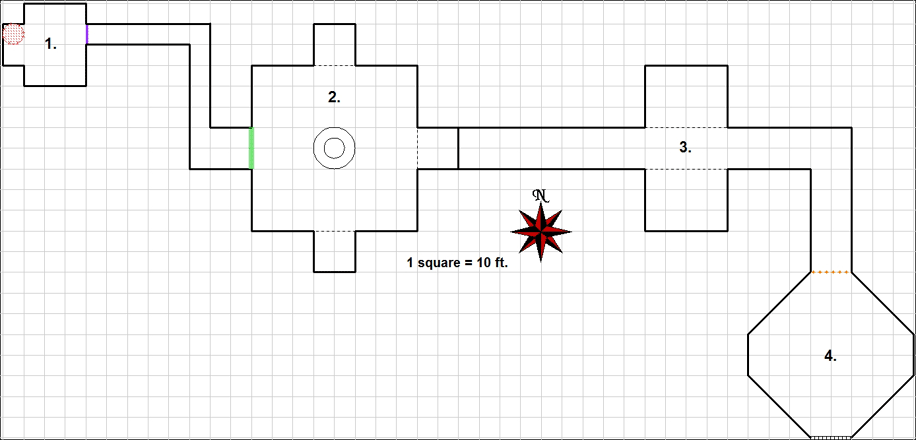
Note: Although there is no real north or south on this demiplane, for purposes of mapping, north is towards the top of the above map.
1. Entry Chamber:
The PCs will arrive in the northern half of an alcove in the
west of this chamber, as shown on the map as a red circle.
| You appear in a chamber that is 10 ft tall. The walls are of grey stone with tiny, regular seams, and the floor and ceiling are both of polished grey stone. The room is infused with a shadowy illumination that seems to diffuse from the air itself. Other than a passageway to the east, there is a comfortable looking wooden bed with purple covers to the south. Next to the bed is a wooden nightstand upon which rests an ornate blue glass flask stoppered by a cork topped with lead. Next to the flask is a rolled up piece of parchment. On the other side of the bed is a wooden shrine of some sort. |
The shrine is a small wooden travelling shrine of the kind used by itinerant priests, although this one bears a rather generic carving or idol that cannot be ascribed to any particular god or goddess.
The piece of parchment, when unrolled, reveals writing in Common in a flowing, ornate hand. It reads:
|
Dear Intruder: It is to your lasting regret that you have elected to attempt to pilfer the store of Hagistre the Grand, archmage extraordinaire. While, indeed, great treasures reside within this demesne, you will never touch a tarnished copper of it. Trust me when I say this. In fact, you have absolutely no way to ever return to Therra from this place and no way to escape. In short, you are doomed. Sorry. Now, although I despise thieves and robbers, I am not without sympathy. I am sure you will spend some indeterminate and ultimately inordinate amount of time attempting to escape before you are convinced of the truth of my words. By all means feel free. But when you have finished and resigned yourself to your fate, and have gone through all five stages of grief, then you will see that I have left you a small measure of kindness. To one side of the bed you will find a small shrine. Please do pray at it to whatever god you worship. Last rites are recommended. Yon flask contains a highly potent poison, intermixed with a narcotic sleep draught. Once your prayers have finished, settle into the bed, unstopper the flask, and drink of the draught inside. You will drift off to sleep and perish in an absolutely peaceful manner. Rest assured that when I visit my store and find your body in the bed, I will neither molest it nor perform any sort of necromancy upon thy corpse. Rather, I will bury it in an unmarked grave. It is the least I can do and almost certainly more than you would have done for me were the situations reversed. In any event, I salute the end of your long and no doubt illustrious career of pilferage and wish you godspeed on your journey to the afterlife. Yours in death, Hagistre the Grand |
The flask on the table does, indeed, contain a mixture of potent sleep poison and toxic ingested venom. There is a single DC 25 Fortitude save for the draught. Failure means sleep within 1 round and 3d6 Con damage 2 rounds thereafter. A minute later, a second DC 25 Fortitude save must be made or another 3d6 Con damage will be taken. There is enough draught within for 4 doses. Note that the initial save can be automatically failed by an imbiber, but the secondary save must be checked normally.
Traps: While there are no traps here per se, the passageway to the east is blocked by a permanent wall of force (caster level 17). If the wall is approached within 10 ft, a glowing amber circle about 3 inches in diameter will appear at waist height just to the north of the passageway. If the top of the magic rod is pressed into the circle and a 3rd level spell is used to empower it, the wall of force will lower for as long as the rod is held to the glowing circle or 1 minute later, whichever comes first. When the wall of force begins to rise, it will take a full round to start to rise and the actual rising will take another full round; a humming sound coming from the top of the wall will indicate to even those PCs that cannot see invisible objects that the wall is slowly raising back up. Thereafter, the wall of force can be lowered again by empowering the rod and touching the circle.
It should be noted that there is no such circle on the other side of the wall of force. The slow rising rate of the wall and the humming sound should allow even incautious PCs to realize that the rod should be held to the circle until all of the PCs but the rod holder have passed and then the rod should be removed. If a PC is still stuck on the wrong side of the wall of force after it has been raised, then he will effectively be out of the adventure unless the wall of force can be brought down (e.g. disintegrate) or the PCs pass all the way through the scenario and then re-enter to rescue and bring through the stranded PC.
Developments: Once this chamber is exited, Jevris will suggest that the magic rod wielder use the rod to bestow touch of admantine on PC weapons. He will explain that there are likely golems guarding the treasures. If the rod is touched to a weapon (not a natural weapon) and a 5th level spell is used to empower it, the rod will cast touch of admantine at caster level 17 on that weapon (as the spell, see Book of Exalted Deeds page 110). This feature can be used as many times as desired, as long as there are 5th level spells to empower it.
2. The Treasure Chamber (EL 14):
Blocking the way into this chamber is a 20 ft wide, 10 ft tall permanent prismatic wall (caster level 17). Close examination or even a casual DC 28 Spellcraft check will show that there is no violet colour running through the wall. In fact, this is a modified prismatic wall in that the violet effect is not present.
If the wall is approached within 10 ft, a glowing amber circle about 3 inches in diameter will appear at waist height just to the north of the passageway. If the top of the magic rod is pressed into the circle and a 6th level spell is used to empower it, the prismatic wall will lower for as long as the rod is held to the glowing circle or 1 minute later, whichever comes first. When the prismatic wall begins to rise, it will take a full round to start to rise and the actual rising will take another full round. Thereafter, the prismatic wall can be lowered again by empowering the rod and touching the circle.
It should be noted that there is no such circle on the other side of the prismatic wall. The slow rising rate of the wall should allow even incautious PCs to realize that the rod should be held to the circle until all of the PCs but the rod holder have passed and then the rod should be removed. If a PC is still stuck on the wrong side of the prismatic wall after it has been raised, then he will effectively be out of the adventure unless the prismatic wall can be brought down (e.g. by the normal means of doing so) or the PCs pass all the way through the scenario and then re-enter to rescue and bring through the stranded PC.
Note: The DM should initially draw and present the room to
the PCs as a square. The dashed lines on the map indicate where
the walls are initially.
| Beyond the prismatic wall is a large chamber with a 15 ft tall ceiling. The chamber is 80 ft square, and in the center is a massive iron disc 3 inches high and 20 ft in diameter. Set equidistant around the disc on its face are glowing numbers, from 0 to 9. In the center of the disc is an iron pedestal or dais, 10 ft in diameter and 2 ft high. A single glowing line runs from the center of the pedestal to the edge. |
Creatures: 3 golems are present here, each housed in one of the alcoves hidden by walls. When the magic rod is NOT being held to the glowing circle just outside this chamber and if the central iron disc or pedestal are touched or moved in any way, then the walls represented by dashed lines will disappear (they are normal 1 ft thick superior masonry stone walls) and the golems will be released. The northern alcove holds an alchemical golem. The eastern alcove holds a stone golem. The southern alcove holds a mud golem.
Within the northern alcove are 2 large barrels filled with alchemical mixture with which to utilize its alchemical healing ability.
When and if there are no creatures in the room aside from the golems, then they will return to their alcoves and the walls concealing the alcoves will phase back into existence (shoving objects in the way back into the main room). If a golem is destroyed, then that wall will not phase back but the alcove will remain exposed.
The alchemical golem bears a metal plaque sewn into its chest that reads "Arvinerus".
The stone golem bears a metal plaque pounded into its chest that reads "Barim"
The mud golem bears a metal plaque spiked into its chest that reads "Cincero"
The golems are instructed to attack anyone who is not Hagistre. They are specially enchanted to recognize inherently their creator, and so cannot be fooled. They will attack until destroyed. The alchemical golem is programmed, when it is down to 25% or less of its total hit points, to retreat back to the northern alcove and consume one of the barrels there to regain its hit points.
|
|
|
|
|
|
Secret Doors: If the far wall of the eastern alcove is approached within 10 ft, a glowing amber circle about 3 inches in diameter will appear at waist height just to the north of the passageway. If the top of the magic rod is pressed into the circle and a 4th level spell is used to empower it, the wall will lower for as long as the rod is held to the glowing circle or 1 minute later, whichever comes first. When the wall begins to rise, it will take a full round to start to rise and the actual rising will take another full round. Thereafter, the wall can be lowered again by empowering the rod and touching the circle.
It should be noted that there is no such circle on the other side of the wall. The slow rising rate of the wall should allow even incautious PCs to realize that the rod should be held to the circle until all of the PCs but the rod holder have passed and then the rod should be removed. If a PC is still stuck on the wrong side of the wall after it has been raised, then he will effectively be out of the adventure until the PCs pass all the way through the scenario and then re-enter to rescue and bring through the stranded PC.
Traps: The iron discs function as a combination lock. The combination is Left 9, Right 5, Left 7. Jevris knows the combination, and in theory the combination can also be gleaned from the plaques on the golems (the order is determined by the alphabetical order of the names and the numbers by the number of letters in each name). Turning the iron disc is not easy. It requires a full round action and a DC 13 Strength check to turn the dial (up to 6 additional people can help). Failure means the dial is turning but has not reached whatever number is desired).
If the dial is turned and brought to rest on a number not in the proper combination and not 0, the trap is set off. Turning the dial to 0 resets the combination.
The trap involves calling 1d3 creatures from the following table. These are not summoned creatures and cannot be warded by protection from evil spells or the like. They are compelled, regardless of their alignments, to attack all non-golems in the chamber (except for other creatures called by the trap) and persist for 17 rounds. Such creatures can be banished or dismissed. Creatures so called are not present in their physical bodies and once brought to 0 hit points their bodies and possessions fade away.
|
|
|
| 1 | Leonal Guardinal |
| 2 | Elder Elemental (random type) |
| 3 | Barbed Devil |
| 4 | Gargantuan Fiendish Monstrous Scorpion |
| 5 | Night Hag (mounted upon Nightmare) |
| 6 | Bebilith |
| 7 | Colossal Fiendish Monstrous Spider |
| 8 | Hezrou |
The PCs should get no experience points for bypassing this trap, since Jevris should be protected and give them the combination. If they trip the trap, then they should have to fight but get no experience points for it.
Treasure: Once the proper combination is done, the central pedestal will phase away revealing a 10 ft diameter hole in the top of the larger iron disc. Within is an iron chamber 20 ft in diameter and 10 ft deep. This chamber holds Hagistre's treasure (which is detailed at the end of this scenario).
Developments: Jevris will stay way out of the way of the golems, who will, in turn, tend to attack the PCs rather than the cowering construct. When the golems are defeated, he will announce that the treasure is below the iron disc and that the whole is a combination lock to which he knows the combination. He will warn the PCs not to stop at the wrong numbers lest some dangerous trap be sprung. He has no idea what the trap might be, and he does not know what the plaques on the golems mean. Jevris will state, once the treasure is gained, that they must now proceed to the way out, which is also warded.
3. The Walls Have Eyes...and Hands and Oozes! (EL 15)
| The passageway here becomes rougher, with the walls to the right and left becoming as rough hewn cavern walls, although the floor and ceiling remain smooth, polished stone. |
Behind each set of walking walls is a massive gelatinous cube. Each is kept alive by Hagistre's magic. The cubes, like the walking walls, will attack anyone not bearing the magic rod.
|
|
|
|
Tactics: The oozes will hang back until there are no more walking walls in the passage (other then the ones blocking the way). Thereafter they will advance. Until then, the walking walls will seek to grapple foes and then throw them at the cubes.
Developments: While the creatures will not attack the rod bearer, they will also not unblock the passageways as long as a non-rod bearer is in the hallway.
None of the creatures will leave the area of the passageway bounded by the dashed lines. Once all non-rod bearers have left the hallways, they will return to their previous configuration and will not pursue further.
4. The Way Out (EL 15+)
|
This large octagonal chamber is 15 ft high. The southern wall of the place seems to be made entirely of mauve crystal in which strange mists swirl and roil. In the center of the place is a 10 ft diameter iron pillar that rises 10 ft into the air. |
Jevris will urge all of the PCs to enter the chamber, as he believes that a ward will rise up when the pillar is approached.
When the magic rod is brought within 10 ft of the pillar, a glowing spot 3 inches in diameter will appear at chest height on its northern face. If the rod is touched to the spot and a 1st level arcane spell is used to empower it, several things will happen:
First, the pillar will quickly form arms, legs, and a head and animate as an iron golem (see Creatures below).
Second, a forcecage effect (caster level 17) will cover the entrance as bars of solid force. They will not lower until the magic rod passes out of this chamber.
Creatures: The iron golem will attack all non-golems and will pursue anywhere in the complex.
|
|
Developments: When the golem is slain, its body will melt away as liquid iron, sizzling away in 1 round and leaving behind a large, fist-sized glowing gem. This gem activates the crystal magic portal on the south wall that leads back to the entrance in the Feyindir Forest. The key activates the portal for 1 minute when brought within 5 ft of it.
The Demon Strikes!
The demon is biding his time until the last moment, since he is incapable of weilding the rod and therefore needs Argus to activate the golem in room 3. He will do everything in his power to stay safe and out of the way of combat.
Once the gem activating the crystal gate is revealed, he will conduct his final transformation and attack the PCs. He will first seek to summon 1d4 hezrous and then attack to the best of his ability. In order to defeat the PCs he will need to acquire the gem, but he also wants the treasure and to defeat the PCs in any event. Since only his projected body is at risk, he has no problem dying and will not give up on his task until slain.
|
|
Hagistre's Treasure:
This store of treasure does not represent Hagistre's full wealth, most of which was destroyed when his tower exploded. Instead, these represents a cache that contains a backup copy of his most prized lore plus a few items to get him back on his feet should he need to flee here.
AH! We're Stuck!
These exists the possibility that the arcane caster amongst the PCs is slain or otherwise rendered unable to assist the PCs, who are then technically stuck in the cache. As that is not a fitting end for PCs, the DM should devise some alternate means of escape, but one that does not reward the PCs for messing up.
If the PCs are stuck, then of a certain the nalfeshnee will transform and attack, seeking to slay the PCs before ending its own life and thereby transporting back to its home plane.
The DM can assume, if necessary, that the death of Hagistre has caused all of the magic keeping the cache intact to slowly dissolve, and after some time stuck in the cache, the whole thing dissolves and implodes on itself. The PCs will be shunted as a group to a random plane of the DM's choice but unless they already recovered the treasure it will be scattered throughout the multiverse...lost for now or forever.
Divine Help:
If the DM feels this scenario would be a bit too difficult for the PCs, he can add the help of a healer of Vastalla from House du Coppi in the Imperium. She will have transported magically to Dwillingir to aid the wounded after the events of a week before, and she would be willing to accompany the PCs on this adventure.
|
FEATS: Augment Healing (CD p79) +2 per spell level to the amount healed by any Conjuration (healing spell). SPELLS: close wounds (SC p48) - immed, r cl, 1 creature, SR; cures 1d4 +1 per CL (max +5). panacea (SC p152) - r touch, creature, SR; ends blinded, confused, dazed, dazzled, deafened, diseased, exhausted, fatigued, frightened, nauseated, pnicked, paralyzed, shaken, sickened, stunned, sleep, feeblemind, poison and cures 1d8 +1/CL (max +20). revivify (SC p176) - r touch, dead creature, SR; restores to like creature dead within 1 round of casting with no level or Con loss, subject has -1 hp and is stabilized. MAGIC ITEMS: ring of mystic healing (MIC p126) - +1 to CL when casting cure spells, 3 ch/day bonus to cure spells: 1 ch = +2d6 healing, 2 ch = +3d6 healing, 3 ch = +4d6 healing. |
|
|
Experience Points:
In addition to normal experience (which in Therra is half of that recommended in the DMG), each party member should be rewarded as follows:
There are no special XP awards for this scenario.
Return to the Therran Scenario Page