Return to Part 1 of the Adventure
The Map:
The Map to the Folding Boat is genuine in one respect and disingenuous in another. The map does lead to an old ruin in the desert where it is said that a sultanic wizard had in ancient times a ship that folded into a box. However, Angaralok knows that the place is currently inhabited by some rather dread creatures, and since he wishes to dispose of the party, he has enscribed some Moon Runes on the map.
Normal Morakki runes on the map read:
If thou seekest to see the
light of truth
In the dark of the night
Thou must know that for every truth is an equal lie
For every light, an equal dark
For every half, an equal unhalf
Those runes, written there by Angaralok himself, hint that if the map is observed by the light of a half moon, the Morakki Moon Runes will appear:
Enter ye / not / with weapon,
/ not / blade / nor stave / nor cudgel
For my house / is a house / of peace
Enter ye / not / encased / in the armours / of war
For thou / shalt need / them / not / in my house
They are / an abomination
What need / hath the true / and right / man / for force / of arms?
What need / hath the brave / and strong / man / of the succor
/ of armour?
Be thou / as humble / as the blind / and bind / thy eyes
Be thou / as humble / as the deaf / and plug / thy ears
Then shalt / thou find / the true / way
(There are a total of 48 runes from 7 castings of the Moon Rune spell, and the above verse has marks showing the extent of each rune)
The runes are a ruse created by Angaralok to entice the party to lay down its weapons and armour and go blind and deaf into a hostile setting. His hope is that the party is killed, but if not, they will never know of his treachery, for if they do prevail, then they shall find their boat and leave his lands.
The Ruins:
The ruins are in some respects not a fraud. There are indeed ancient ruins at the point where the map indicates. The ruins are the remains of a tomb of an ancient desert Khan. And the Khan did indeed possess a wondrous folding boat that still lies entombed with him. Angaralok chose purposefully to include at least some semblance of truth in his offer of a map to the party for two reasons:
1. In case the party should survive the ruins, there is nothing that could be directly pinned on him and so the party would not seek revenge.
2. In case the party casts truth-seeking spells or uses legend lore the map would reveal crucial elements of the truth.
The ruins are located fairly in the middle of the Wylag Desert, amid a veritable sea of undulating dunes. Random encounters along the way can be left to the DM, but following are several desert encounters designed to make the journey dangerous and eventful. The ruins are a good 5-8 days into the desert as travel on foot goes.
Sandmen - Sandmen servants of a dao ambush the party, seeking to capture valuable slaves for their master. The dao master is on a high dune crest nearby invisibly watching his slave takers. He will not intervene in any way, and will flee to the ethereal plane if detected or assaulted (casting Misdirection first). The only manner in which he will react is to possibly use his Spectral Force spell (1/day) to create an illusion to confuse the party if it looks as if this use of illusion will make the difference between the success or failure of his sandmen. The sandmen will attempt to sleep the party, and will then choose the two most capable as slaves. These will be brought to the dao who will carry them back to his palace on the Plane of Earth. The remaining party members will be released unharmed to waken from their slumber.
The dao will use captured party members as servants, and he can be convinced to ransom or sell them back should the party concoct some way of parleying with him on his home plane.
If the dao is spotted and subdued, he will offer the use of his Limited Wish (perverted) in exchange for his freedom.
Sandmen (6) (AC 3, MV 9, HD 4, hp 26, 21, 24, 20, THAC0 17, #ATT 1, D nil, SA sleep (when within 20' for the first time or when touching or touched by the Sandman, save vs spells), MR 20%, AL NE, XP 975 ea, Source: Monstrous Compendium 1)
Dao (AC 3, MV 9 fl 15[B] br 6, HD 8+3, hp 51, THAC0 11, #ATT 1, D 3D6, SA powers (see below), SD powers (see below), immune to earth spells, double damage from holy water, Al NE, XP 5000)
Dao Powers: Change Self 1/day, Detect Good 1/day, Detect Magic 1/day, Gaseous Form 1/day, Invisibility 1/day, Misdirection 1/day, Passwall 1/day, Spectral Force 1/day, Wall of Stone 1/day, fulfill perverse limited wish 1/day, Rock to Mud 3/day, Dig 6/day
Treasure: A necklace of platinum strung with amber globules each containing a tiny encased human figure in grotesque poses of agony (worth 10000gp to a suitably twisted collector), copper bracers with streaks of sard blended into them in a very strange manner (worth 4000gp)
Addazahr - A swarm of these insects attacks the party and its mounts!
Addazahr (32) (AC 4, MV 6 fl18[B], HD 1 hp, hp 1 ea, THAC0 20, #ATT 1, D 1+disease (save vs paralyzation), SA disease (soreness of joints in humans and non beasts of burden, beasts of burden are in severe pain and cannot carry or move, lasts 2 weeks), AL N, XP 15 ea, Source: Monstrous Compendium 2).
Opinicus - A friendly opinicus will be encountered in a small abandoned temple in the desert. The opinicus is very very long-lived, and can explain that eons ago before the desert was a desert, this was a temple dedicated to all of the gods. Over time, the priests of the temple became seduced to evil and helped bring about the waste that came to these lands. As he explains this, the creature sheds tears from its strange face, as if remembering the incident first hand (which it is). The beast will not go into further details.
However, if he senses that the party is good intentioned and pure of heart, he will offer to cast his spells in their aid if they desire. The opinicus knows of the ruins the party seeks, and he does remember even a Khan of ancient times who dwelt in that region and who had a folding boat. He has not been near those ruins for many centuries though and knows nothing of its current disposition nor of the map the party possesses.
Opinicus (AC -2, MV 21 fl30 [B], HD 7+7. hp 48, THAC0 13, #ATT 2, D 1D3 / 1D3, SA psionics (see below), spells, rear-claw rake if flying (1D6 twice), surprise (-2 to roll, -5 in desert), turn undead (as 7th level priest), SD never surprised, spells at 18th level ability, psionics (see below), gaze (sun sparkle, 20' long 10' cone 1/turn 2D8 damage to lower planar and undead, save vs spell for half damage), MR 35%, Spell Points 115, AL CG, XP 14000, Source: Monstrous Compendium 1)
Spells Memorized: Cure Light Wounds (4), Bless (4), Command (4), Wind Column (4), Slow Poison (6), Hold Person (6), Detect Charm (6), Cure Disease (10), Dispel Magic (10), Neutralize Poison (15), Tongues (15), Abjure (15), Imbue with Spell Ability (15), Orison (1)
Psionics: Level 5, Dis/Sci/Dev 2/3/10, Att/Def All/All Score per ability, PSP 150
Psychoportation - Sciences: probability travel, teleport; Devotions: astral projection, dimensional door, dimension walk, dream travel, teleport trigger, time/space anchor.
Psychokinesis - Sciences: telekinesis; Devotions: animate object, control wind, inertial barrier, levitation
Other Powers: Holy Word 3/day, Heal 3/day, Ethereal at will
The Ruins:
The ruins take the form of an outlying region of almost wholly destroyed foundations and small walls of stone. At its centre is a two-stepped stone platform some 100' by 100' at its base, with the second step being 60' by 60'. Each step is 15' high. Atop the second step are two obelisks, 50' high (though one is broken at the top and is only 35' high) and engraved with pictoglyphs that tout the greatness of "the lord of the verdant land of Palliag"…mute testament to the failed nature of this land and its inhabitants.
In the west face of the first step is an entryway, half covered by windblown sand and 20' wide, with only about 8' of space between the top of the sand and the top of the entryway.
Within the structure dwells a large coven of ghuls, perhaps the largest in this desert. These are led by a ghul-kin witherer and his lover, a ghul mage. While it is rare for ghul to congregate in such large numbers or for ghul-kin to inhabit such a remote a lonely place, this band is in the planning stages of taking power in a nearby fairly powerful nomad camp some 50 miles to the northeast.
These ghuls occasionally range out to capture nomads and bring them back here to devour them. Additionally, nomads nearing the ruins have been known to disappear, giving the ruins a taboo reputation amongst the nearby nomad clans.
The ghuls prefer not to emerge from their lair in the daytime, but have no problem pursuing problematic persons at nightfall.
Great Ghuls (8) (AC 0, MV 18 br3 cl12, HD 4, hp 26, 22, 19, 23, 24, 24, 18, 25, THAC0 15, #ATT 3, D 1D6 / 1D6 / 2D6, SA magic use (see below), shapeshifting, SD undead immunities, +1 or better weapon to hit, 2D6 from holy water, 1/2 damage from falls, AL NE, XP 1400 ea, Source: Monstrous Compendium 2)
Magic Abilities (at will): Shocking Grasp, Invisibility, Bestow Curse, Polymorph Self
Treasure: Each ghul has a key to her chest in her living quarters (room 5 and 10). Each is adorned with jewelry as follows:
Ghul #1 = copper earrings shaped like a crescent moon (75gp), a dented and scratched silver ring shaped like vines worth 15gp, a golden hoop earring worth 5gp.
Ghul #2 = a silver and emerald bracelet worth 450gp, a golden hoop earring worth 10gp.
Ghul #3 = a leather diadem studded with amethyst, sard, and tourmaline worth 600gp, a pair of copper rings inset with jade worth 175gp each.
Ghul #4 = a circlet of silver chain with a dangling teardrop ruby set in a gold lace setting worth 900gp.
Ghul #5 = a golden bracelet shaped like a serpent with a silver chain that attaches to the bracelet and runs 2 feet to a copper armband to be worn on the upper arm in the shape of three birds flying head-to-tail. The whole piece is worth 600gp.
Ghul #6 = a silver nose ring with a dozen small ivory teardrop charms hanging from it worth 85gp, an electrum hairpin set with a small white pearl worth 550gp.
Ghul #7 = a leather belt stamped with flowers and painted in a myriad of colours worth 7gp, a fine Gerilong silk robe of lavender edged with gold threaded embroidery worth 275gp.
Ghul #8 = a bizarre headdress of leather with metal brackets around its rim which may have held candles or other such devices but now hold 6 perfume bottles.
Ghul Mage (AC 0, MV 18 br3 cl12, CL Wi, LV 7, HD4, hp 27, THAC0 15, #ATT 3, D 1D6 / 1D6 / 2D6, SA magic use (see below), spells, shapeshifting, SD undead immunities, spells, +1 or better weapon to hit, 2D6 from holy water, 1/2 damage from falls, Spell Points 74, AL NE, XP 5000, Source: Monstrous Compendium 2)
Spells Memorized: Magic Missile (4), Spook (4), Shield (4), Choke (6), Web (6), Lance of Disruption (10), Invisibility 10' radius (10), Vitriolic Sphere (15), Phantasmal Killer (15)
Magic Abilities (at will): Shocking Grasp, Invisibility, Bestow Curse, Polymorph Self
Ghul-Kin Witherer (AC 0, MV 18 sw12, CL Pr, LV 9, HD 9, hp 56, THAC0 11, #ATT 3 or 1, D 1D6 / 1D6 / 2D6 or withering, SA magic powers (see below), spells, withering touch (1D10 damage, drain 1 strength, age 1 year, hp added to witherer's total for 1 hour, strength to zero equals death as does aging past normal lifespan, those slain by withering most have remove curse before being raised, strength regained 1.hour, aging is permanent), SD +2 or better weapon to hit, undead immunities, holy water does 2D6 damage, spells, Spell Points 170, AL NE, XP 10000, Source: Monstrous Compendium 2)
Magic Abilities (at will): Invisibility, Polymorph Self
Spells Memorized: Sanctuary (4), Destroy Water (4), Locate Animals or Plants (4), Protection from Good (4), Faerie Fire (4), Resist Cold (6), Dust Devil (6), Hold Person (6), Heat Metal (6), Charm Person or Mammal (6), Silence 15'r (6), Dispel Magic (10), Animate Dead (10), Summon Animal Spirit (jackal) (10), Summon Insects (10), Recitation (15), Cloak of Fear (15), Spike Stones (22), Wall of Fire (22)
Spirit Animal (summoned by the Summon Animal Spirit Spell - Jackal form) (AC 4, MV 24, hp 19, THAC0 15, #ATT 1, D 2D4, SA affects monsters hit by only +1 or better weapons, SD immune to non-magical weapons)
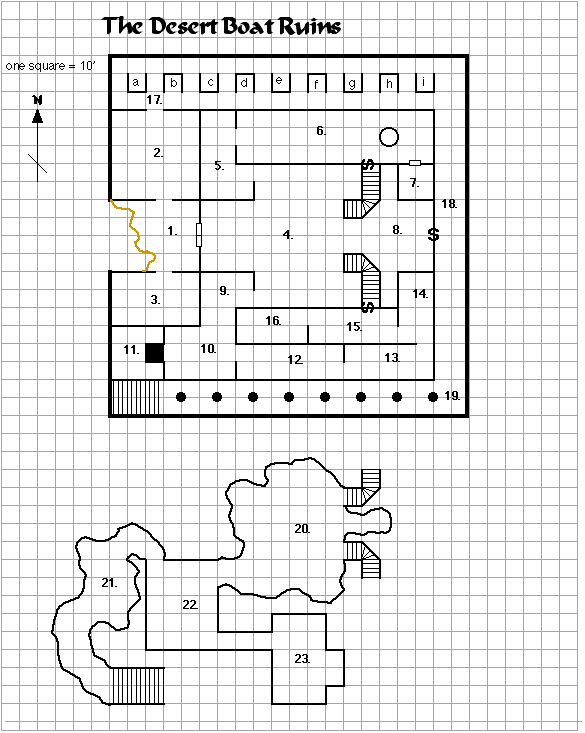
KEY TO THE RUINS:
Unless otherwise indicated, all walls, floors, and ceilings are of quarried granite fitted together without mortar but very closely fitted, in the style of pyramids or Incan constructions.
All ceilings are 15' high unless specified.
1. Antechamber
This chamber is open to the desert along its western face, at one time forming a roofed antechamber that was also the entryway into the ruins. Sand has piled up from the desert into a drift that has invaded this area as indicated on the map. The sand is 7' high at its apex (which occurs along the imaginary line between the western edges of rooms 2 and 3) and descends quickly to the limits indicated on the map. The remainder of the floor of this area is strewn with sand and dust, causing boots to grate underfoot.
To the north and south are arches which lintels are decorated with pictoglyphs. A proficiency in ancient Morakki pictoglyphs or comprehension magic will show that both sets of pictoglyphs name this ruin as the resting place of the "great Lord of the Land of Palliag, conqueror of the demons of Wylag and contender for the Heavenly Throne of Light".
To the east is a massive set of bronze valves, little tarnished due to lack of moisture. The doors are 5' across and 13' high each, and are decorated with bas-reliefs of djinn of various sorts bowing to a turbaned man with a pointed beard seated on an ornate throne. At various places on the doors are signs that gems and other precious metals were inlaid into the designs, but these have been pulled out to the last stone and nugget.
The doors are barred from the inside by a set of three steel bars that cannot be forced by anything less than hill giant strength (i.e. 19 strength, assume chance equal to 5% per strength over 18). Knock spells will be effective, although it will take more than one to remove all of the bars. Such methods, unless magically silenced, will result in a clatter that will certainly echo throughout the ruins and alert its occupants.
Once unbarred, the doors must still be forced, due to dust, age, and sand, with a normal open doors roll. As they open, the doors will rasp against sand on the floor, again making substantial noise.
2. North Chamber
This large chamber's west and east walls are inset with ten stone coffins, standing upright, sprouting from the walls (five on each wall) and as follows:
From South to North:
West Wall:
A. Opened with its door smashed and gone. The interior is empty.
B. Opened, with the door smashed around the middle of its edge (where the lock was). The face of the door is in the shape of a humanoid with an ornate, hawk-like head. Other than some ancient bandage scraps the coffin is empty.
C. Opened with its door smashed and gone. The interior is empty.
D. Closed, though with obvious defacings on the door, as if struck by hammers and chisels. The design appears to have been a man standing below the sun, arms upraised towards it. The head of the man-figure is missing, so it is impossible to say if the figure had a human head. The door is latched shut from the inside (a neat trick) by a steel latch and can only be opened by magic (the door is flush against the coffin and grooved inward to prevent insertion of even paper-thin tools). Within the coffin is an animated mummy, accounting for the relatively unmolested condition of this coffin.
Mummy (AC 3, MV 6, HD 6+3, hp 33, THAC0 13, #ATT 1, D 1D12, SA fear, disease, SD undead immunities, vulnerable to fire, half damage from magical weapons, AL LE, XP 3000)
The mummy is male sized and emanates a combined smell of putrescence and preservative spices. It looks to be quite ancient, and bears within its wrappings an amethyst (100gp) and 2 large rubies (worth 1500gp each).
The mummy will attack anyone opening its door or molesting its coffin in any way, including pounding on it. It will pursue any living beings once it is released as long as they remain in the ruins. It will thereafter return to its resting-place, close its coffin door, and re-latch the lock.
E. The door to this coffin is open and gone. Within is a partially enwrapped skeleton of a human female (which can be guessed from the size and the long hair still on the skull).
East Wall:
A. Opened with its door smashed and gone. The interior is empty.
B. The door to this coffin is intact and displays a large raven-looking bird swooping down upon a coiled snake. The door is closed but unlocked. Within are a few bones on the floor of the coffin.
C. Opened with its door smashed and gone. The interior is empty.
D. The door to this coffin is spattered with dried blood. Were the blood to be cleaned, the door would show a carving of two men carrying a chest on poles over their shoulders. The coffin door is unlocked, and within is the body of a desert nomad. His eyes are wide with terror and his face a rictus of horror. The flesh is desiccated, but also shows strange bumps and boils, as if diseased (which is the case as this nomad was attacked by the mummy).
Upon the nomad's head is a turban and veil. Inside the turban is a small pouch containing 5 gold coins of ancient Morakki mintage and 4 opals worth 250gp each.
At the nomad's belt is a rotted dagger sheath containing a dagger +1/+2 versus undead.
Inside the nomad's rotting leather desert boots is a small copper disk engraved with an angelic looking creature. This disk radiates Abjuration magic and provides anyone in direct contact with it (only 1 person at a time may avail himself of it) a +1 to saves and a -1 to AC when attacked by creatures normally subject to a protection from evil spell. Ranged spells and effects are not affected by this charm.
E. Opened with its door smashed and gone. The interior is empty.
The arch to the north of this chamber bears an ornate lintel of jade which bears time-worn carvings of great martial victories of the Lord of Palliag who is buried herein.
3. South Chamber
This chamber has no egress beyond the archway to the north. Faded paintings on the walls are too ruined to show anything of their nature beyond blotches of colours. The place smells of putrefaction caused by the bones and fleshy scraps of the victims of the ghuls, which lay around the floor of this place amidst dust and rocks and other rubble. Scraps of cloth and leather abound as well. Beetles of all sorts meander through the mess, and anyone searching through the mess may (25% per turn) be attacked by D6 rot grubs (see monstrous manual for details and statistics).
4. Main Chamber
This grand chamber has a floor composed of white marble stones intermixed with green jade stones covering the granite floor. The pattern of the two colours is not quite a checkerboard pattern, with there being a predominance of white stones.
To the east, stone walls enclose the area taken up by two secret stairways that descend into the lower levels.
The great ghuls are most often found in this area, usually resting or gnawing on bones, applying perfumes, or practicing shapechanging and working out their next deception or raid against the nomads.
The chamber is cluttered with bits of bones and other leavings of the ghuls. A putrid stench underlies the wafting essence of perfumes. A few bottles of unguents can be seen cast into a corner here and there.
5. Ghul Lair
This chamber, accessed from an unadorned archway from the Main Chamber (room 4), is the living quarters for four of the great ghuls that inhabit this ruin. There are four beds here, plush piles of pillows (now infused with ghul stench) obviously stolen from nomads and set into a wooden frame lying on the floor. There are also four chests here, all locked and each with a key to be found on a great ghul. Each chest contains clothing (most of a fine nature), unguents and perfumes, spices, and personal effects.
In addition, each contains the following unique items (all coins of both ancient and recent Morakki mint):
Chest #1 = 250gp, 300cp
Chest #2 = 128gp, 35ep, 124sp
Chest #3 = a potion of free action (as the ring but lasts 5D4 rounds), 27gp
Chest #4 = a scroll of protection from petrifaction on mule hide, 5pp, 164ep
6. Well Room
This long room is dusty but empty, save for faded frescoes along the walls depicting labourers building these ruins. One final fresco shows nine labourers being entombed in alcoves and blessed by a priest as the tomb is being sealed.
To the east is a stone well. The well was dug to serve the builders of this structure and as an omen of good luck. After completion, the well was sealed with a stone cap, which the ghuls promptly tore open upon their arrival here. The remains of the stone cap lie on the floor, and the well's edges are jagged from the ghuls' ripping apart of the cap. Within the 75' deep well is approximately 25' of water, which collects from the water table and which depth varies with the seasons. The water is stale but potable. A rope and metal bucket nearby allows the ghuls to draw water from the well, although they do not need to drink water due to their undead status, they still use it for other purposes, like bathing (when they wish to disguise their stench) and cleaning their jewelry.
A secret door on the south wall leads to stairs descending to room 20. A door to the far east is made of stone with a metal handle and pulls outward. The door is unlocked.
7. Priest's Chamber
When the party pulls open the door to this room out will emerge a menacing skeletal figure, hands outstretched to grasp at the nearest party member. A moment later the corpse falls to the floor…inanimate and actually just propped up against the door where it had expired.
The corpse is of a nomad tomb raider. He had come in here seeking treasure and had been in the ruins when the ghuls initially arrived at these ruins. Afraid for his life, he hid in this room awaiting the ghuls' departure. Unfortunately for him, the ghuls remained, and several attempts by him to flee were always thwarted by the presence of the ghuls. His food and water left in a heavy pack in the antechamber (room 1), he slowly died of thirst in this dry land and expired propped against the door.
The corpse is dressed in traditional nomad robes. A scimitar is in its sheath on his belt, as is a bone short composite bow and a quiver of 12 arrows, 4 of which are silver. His pouch contains 40sp and 15gp of recent Morakki mint. His working bag, on his shoulders, contains the devices of a tomb robber, including hammer and chisel, whisk broom of camel hair, iron spikes, a silk rope of 100', and a wooden ball the size of a bowling ball weighing 10 pounds and attached to a silk cord 50' long.
Within the room are a lantern and 3 vials of lamp oil. There is also a stone ledge along the south wall upon which, beneath a blue burial shroud, is a skeleton dressed in robes similar to the priest's image on the frescoes in room 6. Holy symbols to Ularinn adorn the robe and is present in gold on a chain around the skeleton's neck.
The priest who consecrated this tomb was afforded the honour of being entombed within it to accompany his lord into the afterlife.
8. Leaders' Room
This room was originally a shrine to Ularinn, designed to bless the interred and to guard this tomb. With the recent desecration of the sun by the Deceiver, the holy presence of Ularinn fled this place, and the large golden and bronze statue of the sun god melted to slag when the sun was marred. All that remains now is a large set of feet and legs of gold and bronze seated on a chair of some sort, and then a bunch of melted metal in lumps above that. It is clear from markings on the wall that the statue was probably 12' high in its full glory.
Touching the big toe of the right foot and twisting it clockwise pivots the statue out, revealing a secret way to the Long Passageway (room 18). The ghuls do not know of this secret door.
The ghul leaders dwell here, specifically the mage and the witherer. There is a bed made up of an altar stone set before the melted statue, upon which were ornate decorations now gouged out by the ghul. Atop this have been set pillows and beddings of fine linens and carpet.
Braziers hang from the ceiling by chains in the two alcoves to the north and south, each descending to a height of 5' and wafting strong incense through the chamber.
The altar/bed can be pivoted aside, revealing a small niche in the floor into which the ghul leaders have placed a chest. This chest contains the ghul leaders' treasure and is warded by a Glyph of Warding. This glyph sets off a keening ghoulish wail and causes everyone in a 5' radius to be bathed in a sickly green glow that causes paralysis unless a save versus paralysis is made. Such paralysis lasts 1D4+1 turns.
Within the chest are 1400sp, 190gp, 500ep, 24pp, a potion of ghoul control, a potion of delusion (acts like a potion of treasure finding), and an amulet of shielding (like a brooch of shielding) with 64 charges which is cursed if not worn by a member of a now long-dead family.
The curse manifests when a magic missile is cast at anyone within 50' of the amulet wearer. Such magic missile will veer to strike the wearer of the amulet (which gives no protection), which will then expend a charge for each magic missile and fire one magic missile of its own at the original target of the spell. If the wearer was the original target, then he will be struck twice, once by the original missile and again by the amulet's missile. The amulet may be removed at will and identifies as a normal amulet of shielding until its curse manifests.
Along the south wall are racks of clothes and other accoutrements designed to allow the ghuls to disguise themselves when infiltrating nomad settlements and caravans. A shelf holds fine incenses and perfumes and unguents.
9. Small Chamber
Accessed through an unadorned arch to the Main Chamber (room 4), this room contains an overturned wagon used as a table along with crates as chairs. Upon the table are crude maps of the region showing nomad routes and settlements and caravan routes. Three oil lamps and a small barrel of lamp oil with a small steel dipper are nearby.
10. Ghul Lair
This chamber, accessed from an unadorned archway from the Small Chamber (room 9) is the living quarters for four of the great ghuls that inhabit this ruin. There are four beds here, plush piles of pillows (now infused with ghul stench) obviously stolen from nomads and set into a wooden frame lying on the floor. There are also four chests here, all locked and each with a key to be found on a great ghul. Each chest contains clothing (most of a fine nature), unguents and perfumes, spices, and personal effects.
In addition, each contains the following unique items (all coins of both ancient and recent Morakki mint):
Chest #1 = 175cp, 200ep, 15gp
Chest #2 =300sp, 10ep, a small metal cube which, when pressed in a certain fashion, causes the cube to fold out into a small metal replica of a sailing ship (perhaps 3 inches long). This amusing contraption is mechanical and not magical and may be re-compacted into a cube with some practice. It is of dwarven make and was a gift to the ancient lord of Palliag. Dwarves would pay perhaps 5000gp for this ancient relic of their craft.
Chest #3 = a small stone tablet containing a priest spell of Entangle at the 7th level of ability, and a small jade statue of a fat man sitting cross-legged apparently nude and sticking his tongue out (worth 2500gp).
Chest #4 = 10cp, 150ep, 2pp, a small carpet with golden tassels and red runes embroidered into its mauve fabric. The carpet is 2' square when unfolded and is entirely non-magical and fairly worthless.
11. Sealed Room
This room's entryway was blocked off by a 5' square stone block that has been sealed into place by tar along the edges of the block. The block was then plastered over to appear to be part of the western wall of room 10. Only a successful search of secret doors or a dwarven new construction proficiency roll will note the cover-up.
Once the plaster is removed, some way will have to be devised to move the block. The block is smooth on this side, with no way to grasp it, and cannot be pushed due to the fact that it sits in a 3' depression in the floor of room 11. The block is extremely heavy, and magical means are probably the best way to bypass it (i.e. Stone Shape, Dimension Door, Passwall, etc.).
Within the room are a treasure and its guardian.
The treasure is a small crate, about 1' long by 1/2' wide by 1/2' deep. This is a folding boat. The command words are not located anywhere upon the item. The crate is set on a stone pedestal decorated with carvings of waves and mermen.
The guardian is a mummy giant scarab beetle. This beetle dwells within the stone block that seals off this room (and thus anyone casting passwall through the block will encounter the creature and be attacked).
The creature will emerge to attack if its block is attacked in some fashion, if the block is removed from its resting-place, or if the room is breached. The beetle will emerge from the solid block using its passwall ability, almost certainly by surprise (-4 from the die roll).
Mummy Giant Scarab Beetle (AC 3, MV 9, HD 7+3, hp 49, THAC0 11, #ATT 1, D 5D4+2, SA curse, fear, disease (save vs poison or contract mummy rot), SD vulnerable to fire, undead immunities, 1/2 damage from magical weapons, passage through solid matter, AL NE, XP 6175, Source: Monstrous Compendium 2)
Curse - Anyone who enters the sealed room or breaks the seal will be subject to the beetle's curse. This curse has no save and manifests in several ways:
In one case, the cursed will emit a smell that is undetectable by non-beetles but will cause all beetles within 100 yards to attack the cursed unceasingly.
In another case, the cursed will begin to hallucinate…at first seeing beetle or beetle like shapes scuttling in the shadows or in the corner of the eye occasionally. As time goes by, these hallucinations will become more real, until the afflicted actually begins to see imaginary beetles and be attacked by them. Such images will initially be insubstantial phantasms, but will eventually begin to take shape (treat as Demi Shadow Monsters and then Shadow Monsters). This second curse could work in conjunction with the first, causing the afflicted to disbelieve a real beetle attack!
In another case, the cursed will have progressively more horrific dreams of being eaten alive by beetles. This will force him to save vs. spells each time he tries to get a good sleep. Failure means the dreams were so intense that no rest was received (i.e. fatigue sets in and no spell memorization or healing is possible).
A final case is that the person becomes deathly afraid of beetles and must save vs spells at -4 or become afflicted as with a Fear spell cast by a 14th level wizard when brought within 100 yards and within sight of a giant beetle. Normal sized beetles also cause problems, though not as severe.
Each person might be subjected to one of the above manifestations. If more than 4 people enter the chamber, roll randomly to determine who receives each aspect of the curse. No more than 4 people in a given group can be affected (1 for each aspect).
The curse requires a Remove Curse spell to dislodge or until the folding boat is returned to its place and the room resealed.
The mummy beetle, even if destroyed, will rejuvenate within 1 week after the room is resealed and the folding boat placed into the room.
12. Ghoul Gate
This room is empty save for faded frescoes which are so faded that only partial figures can be divined. There is a portcullis dropped across the archway between this room and room 13. This was a portcullis trap designed by the tomb makers that was sprung long ago. The ghuls have now rigged a wooden crank and chains to raise the portcullis. The crank is located 10' west of the portcullis along the south wall. Without the crank, the heavy portcullis is also locked by a steel bar the springs from the portcullis slot above the archway. The cranking of the chain both retracts the bar and raises the portcullis.
13. Ghoul Room
Behind the portcullis between this room and room 12 is the beginning of the ghoul chambers. The great ghuls, as is the wont of their kind, keep ghouls as slaves, servants, pets, warriors, and, disgustingly, for carnal pleasure. These ghouls hate and fear their masters, but could only be convinced to rebel by a very strong evil personage. Otherwise, they are very hungry and very desirous to slay any living being they encounter.
This room is smelly and dirty and decorated with bones and offal and gibbets of uneaten flesh, as well as scraps of nomad clothings and accoutrements shredded from the bodies of the ghouls' victims.
14. Ghoul Room
This room is smelly and dirty and decorated with bones and offal and gibbets of uneaten flesh, as well as scraps of nomad clothings and accoutrements shredded from the bodies of the ghouls' victims.
15. Ghoul Room
This room is smelly and dirty and decorated with bones and offal and gibbets of uneaten flesh, as well as scraps of nomad clothings and accoutrements shredded from the bodies of the ghouls' victims.
A secret door in the north wall leads to stairs descending into room 20.
16. Ghoul Room
This room is smelly and dirty and decorated with bones and offal and gibbets of uneaten flesh, as well as scraps of nomad clothings and accoutrements shredded from the bodies of the ghouls' victims.
There are a total of 16 ghouls in these chambers, accompanied by 7 agarats and 1 greater agarat, and they will generally be found evenly spread amongst the rooms. They will respond to trouble if the portcullis in room 12 is opened. Otherwise, they are cunning enough, if alerted, to hide away from the portcullis and await intruders to penetrate their rooms deeply before ambushing them and trying to cut off their escape.
Ghouls (16) (AC 6, MV 9, HD 2, hp 12 each, THAC0 19, #ATT 3, D 1D3 / 1D3 / 1D6, SA paralyzation, SD undead immunities, AL CE, XP 175 ea)
Agarats (7) (AC 4, MV 9, HD 4+3, hp 25 ea, THAC0 15, #ATT 3, D 1D3 / 1D3 / 1D3, SA scream (1/turn, all in 20' must save vs spell or lose 1 pt from each characteristic for 1D4 turns, anyone drained fully of a characteristic falls unconscious for 2D6 turns), ghouls in presence of agarat turn as spectres, SD undead immunities, hit only by cold iron or magical weapons, AL CE, XP 975 ea, Source: Mystara Monstrous Compendium)
Greater Agarat (AC 0, MV 9, HD 8+3, hp 55, THAC0 13, #ATT 3, D 1D6 / 1D6 / 1D6, SA scream (1/turn, all in 20' must save vs spell or lose 2 pts from each characteristic for 1D4 turns, anyone drained fully of a characteristic falls unconscious for 2D6 turns), paralyzation as a ghast on touch, carrion stench (save at -2 vs poison or -2 to attack rolls), turned as a "special" creature, SD undead immunities, hit only by cold iron or magical weapons, AL CE, XP 4975, Source: Mystara Monstrous Compendium)
17. Hall of Alcoves
This hallway contains 9 stone alcoves, each decorated with scenes of craftsmen building or forming stoneworks. The 9 chief labourers of this tomb were buried with the entombed lord, set in these alcoves as guardians over their lord. In each alcove is an undead creature. These will attack once anyone enters the long hallway (room 18), or if they are attacked.
Alcove a = Dust Skeleton (AC 10, MV 9, HD 1-1, hp 4, THAC0 20, #ATT 1, D 1 hp, SA choking cloud (save vs poison for paralyzed for 2D6 rounds, success means coughing for 1 round), SD undead immunities, AL N, XP 65, Source: Monstrous Compendium 4)
Alcove b = Baneguard (AC 7, MV 12, HD 4+4, hp 27, THAC0 15, #ATT 1, D 1D6, SA magic missile 1/3 rounds (2 missiles, 60' range), blink (four rounds then wait 1 turn), SD half damage from edged weapons, undead immunities, AL NE, XP 975, Source: Monstrous Compendium 1)
Alcove c = Spike skeleton (AC 6, MV 12, HD 3, hp 20, THAC0 17, #ATT 1, D 1D6, SA bonespray (when hits or is hit, 1D3 spikes explode for 1D4 damage per spike in a 5' radius [save vs breath for 1/2 dmg], skeleton suffers 1 pt of damage per spike), blood burn (creature with open wounds within 5' and nearest to skeleton save vs spells at -3 or suffer 3D4 damage for up to 3 rounds. Save on subsequent rounds ends the damage. Blood burn usable once per year for this particular specimen), SD undead immunities, half damage from edged weapons, AL N, XP 650, Source: Monstrous Compendium 4)
Alcove d = Banedead (AC 4, MV 12, HD 6, hp 32, THAC0 15, #ATT 2, D 2D6 / 1D6, SA dexterity drain (2 pts per hit, when dex reaches 0 paralyzed for 1 turn, regained at 1 dex per turn), SD +1 or better weapon to hit, undead spell immunities (but not immune to cold), AL LE, XP 2000, Source: Monstrous Compendium 3)
Alcove e = Wight (AC 5, MV 12, HD 4+3, hp 22, THAC0 15, #ATT 1, D 1D4, SA energy drain, SD hit by silver or +1 or better weapons, undead immunities, AL LE, XP 1400)
Alcove f = Zombie (AC 8, MV 6, HD 2, hp 14, THAC0 19, #ATT 1, D 1D8, SD undead immunities, AL N, XP 65)
Alcove g = Skeleton (AC 7, MV 12, HD 1, hp 8, THAC0 19, #ATT 1, D 1D6, SD undead immunities, half damage from edged weapons, AL N, XP 65)
Alcove h = Wight (AC 5, MV 12, HD 4+3, hp 26, THAC0 15, #ATT 1, D 1D4, SA energy drain, SD hit by silver or +1 or better weapons, undead immunities, AL LE, XP 1400)
Alcove i = Spike skeleton (AC 6, MV 12, HD 3, hp 18, THAC0 17, #ATT 1, D 1D6, SA bonespray (when hits or is hit, 1D3 spikes explode for 1D4 damage per spike in a 5' radius [save vs breath for 1/2 dmg], skeleton suffers 1 pt of damage per spike), blood burn (creature with open wounds within 5' and nearest to skeleton save vs spells at -3 or suffer 3D4 damage for up to 3 rounds. Save on subsequent rounds ends the damage. Blood burn usable once per year for this particular specimen), SD undead immunities, half damage from edged weapons, AL N, XP 650, Source: Monstrous Compendium 4)
18. Long Passageway
This long passageway is entirely unadorned except for a long fresco along the western wall which is in surprisingly well-preserved condition. It starts at its northern end with a depiction of the building of this tomb and the interment of the Lord of Palliag. As the fresco proceeds south, it shows the interred's journey to the netherworld, judgement of the gods, and arrival in the blessed precincts of heaven and of an eternity in the gardens of the houri.
The hallway serves as a trigger for the guardians in room 17, for they will emerge and attack intruders once they proceed a full third to half of this hallway.
19. Pillared Hallway
This hallway is trapped by a permanent modified Evard's Black Tentacles spell.
Upon a living being passing within 5' of the pillar 4th from the east, a magic mouth spell on that pillar activates, exclaiming in booming Morakki:
Defile my body wouldst thee? Thy corpse shall be as a warning to others hereafter!
At the same time, an Evard's Black Tentacles spell will erupt in an area 22.5' in each direction from that pillar (and 10' wide for a total of 450' square feet as cast by a 15th level wizard). In this area are 17 tentacles (one on the pillar, and 8 each side of it, 1 per 5' square).
Each tentacle will be AC 4, 10' long, and has 15 hp. The tentacles are specifically modified not to attack the pillars. A dispel magic cast on these tentacles will dispel this effect for 24 hours. This effect is essentially the result of a Limited Wish spell.
Steps at the far west of the hallway lead down into the ground, descending 20' down to the lower level.
20. Cave of the Companion
This rough walled cavern is 20' high. Two sets of stairs lead down into this cavern from room 6 and 15 above.
The cavern contains naught but a stone pedestal in its centre upon which rests a golden statue of a medium sized dog bedecked with turquoise, jade, and sapphires (the object is very heavy and is stone covered with gold, but is worth at least 25000gp).
In a small alcove between the two stairs to the west is the actual companion of the interred Lord of Palliag, a mummy dog. This dog will attack any intruders in an effort to protect the corpse of its master.
Mummy Dog (AC 6, MV 12, HD 3+5, hp 23, THAC0 15, #ATT 1, D 2D4+1, SA fear, mummy rot (save vs poison or contract), SD magical weapons cause 1/2 damage, undead immunities, vulnerable to fire, AL NE, XP 650, Source: Monstrous Compendium 2)
21. Trapped Cave
This cavern, accessed from the steps from room 19, is trapped. The central 10' square is a pit, well concealed. The pit is sensitive to any weight of 10 pounds or more. The pit is 50' deep (5D6 damage) and 10 seconds after the trap is sprung, a scything blade sweeps across the pit 5' below the lip. This will sever ropes and will cause 3D6 damage to anyone in the scything area. This blade will then, by way of weights and counter-weights, scythe across 6 more times at intervals that increase by 3 seconds each time (i.e. first sweep 10 seconds after trap is sprung, second 13 seconds after that, third 16 seconds after second, and so forth). Subtract 1 damage for each swipe after the first, though ropes will always be severed unless magical or resistance to cutting.
This trap is reset by way of a lever on the wall of room 22 and is reset when needed by the crypt servant therein.
22. Servant Chamber
This chamber is carved with bas-reliefs showing servitors rendering obeisance and services of various kinds to their lord. This includes tending their lord, fighting for him, protecting him, mending his wounds, bathing him etc.
A stone chair carved out of the floor of the cavern sits in the centre of the room facing north. Sitting in the seat is a crypt thing, final guardian of the Lord of Palliag. The crypt thing will, in a sepulchral voice, warn the party, in Morakki, to leave these tombs at once. Those not doing so immediately will be subject to the crypt thing's teleport attack. Once this occurs, the crypt thing will emerge from its seat and attack any remaining intruders.
Simultaneously, 8 crypt servants will attack, emerging from dust covered alcoves that dot the room.
To the west, on that wall, is a lever that resets the pit trap in room 21.
Crypt Thing (AC 3, MV 12, HD 6, hp 34, THAC0 15, #ATT 1, D 1D8, SA teleport, SD undead immunities, AL N, XP 975)
Crypt Servants (8) (AC 5, MV 12, HD 6, hp 32, 29, 30, 35, 32, 31, THAC0 15, #ATT 2, D 1D4 / 1D4, SD undead immunities, AL LN, XP 650 ea, Source: Monstrous Compendium 1)
23. Palliag's Tomb
This room contains bas-reliefs extolling various deeds from the life of the Lord of Palliag. A niche in the eastern wall holds a stone sarcophagus. The sarcophagus is decorated with more bas-reliefs.
Upon the sarcophagus is a Glyph of Warding. Anyone touching the sarcophagus activates the glyph. The glyph turns anyone within 5' of the sarcophagus into stone unless a save vs petrifaction is made. Turning to stone is permanent until negated by magical means (a dispel magic will not work).
Within the sarcophagus are a burial shroud and the lime eaten remains of the Lord of Palliag. A platinum crown studded with emeralds, diamonds, and rubies lies in the resting place, worth at least 50000gp on the open market. Also here is a golden sceptre studded with onyx with its head in the shape of a hawk's head under a blazing sun (worth 10000gp). A golden tablet contains three Morakki words:
Chanatu-ko (means water reed)
Manash-ito (means water lily)
Faragamo (means dusty wind)
These are the command words for the folding boat (room 11) and respectively create the small boat, the large boat, and the box.
The Ghuls:
The ghuls are aware of most of the hazards of this place. They have no knowledge of the folding boat, but have encountered the crypt thing and its servants as well as the mummy and the mummy dog and have no desire to test themselves against those foes. Similarly, they have no real desire to defile the body of the Lord of Palliag. As such, the ghuls do not enter room 17-23 and refrain from entering room 2 unless setting up an ambush for the antechamber (room 1). If attacked, one ghul will certainly attempt to release the ghouls and agarats in rooms 13-16. These will be ordered to charge intruders en masse while the ghul mages cast spells and the greater ghuls form a protective bodyguard in front of the mages and priests.
The ghuls would be happy to bargain for their existence with parties that seem too powerful for them, but such bargain would be twisted as much as the ghuls safely could.
Journey to Hamasha:
From the ruins, it is likely the party will want to follow the advice of Captain Creele and make for Hamasha from which to launch their folding boat into the Endless Ocean. Creele will advise against launching in the Inner Sea, as that will likely run the party afoul of Vingariku pirates and patrol vessels, and the Vingariki are a people to be avoided whenever possible.
The best route out of the Wylag Desert is to proceed east to the coast, and then follow that north as it leaves the desert and eventually turns east forming the southern coastline of Hamasha.
During this journey out of the desert, the DM may spring some encounters on the party. A few of these have been included below:
The Caravan - The party comes across a large nomad caravan, comprised of at least 20 camels and over 100 nomads counting women and children. Approximately 30 nomads are male and of fighting age. These nomads are a merchant clan, which take items from Nygoto and Hamasha south to Xydlont and then back again, having no permanent home.
As Morakki, they are likely to be initially distrustful of gaijin. As merchants, that mistrust can be overcome by the prospect of desperate and wealthy foreigners in need of provisions.
The merchants can be persuaded to sell anything for the right price, including camels, provisions, and even women and children!
They currently carry spices from the south to trade with the Hamashans in exchange for northern ivory and whale products, which are valued in Xydlont. In addition, they have various metal implements, including weapons, that are difficult to come by in the more primitive Hamasha.
These merchants will only accept coin of the current Emperor's mint at full value. Ancient Morakki coins they will say are bad luck and worth less (75% value). Western coins are worth even less. They must be defaced, and the edges cut off and buried, for which effort and loss of metal they will value such coins at 50%.
If the party wishes to accompany
the caravan, they will be respectfully refused. First, even with
the marks of purity from Gerilong (which marks they know nothing
about), they do not trust gaijin. Second, they are afraid of diseases
from the West and of evil spirits accompanying the party. Only
massive bribery or magical persuasion will allow the party to
accompany the caravan.
Part Seven - Finally, the Sea!
At long last the party has made it to the sea. The sea here is a choppy affair, dark blue and with a chill wind coming from the east even in high summer. Tall dun cliffs pockmarked by scrub and ice plants tower above a small rocky shelf that serves as a beach in southern Hamasha. Several river gullies allow access down from the cliffs to the shoreline, and the party may use one of these to access the shore and to fill their water supply.
Assuming the party has the Folding Boat from the Ruins of Palliag (as well as the command words therefrom), then getting started with the ocean voyage will be as simple as placing the crate form of the Folding Boat on the shoreline and speaking the proper command word.
A Word About Folding Boats:
In Therra, the Folding Boat is a unique item, almost an artifact. Few if anyone know exactly how the thing works. Learned mages, upon examining the device, might conclude:
1. The three forms all exist in a pocket dimension and one of the three forms is summoned while the other form is whisked away to the dimension when a transformation takes place.
2. Only one "form" exists and it morphs into the other forms during transformation.
3. All three forms exist simultaneously, but one is brought to "reality" while the others remain masked.
This could have some implications for the party, and so the DM should decide how the thing actually works. In the official Therra campaign, #2 is the true working. This means if foreign objects larger than an insect are on the boat in its ship form, and the command word is spoken folding it into a crate, the objects caught inside would be crushed if they were small and pliable. Otherwise, they would burst the crate asunder. A kind DM might wish to caution the party if it decides on this effect. A person caught on the boat when it is collapsed would either be crushed to a pulp if the folding effect is strong enough and the boat itself could withstand the pressure. Or, the person might be intact but the crate-boat would burst from the pressure. Or both might occur.
The Palliag Folding Boat operates just as is stated in the DMG, except that the largest form is a Caravel (larger than the boat described n the DMG. Refer to Of Ships and the Sea for specifics regarding caravels).
But We Don't Have a Folding Boat!
If the party did not gain the folding boat (perhaps they did not perform a service for the blue dragon, or perhaps they failed to slay the upstart dragon brothers, or perhaps the ghuls in the ruins drove them off, or perhaps they simply never located the place where the folding boat was located), then overseas conveyance must be gathered by some other means. A creative DM and a party of the level to partake of this scenario should be able to gain a boat. A good way would be to have the Vingariki pirate encounter listed below occur while the party is on the shoreline. The pirates perhaps are taking in supplies or are raiding a Hamashan village or even attacking a ship a ways out at sea. The party could certainly be induced to intervene and then take the pirate ship away from the pirates.
While this option is certainly not as neat as having a Folding Boat, it will serve to get the party to the next stage of the adventure.
Sailing…Sailing
The choppy seas are likely to make landlubbers seasick.
The Captain, as you might recall from his tale of his first trip to the Lost Isle, does not have a precise fix or course for the Isle. Indeed, all he knows is that he sailed east by north east, and the giant worm and storms that drove his vessel thereafter took him in a generally north and east heading. Thus, Creele will suggest the party makes for the "nor'east".
The party's initial journey will be uneventful. Flying fish may be seen, which will prove an oddity, as well as albatross, all gliding in the perpetual twilight of the open sea. For three days the peace will last, with the party close to land but unable to sight even the massive coast of Vingariku to the south due to the lack of sunlight.
On the fourth day the party will encounter a Vingariki corsair ship. These are sleek, fast coasters, unfit for long voyages on high open seas, but also much faster than most wind driven merchant ships. The corsair ship will sight the party by a rather ingenious means. The corsairs like the perpetual twilight, as it allows them to creep on their prey unseen and to escape reprisals by authorities. However, the dimness does make sighting prey from far off a bit difficult. To counter this, this particular set of corsairs uses "flare boats".
Flare boats are small rowboats with a small lantern lashed to a pole in the centre of the boat. The boat is dropped at a certain spot and anchored to the sea floor by way of a long line and a weight or grapple. The corsair will usually send out six such flare boats, in a 5-10 mile radius from the ship. Observers on the deck of the corsair then keep a careful watch on the flares. In calm seas, should a ship pass between the corsair and a flare boat, the light from the flare boat will wink out from being blocked by the passing ship. The amount of time the light is blocked will allow a reasonable guess at the distance the passing ship is from the flare boat, and the flare boat itself will give the direction of the passing ship from the corsair. The corsair can then make speed to that location and begin to hunt for its prey.
The party will see such a flare boat, perhaps 2 miles off of its port bow. They may go and investigate it if they wish, but as they do so the corsair will approach them.
The corsair is a pentekonter. It is powered by three banks of 20 oarsmen, all slaves and captives of the corsairs. Such slaves are chained to their oars and have their feet chopped off to prevent them from escaping. A few of the slaves are gaijin, merchants from Antorium and the like who were captured by the corsairs who plundered their ships. At the prow of the pentekonter is a bronze ramming plate shaped like an eagle's beak, but with a unicorn-like horn protruding from its brow.
The corsair is manned by 35 Vingariki pirates. They are led by a wu-jen specializing in water magicks, and a ronin samurai. The pentekonter carries four large ship-to-ship weapons:
1.
A pitch thrower, a small catapult which hurls burning pitch onto
enemy decks (treat as double strength burning oil with double
radius and splash effects). Fires 1/4 rounds.
2. A ballista, which hurls large darts or javelins. Fires
1/3 rounds.
3. A chain thrower, which resembles a ballista but hurls
a thick chain with a grapple at the end at a ship to hook it.
A winch attached to the chain can be used to haul the hooked ship
towards the corsair.
4. Another pitch thrower
Weapons 1-3 fire forward and are in the fore of the ship, while weapon 4 is located in the aft and fires aft.
Vingariki Corsairs [30] (AC 8, MV 12, CL Wa, LV 2, hp 16 ea, THAC0 19, #ATT 1 or 3/2 or 2, D by weapon type, Weapons: tulwar [Av 1D6+1/2D4 kd D8], dagger [Fa 2/r 2/4/6 1D4/1D3 kd D6], cho-ku-no [repeating crossbow - 10 bolt magazine Av 2/r 10/20/30 1D6+1/1D8+1 no armor penetration ability],Armour: leather and wooden target shield, SA specialized in tulwar (+1/+2), AL CE, XP 120 ea)
Each corsair has personal coinage of 1D20cp, 1D10sp, 2D10gp and semi precious jewelry worth 1D100gp.
Vingariki War Leaders [5] (AC 7, MV 12, CL Wa, LV 5, hp 39 ea, THAC0 16, #ATT 1 or 3/2 or 2, D by weapon type [+1 due to strength], Weapons: tulwar [Av 1D6+1/2D4 kd D8], dagger [Fa 2/r 2/4/6 1D4/1D3 kd D6], cho-ku-no [repeating crossbow - 10 bolt magazine Av 2/r 10/20/30 1D6+1/1D8+1 no armor penetration ability], Armour: leather and wooden target shield, 16 dexterity, SA specialized in tulwar (+1/+2), AL CE, XP 420 ea)
Each war leader carries coinage of 1D20cp, 1D20sp, 1D10ep, 4D10gp, 1D10pp and semi precious jewelry worth 3D100gp. At least 4 pearls of just over 100gp value can be found amongst this jewelry.
Each war leader also carries a potion of healing, a potion of water breathing, and a potion of invulnerability.
Corsair Wu-Jen female (AC 7, MV 12, CL Wi [Wu-jen kit, water elementalist], LV 6, hp 23, THAC0 19, #ATT 1, D by weapon type, Weapons bo stick [Fa 1D6/1D4 kd D8], short bow [non-proficient] [Av 2/r 10/20/30 1D6/1D6 kd D6], Armour none, 16 dexterity, robe of protection +1, SA -2 to opponent saves vs water spells, +1 to hit with bo stick, 1/day cast 1st level spell at maximum range, duration, and effect, +3 bonus to initiative roll 1/day, cast one water spell per day at 1D4 levels higher, SD +2 save vs water spells, Spell Points 81 [+1] (17 INT), AL N, XP 4000).
Spells carried: Magic Missile (4), Shield (4), Still Water (4), Turbulence (4), Swim (4), Water Protection (4), Animate Water (6), Bind (6), Wind Breath (6), Dispel Magic (10), Dispel Magic (10), Protection from Normal Missiles (10), Steam Breath (10)
Magic Items:
Jade charm in the shape of a dragon warn on a leather thong. This charm, when attuned by a wizard over the course of a week of continual contact with his flesh, adds 1 spell point to the caster's total.
Scroll with Water to Poison spell on it [5th level Wu-Jen spell from Oriental Adventures].
Wand of Storms with 41 charges left carved out of jade with mother of pearl clouds inlaid around it (per Encyclopedia Magica V4 pg 1493. Casts Wall of Fog - 1 charge, Precipitation - 1 charge (causes rain in the area), Gust of Wind - 2 charges, Cloudburst (per Wu-Jen spell) - 2 charges, Chain Lightning - 8 charges, Influence Weather - 3 charges. Chain lightning has a range of 70'. It hits its target for 6D6, then a random target within 35' for 5D6, and so forth for a total of 6 targets. Influence Weather is similar to Control Weather, but only used to increase or decrease cloudiness, rain/snowfall, and/or wind velocity. Every time a power is used there is a chance severe weather will occur. Severe weather drains additional charges. Wall of Fog - 10% 3 charges, thick, persistent fog; Precipitation - 10% 3 charges, rain or snow squall; Gust of Wind - 20% 4 charges, gale or tornado; Cloudburst - 20% 4 charges, hailstorm or severe snow; Chain Lightning - 30% 5 charges, lightning storm; Influence Weather - 30% 5 charges, heavy rain or blizzard).
Potion of extra-healing.
Robe of Protection +1 (as cloak)
Wealth:
150gp, a necklace of black pearls, one huge one worth 5000gp and 8 small ones worth 500gp.
Ronin Corsair Leader (AC 4, MV 12, CL Wa [Samurai kit], LV 7, hp 68, THAC0 14, #ATT 3, D by weapon (+1 due to strength), Weapons: katana [Fa 1D10/1D12 kd D6], wakizashi [Fa 1D8/1D8 kd D6], Armour: leather, 18 dexterity, SA specialized in katana (+1/+2), kiai 8/day raise STR to 18/00 for 1 round), +1 to hit and damage due to strength, +3 damage samurai ability, cause fear in 1HD or less (save vs breath), SD surprised only on a 1 in D10, immune to fear, NWP 2-handed fighting style x2, ambidexterity, etiquette, heraldry, local history, read/write Morakki, iron will, AL CN, XP 1000)
Magic Items:
Potion of extra healing
Potion of invulnerability
Potion of Water Breathing
Potion of Swimming
Bracers of speed made of beaten copper studded with veins of quicksilver (increases base initiative by 1 phase, including weapon speed and size speed but not spell casting speed).
Wealth:
90ep, 175gp, 20pp, a golden ring set with 5 emeralds worth 1650gp, a platinum consecrated holy symbol to Mergurr in the shape of a skull with ruby eyes worth 1500gp.
The corsair ship itself contains no treasure, other than provisions, as they have just left port in search of new booty. The pirates do have considerable wealth stocked away on shore in safe houses, and the party could theoretically ransom captured war leaders.
The corsairs will not initially toss pitch onto the party's vessel, as they do not want to send a valuable ship and its cargo to the bottom of the sea. They will only use the pitch if the party spies them at a distance and begins to toss spells and such at them. More likely, as they approach within 50 yards, they will shoot the chain to hook the party's vessel and then shoot the ballista towards the steering area, in the hopes of hitting the pilot of the ship.
When the ship is within 30', large planks with spikes at the end will be slammed into the party's gunwale and the corsairs will stream aboard along the planks.
In general, 20 of the corsairs will board an enemy ship. Another 10 will remain on the corsair deck in a raised central area that has crenellated wooden cover. These 10 will shoot arrows into the party, specifically targeting spellcasters.
The remaining 5 corsairs will maintain the corsair and the slaves.
The wu-jen will remain in a wooden turret to the fore of the ship, with a slit in it from which to cast spells. The ronin revels in slaughter and will be one of the first to board the enemy ship.
While these pirates are fierce, they are in this for profit, and will not hesitate to retreat and flee, especially if their leader is slain and the party shows no sign of weakening. The pirates, in Vingariki fashion, will not surrender, and if trapped, will commit suicide by blade or by throwing themselves overboard.
Should the party prevail and capture the corsair, they will have difficulty crewing such a massive ship, and certainly cannot sail it out into the open seas. They might scuttle it, or they could free the slaves and turn the vessel over to them.
Of note, the female Wu-jen is the paramour of the ronin corsair leader, and both will seek to defend or avenge the other fiercely!
After the encounter with the pirates, the party will, over the next few days, veer out of the normal shipping routes and far from land. The seas will, if anything, become choppier and sea birds begin to become fewer. Great drifts of sea weed will be seen from time to time, as will whales in the summer and autumn and furry dolphins will sometimes race the ship.
So it will go for another week and a half. Just the ship and the sea for miles and miles around. The Captain and his men will be in their element, but Creele will also be a bit jumpy and on edge. If asked he will say he just has the willies from remembering the last time he sailed out this way.
It will be after the week and a half that the Beast comes. At first, Creele will get a strange tingling in his left leg. Creele will be seem to be limping a bit and rubbing his leg absent-mindedly, and if it is pointed out to him, he will remark that he hadn't noticed it really until it was pointed out to him, and that now that he was aware of it, he is worried.
Creele will explain that his leg is where he was hit by a disc thrown by the bird men of the Lost Isle. And now that he thinks about it, his leg was bothering him just before his second encounter with the worm, in the Oto Sea with the party. And now, the same damned leg is bothering him again…
As the next two days go by, Creele gets edgier, starts to snipe at his crew, and his leg gets so bad he has to prop it up or soak it in hot water. He begins to drink heavily as well. During the second night, he wakes up in a cold sweat in the middle of the night after screaming "The Beast! The Beast! She Comes!" He can relate that he had a nightmare of some sort, but does not remember what it was about.
The next day, at almost noon, the Beast arrives.
As before, it appears on the horizon, and due to its white colour it is easily visible even in the gloaming conditions. Once spotted, the white hump resolves into the head and forebody of the white worm, the same that the party has encountered in the Oto Sea. And the worm begins to approach the ship. As it does so, it opens its mouth…perhaps to feed or take in water.
As the party watches and prepares, something strange occurs. The worm gives the illusion of great speed, what with the wake before and behind it and the frothing around it, but it seems to approach the ship slowly, not getting much closer for its great speed. Only after observing this phenomenon for a while will it dawn on the party that the worm is much farther away from the ship than they originally thought. It is also far far larger than the worm they had encountered in the Oto Sea.
Closer and closer the behemoth will come, now looming as large as an island. The mouth, at first seeming large enough to perhaps swallow a man whole, now looks easily capable of swallowing the entire ship! Still the worm comes on.
Nothing in the party's repertoire will stop the worm. As before, it is a servitor of Flupnir, a being of demi-godly calibre, on the order of the Maug, and no ship can outrun it and no weapon or spell can adversely affect it, though the party may try. Assume 195% magic resistance, an AC of -25, and 2000hp. The creature saves as a 30HD character of whatever class is most advantageous to the saving throw. It possesses a 25 Con and a 20 Wis and Int. It is immune to weapons of less than +3 enchantment.
The worm will eventually reach the ship and swallow it whole, mast and all. The worm, up close, is well over 4 miles long and perhaps 400 yards in diameter.
In the Belly:
The worm has been sent by the influence of Flupnir to convey the party to the Lost Isle. In addition, however, the worm can be viewed as yet another means to test the party's worthiness for what is to come.
The worm is virtually impregnable from the inside (with the exception of its heart wall described later). No travelling magic will allow a person to leave the worm. Teleport spells and the like only function within the confines of the beast, and plane travel attempts stun the wielder for 1D4 turns. All means to escape from the worm should fail, even Limited Wishes and Wishes would be foiled, since those spells come from Flupnir.
The party's ship will first enter the mouth of the worm, which will close behind them. A sudden rush of water will accompany peristaltic motions in the throat walls of the Beast as the party speeds down its throat
Suddenly, a huge sphincter-like opening will appear ahead. The opening will dilate to accept the ship and then quickly contract behind the boat.
Within is the great gullet of the beast. The water is calmer here, though the chop of water from the throat reverberates throughout the chamber. After a moment, as the ship slowly glides into the gullet of its own momentum, the gullet water will lurch forward, pulling the ship along fast with it for a moment, before that motion too subsides. This final motion is caused by the sphincter at the far end of the gullet opening up to let out water. The water level will drop slightly when this happens.
The party is now trapped in the great gullet of the beast. The gullet is huge, almost 375 yards in diameter and extending some 2 miles from the throat sphincter to the stomach sphincter. The water here is seawater, as there are no digestive juices in the gullet (those are contained in the stomach beyond the far sphincter).
Refer to the map of the gullet as needed. Time does not pass within the body of this beast. That is, it passes, but in no relation to the outside world. Spells have duration, and bodies maintain their needs, hair and fingernails grow, but nothing ages. Wood does not rot. Beings do not age beyond adulthood. Those beings present who have already attained adulthood do not age at all. This occurs because the worm is almost a plane of its own, given consciousness and formed into the shape of a worm. Time here progresses in this strange fashion because Flupnir willed it so.
Over the course of centuries, this worm has swallowed any number of objects and beings. A great many of the former have since passed out of the worm's gullet, into its stomach, and been digested or passed as waste.
However, several large ships and other heavy detritus have remained in the gullet, wedged into place by design or chance. In addition, flora and fauna have entered the gullet, and these have, in some ways, thrived and become kind of a strange, closed ecosystem.
There are two main factions dwelling in the gullet. Along with these two factions are the Archmage and a variety of unintelligent flora and fauna.
The first faction is the tritons. The tritons are opposed by the second faction, a group of merrow (aquatic ogres) backed up by some scrag (saltwater trolls).
Many years ago, the tritons and the merrow were longtime enemies, both often vying for the same fertile underwater ground. Wars between them were common, but neither side could prevail. After one particularly vicious series of raids, where the merrow lured the triton warriors away from the triton village and then slaughtered the females and children, and where the tritons then tricked the merrow and did the same to their brood, it was decided that their perpetual war could go on no longer, and so delegates from both sides agreed that a single battle would be held, and both sides would make strong magical oaths to their gods and ancestors that whomever returned from the battle with the heads of all of their opponents would win the war. The losers would have to surrender their lands, all of their wealth, and half their number as captives.
Both sides so swore and they picked 24 of their best warriors. They met upon the agreed field of battle and commenced the fight. Suddenly, out of nowhere, swooped the great worm. He opened his mouth and swallowed all of the warriors of both sides. None of the warriors ever came back to either side, and to this day the feud goes unresolved.
Inside, the two factions accused the other of summoning the great worm and cheating the bargain. However, it soon became apparent that both sides were trapped, and neither was much advantaged by the turn of events. After some time fruitlessly trying to escape, and realizing that they could survive in the belly of the Beast, the two sides started fighting again.
However, both factions did not arrive to an empty gullet. For within dwelt a strange human. At first, both sides assumed he was responsible for their predicament, and they attacked him. However, he proved to be a powerful magician, and he beat back both attempts. The man then explained that he, too, was trapped here, and that all he wanted was to live in peace undisturbed. He proclaimed himself absolutely neutral in any dispute between the tritons and the merrow, and warned that any further attempts on his person would meet with utter destruction for both sides.
This old man was an Amorian Archmage from the days of ancient splendour of that fallen Empire. He, fearful of the drag of time upon his body and of his one-day death, worked at his craft obsessively, eventually gaining the rank of archmage and attaining the highest spells of wizardry. Thus did he learn the Wish incantation, and he carefully worded his wish…for immortality…that he would not die of old age or natural infirmity, but nor would he lose his current form and shape. The wish was very carefully worded indeed, for he did not wish to become a living statue, nor an undead creature.
Alas, his wish was granted, and in the only way Flupnir could thwart the powers of Mergurr, by placing the archmage in the belly of the worm, where Mergurr cannot prevail and where time passes strangely. At first the wizard complained that this was not immortality, because he was only immortal so long as he remained in the gullet of the beast, and so should he leave it he would not have been granted his wish. It was then that Flupnir's dreaming voice informed him that he could never leave the beast, and so his immortality was, indeed, true and unflawed.
Over the centuries, the archmage went a little mad. His spellbook and most of his possessions have been discarded. However, he does cling to his staff and his robes, and they grant him considerable power.
When the two factions entered the gullet, the archmage cared little for their squabbling. However, the constant entreaties for aid and the occasional threat of inadvertent collateral damage to his hut forced him to take matters into hand. Thus was the conflict between the factions formalized somewhat. The archmage and his little isle are now considered neutral ground, a place where emissaries from both factions can talk and present grievances to the archmage.
So the two factions raid each other and fight and give birth (yes there were females chosen to be warriors in the ritual battle, as well as female priests on both sides), and the young grow to adults and then stop growing, but as many die from the fighting as are born, or else they "brave the stomach" and pass through the rear sphincter, never to be seen again.
Into this strange situation comes the party.
At first they will pass through the merrow territory. The merrow, not knowing who the party is, and fearing they are friends of the tritons, will attack the ship and its inhabitants. Assuming the party resists well, the merrow will shortly call off their attack and flee into the depths, rebuffed.
Next the party will pass near to the central isle where the archmage lives. Before they get there, the tritons will attack, certain that if the ship made it past the merrow, it must be allied with them. Again, if the party resists well, the tritons will break the attack and flee.
From here, events are in many ways up to the party and at the DM's discretion. Both factions, having no doubt seen the powers of the party, are now eager to try and convince them to join their side to defeat the other faction. Should the party stay aloof, each will send delegates to persuade the party to join their side. They will even resort to bribery if they think that will work.
Should the party not side with anyone, it is entirely possible that both sides will meet at the hut and form a temporary alliance, worried that the party means to rule them both. In this case, the party may have to fight both sides simultaneously.
Should the party call at the strange hut on the isle in the centre of the gullet, they will meet the archmage.
The archmage will emerge from his hut as soon as the party makes to land on his island. Clutching his distinctive staff and wearing his distinctive robe (which a civilized wizard will likely recognize), the wild-eyed grey-bearded man will leap from his hut yelling something in "fish talk" (which is an agreed-upon mesh of merrow and triton languages that is spoken by both factions). When that evokes no response, ye will begin speaking in ancient Imperial, in a dialect millennia old. Most of the party should be able to pick out a few words of this (akin to picking out Middle English in a Chaucer manuscript).
The archmage will be yelling "Neutral Ground! Neutral Ground!" and threatening the party with his staff. Assuming the party is cautious and can establish communication, they can convince the man that they wish to parley.
Once done, the man will invite them onto his island for an emissary, but only one person may come. At this, some merrow and triton nearby who are observing the doings of the party will show themselves out of the water and demand that the archmage deny the party emissary since he has not "the band of pledge" (remember the tritons and merrow speak in "fish talk"). The archmage will look nonplussed and will then leap into his hut and emerge with a crimson band of cloth. He will urge the party's emissary to tie the cloth onto his shoulder quickly, as this cloth designates one as a neutral emissary and protected from all harm.
At this, the tritons and merrow will evince displeasure, and will then send a cloth-tied emissary of their own each into the hut to listen in on what the party and archmage have to say.
In the hut, which is made of salvage from ships and seaweed and pitch, is a hammock, a little fire spit, and rickety shelves full of gew gaws and junk. Nothing looks much of value here. The entire isle is composed of stones atop a fleshy protrusion in the gullet wall of the worm.
Discussion within the hut will be cordial. The party will be asked how they came to be here. The archmage and the factions will gladly tell how they came to be here. They will also say that there is no way out. The archmage will, if asked about his spells or spellbook, say that he has no need of all that rubbish, and that his staff and robe contain all the spells he needs.
The archmage will also make it clear by his sighs and demeanour that he is tired of his life, and would have gladly ended it years ago were it not for the fact that he feels sorry for the two factions and could not stand to abandon them to their conflict without him available as a judge. It is a strange, almost inflated view of his role in the conflict, but then again, the archmage is quite mad from his time spent here.
Each faction emissary will take time to explain the ongoing nature of their dispute, and if they have not tried to woo the party to their cause, will do so now…again with speech or promises of bribes.
Should the party side with one faction, they may fight what will likely be the final battle against the opposing faction. Should the party wish to be left alone, they may sail their ship to some corner of the gullet, but they will be spied upon continually, and run the risk of a temporary alliance against them as indicated above.
If the party asks about the rear sphincter of the gullet, any inhabitant will tell them that that leads to the stomach of the beast. It is impossible to get out through the front sphincter because the worm never has its mouth and the front sphincter open at the same time. In addition, the rush of air and water when it does swallow makes travel up the throat difficult if not impossible.
Many tritons and merrow have gone into the rear sphincter. They know that any time the front sphincter opens to let in water, the rear will open within 10-15 minutes after to let out excess water and/or to take food into the stomach. The current when the rear sphincter is open is fairly strong, strong enough to wash corpses into the stomach, but a normal-strengthed adult humanoid should be able to easily grab or brace themselves and avoid being dragged in. The tritons and merrow who have voluntarily entered the stomach have never returned.
Most of those who entered the stomach while alive have done so either out of ennui and boredom with their lot, or in the hope that escape could be had through there. Some hoped to avoid digestion and to be passed as waste. None of the inhabitants can say for sure what happened to all of those who went into the stomach. They can only say that none ever returned.
One triton who was lashed near the sphincter when it opened and who peeked inside swears he saw many lumps floating in the water there, as if bodies, but misshapen, and he also saw something flying or floating in the air therein, though the sphincter shut before he could get a good long look.
Triton Faction:
Triton Males [30] (AC 4, MV sw 12, HD 3, hp 19 ea, THAC0 17, #ATT 1, D by weapon, Weapon trident [Av 1/r 2/3/4 1D6+1/2D4 kd D6], heavy crossbow [Sl 1/2r 16/32/48 1D8+1/1D10+1 kd D6 -2 AC medium -5 AC at short], Armor scale armor, MR 90%, AL N(G), XP 270 ea)
Triton Battle Leaders [3] (AC 4, MV sw 12, HD 5, hp 29 ea, THAC0 15, #ATT 1, D by weapon, Weapon trident [Av 1/r 2/3/4 1D6+1/2D4 kd D6], heavy crossbow [Sl 1/2r 16/32/48 1D8+1/1D10+1 kd D6 -2 AC medium -5 AC at short], Armor scale armor, MR 90%, AL N(G), XP 650 ea)
Battle Leaders have conch shell horns that cause fear to all marine creatures with Animal Intelligence or less within 60' unless they save vs spells. Those that save attack at -5 to hit against the tritons. This shell is non-magical.
Triton Shell Leader (AC 3, MV sw 12, HD 7, hp 55, THAC0 13, #ATT 2, D by weapon, Weapon trident [Av 1/r 2/3/4 1D6+1/2D4 kd D6], heavy crossbow [Sl 1/2r 16/32/48 1D8+1/1D10+1 kd D6 -2 AC medium -5 AC at short], Armor scale armor, 15 dexterity, MR 90%, AL N(G), XP 2000)
Possesses a conch shell as above.
Triton Supreme Leader (AC 2, MV sw 12, HD 9, hp 68, THAC0 17, #ATT 1, D by weapon, Weapon trident [Av 1/r 2/3/4 1D6+1/2D4 kd D6], heavy crossbow [Sl 1/2r 16/32/48 1D8+1/1D10+1 kd D6 -2 AC medium -5 AC at short], Armor scale armor, 16 dexterity, MR 90%, AL N(G), XP 4000)
Possesses a conch shell as above, and a Crossbow Bolt of Slaying Sahuagin.
Female Tritons [30] (AC 6, MV sw 12, HD 2, hp 12 ea, THAC0 17, #ATT 1, D by weapon, Weapon trident [Av 1/r 2/3/4 1D6+1/2D4 kd D6], MR 90%, AL N(G), XP 120 ea)
Triton Female Priestess (AC 5, MV sw 12, CL Pr, HD 3, hp 19, THAC0 17, #ATT 1, D by weapon, Weapon trident [Av 1/r 2/3/4 1D6+1/2D4 kd D6], Spell Points 19, MR 90%, AL N(G), XP 2000)
Spells Memorized:
Cure Light Wounds (4), Bless (4), Command (4), Watery Fist (6)
Triton Female Priestess (AC 5, MV sw 12, CL Pr, HD 5, hp 28, THAC0 17, #ATT 1, D by weapon, Weapon trident [Av 1/r 2/3/4 1D6+1/2D4 kd D6], Spell Points 48, MR 90%, AL N(G), XP 2000)
Spells Memorized:
Cure Light Wounds (4), Cure Light Wounds (4), Sanctuary (4), Bless (4), Command (4), Watery Fist (6), Hold Person (6), Chant (6), Protection from Evil 10' radius (10)
Also there are 10 young non-combatant tritons.
Merrow Faction:
Merrow Males [22] (AC 4, MV 6 sw 12, HD 4+4, hp 25 ea, THAC0 15, #ATT 1 or 3, D 2-12 or 1-6 / 1-6 / 2-8, Weapon spear [Av 2D6/2D6 kd D6], SA surprise -5 to opponent's roll, SD camouflage in oceanic settings 10%-80%, AL CE, XP 420 ea)
Merrow Leader (AC 5, MV 6 sw 12, HD 5+5, hp 31, THAC0 15, #ATT 1 or 3, D 2-12 or 1-6 / 1-6 / 2-8, Weapon spear [Av 2D6/2D6 kd D6], SA surprise -5 to opponent's roll, +1 to damage, SD camouflage in oceanic settings 10%-80%, AL CE, XP 650)
Merrow Shaman (AC 4, MV 6 sw 12, CL Pr, LV 3, HD 4+4, hp 22, THAC0 15, #ATT 1 or 3, D 2-12 or 1-6 / 1-6 / 2-8, Weapon spear [Av 2D6/2D6 kd D6], SA surprise -5 to opponent's roll, SD camouflage in oceanic settings 10%-80%, Spell Points 15, AL CE, XP 420 ea)
Spells Memorized:
Cure Light Wounds (4), Bless (4), Chaos Ward (6), Orison (1)
Scrags [5] (AC 2, MV 3 sw 12, HD 6+12, hp 47 ea, THAC0 13, #ATT 3, D 2-12 or 1-4 / 1-4 / 9-16, SD regeneration, AL CE, XP 1400 ea)
Merrow Females [16] (AC 5, MV 6 sw 12, HD 3+3, hp 20 ea, THAC0 17, #ATT 3, D 1-2 / 1-2 / 2-6, AL CE, XP 250 ea)
Young Merrow [5] (AC 6, MV 6 sw 12, HD 2+2, hp 15 ea, THAC0 19, #ATT 3, D 1-2 / 1-2 / 1-4, AL CE, XP 120 ea)
Archmage:
Archmage (AC 3, MV 12, CL Wi, LV 18, hp 45, THAC0 15, #ATT 1, D by weapon, Weapon staff [Fa 1D6+2/1D6+2 kd D10], Armour robe of the archmage, staff of the archmage, MR 5%, AL CN, XP 8000)
Magic Items:
Grey Robe of the Archmage (AC 5, +1 saves, 5% Magic Resistance)
Staff of the Archmage (Detect Magic [0 charges], Enlarge [0 charges], Hold Portal [0 charges], Light [0 charges], Protection from Evil/Good [0 charges], Invisibility [1 charge], Fireball [1 charge], Knock [1 charge], Lightning Bolt [1 charge], Pyrotechnics [1 charge], Ice Storm [1 charge], Web [1 charge], Wall of Fire [1 charge], Dispel Magic [1 charge], Passwall [1 charge], Continual Light [1 charge], Magic Missile [1 charge], Ray of Enfeeblement [1 charge], Levitation [1 charge], Cone of Cold [1 charge], Whirlwind [equal to a djinn, 2 charges], Conjure Elemental [1 8HD of each type per day 2 charges], Plane Travel [2 charges], Telekinesis [8th level effect 2 charges], Shield [5' radius 2 charges], Globe of Invulnerability [2 charges], Paralyzation Ray [cone 40' long and 20' wide 2 charges], strikes as +2 weapon [double damage for 1 charge], +2 to save vs spells, absorb spells) - 25 charges, regenerates 1 charge every 2 days.
The merrow and tritons live off of seaweed grown at the bottom of the gullet as well as from fish and other creatures swallowed into the gullet by the worm. The archmage survives off of the same. He gains fresh water to drink from occasional secretions of freshwater out of the gullet walls that pour down like rain. The archmage collects this in some barrels he keeps on his little island.
Other Denizens:
A single shark has been recently swallowed, and it lives generally off of fish swallowed by the worm. It will attack wounded humans flailing in the water and will likely be attracted to battles.
Shark (AC 6, MV sw 24, HD 6, hp 28, THAC0 15, #ATT 1, D 2-8, AL N, XP 270)
In some of the kelp and weeds at the bottom of the gullet lair weed eels.
Weed Eels [1D6] (AC 8, MV sw 15, HD 1-1, hp 4 ea, THAC0 20, #ATT 1, D 1, SA poison [save or die in 1D4 rounds], AL N, XP 120 ea)
Giant sea urchins scour the bottom of the gullet, feeding on droppings and other rubbish.
Urchins [1D4] (AC 3, MV 6 sw 6, HD 2+1, HD 13 ea, THAC0 19, #ATT 2, D 2-7, SA +2 to hit, spines fire as light crossbows, AL N, XP 120 ea)
Each contains a central gem worth 40x1D10gp
A floating fish has also been scooped up some time ago. Both factions have tried to capture this critter to use it in battle, but so far to no avail due to its powers and speed.
Floating Eye (AC 9, MV sw 30, HD 1/2, hp 4, SA hypnotism [save vs paralyzation within 30' or hang immobile in water], AL N, XP 35, Source: Monstrous Compendium 2)
A small school of sea worms also lairs here.
Sea Worms [7-12] (AC 4[10 internal], MV 6 sw 12, HD 5, hp 25 ea, THAC0 15, #ATT 1, D 2-8, SA swallows on 18+, drain blood, AL N, XP 1400 ea, Source: Monstrous Compendium 4)
The largest predator in the gullet is a giant starfish. This will make a try at cracking the party's ship or snagging crew from the decks.
Giant Starfish [10-armed] (AC 2, MV 6 [spurt for 30], HD 10, hp 47 body/5 arms, THAC0 11, #ATT 1D10, D 1-10, SA ship damage, SD half damage from blunt weapons, AL N, XP 5000, Source: Monstrous Compendium 4)
A few giant clams can be found attacked to the bottom of the gullet.
Giant Clams [1-4] (AC 3[10 inside], MV 1, HD 3+3, hp 18 ea, THAC0 17, #ATT 1 [shell shuts on limb], D trap unless bend bars, 15% of clams sever limbs on a 19 or 20, AL N, XP 175 ea, Source: Monstrous Compendium 4)
Clams will have mother of pearl lining their shells worth 50-500gp. In addition, there is a 5% chance of a pearl (25% for those that can sever limbs) worth 500-1000gp.
Getting Out:
The party will have to find their way out of the Beast. Aside from the factions and the other inhabitants of the gullet, the only events are the occasional rumble or tremor by the worm, and perhaps 5 times per week the opening of the sphincters to swallow.
As mentioned, no magicks or weapons will get the party out of the gullet. Cutting even with a vorpal blade will do nothing, as the gullet lining heals as fast as it can be cut. Even every inhabitant striking simultaneously will not overcome the healing. Nor will a sword of wounding.
The only way to escape the worm is to "give it heartburn"!
Within the worm's stomach is a portion of wall high up where the wall throbs in a large patch perhaps 20' in diameter. The sound of the throb is a tympani which reverberates throughout the stomach and can be heard by the keenest of ears from the rear end of the gullet when the rear sphincter has just opened and before the roar of water flowing drowns it out.
This tympani reverberates every minute or so, and it is the worm's heart. The heart is about halfway along the stomach, which is itself 300 yards in diameter and perhaps half a mile long.
The stomach is deadly for several reasons.
First, there is the acid. This acid is not as strong as one might think, but it does do 1 point of damage per 10 rounds and after 1 turn (50 rounds) items must save against acid or be destroyed.
Second, there are the "leukocytes" of the worm, in this case innumerable crystal oozes. These will swarm on anything entering the stomach waters, and although they move slowly, there are enough of them that any man sized creature swimming will be subject to being attacked by 1D3 of them every turn. Ships and larger objects will attract 1D6 for a longboat and 2D6 for a ship per turn.
These oozes will slowly eat through any wooden ship sailing the stomach waters. It would take hours to eat a hole through a caravel-sized ship, but even a short trip into the stomach acid-laced water and exposure to the oozes will show damage on the hull.
Crystal Ooze (Ac 8, MV 1 sw 3, HD 4, hp 20 ea, THAC0 17, #ATT 1, D 4-16, SA poison (save or paralyzed), AL N, XP 420 ea)
Finally, the spirits of those slain here, which bodies are long since dissolved, haunt the place, since their souls cannot leave the worm to find their rest.
Most of these are floating vaporous spirit forms of merrow and scrag and tritons. These spirits hunt in packs of 2D6 and seek to slay the living so that they may share their torment (misery loves company). At least one powerful spirit dwells in the stomach, and will most certainly come to attack a large group of living creatures. Allow a cumulative 1% chance per person in a group per turn that the ghost comes to attack.
Spirits (AC 3, MV fl 15, HD 2, hp 10, THAC0 19, #ATT 1, D 1D4 [chill damage], SD only affected by +1 or better weapons, undead immunities, cannot be turned, AL NE, XP 250 ea)
Ghost (AC 0 or 8, MV 9 fl 9, HD 10, hp 45, THAC0 11, #ATT 1, D age 10-40 years, SA sight causes humanoid to save vs spell or age 10 years and flee 2D6 turns [priests over 6th level immune and humanoids over 8th level gain +2 to save], magic jar within 60', SD only hit by silver weapons [half damage] or magic weapons [full damage], AL LE, XP 7000)
The sphincter generally remains open for approximately 15 minutes, though this varies by about 5 minutes either longer or shorter. Then the valve starts to close, and this process takes about a minute or so to complete.
If the party gets trapped inside the stomach without the archmage's staff, they are in for a rough, perhaps party-ending time of it. It is up to the DM how much he might want to warn the party away from this predicament, but any part members still in the stomach after the sphincter closes is going to likely be dead, since the sphincter won't open for another day at least!
If the party does get stuck inside the stomach, any boat or ship will eventually be sunk by the stomach water and the oozes. This means the party will have to contrive a way to levitate or fly above the waters. Even so, the party will be subject to attacks by the vaporous spirits.
Assume that there are an unlimited number of oozes (they are formed by the worm as fast as they are destroyed) unless some sort of massive stomach-wide magic is introduced, in which case, destroying all of the oozes simultaneously would offer a good D6 hours respite.
Assume that there are a total of 500 spirits. All of these are not always flying around the stomach. Some are under the water, in the stomach walls, or simply quiescent and invisible. But a party spending the night in the stomach will eventually have to face all 500 of the spirits. Spirits do not regenerate, however, as they are formed from fallen merrow and tritons and have accumulated in their great numbers over the course of millennia.
The heart itself is not directly visible. However, the stomach lining covering it here is very thin, thin enough that a magical weapon can cut away the wall. The wall is AC 6, has 10hp, and regenerates at 3hp per round. Up to triple its hit points may be done to the wall to represent a large hole cut that will take time to reseal.
The heart is red and muscular. It is slightly warm to the touch. The heart is the only vulnerable part of the worm. The heart cannot be destroyed, nor the worm seriously hurt even by attacks directly on its heart, but it does irritate the worm to no end. Normal weapons have no effect on the heart. Magical attacks will cause the slightest of slight shudders in the beast, and only then if a good strong blow is struck. The heart itself will show only the slightest scratch from such blows, which will heal up instantly.
Fire and electricity have a better effect. A good torch thrust into the heart will cause the heart to quiver and the worm will tremor slightly.
A good hit from a shocking grasp or burning hands or flametongue sword will cause a definite shudder in the worm and will cause both sphincters to open simultaneously for a mere second as the worm belches out some water from its stomach to its gullet and its gullet to its throat and from its throat out of its mouth.
A full strength fireball or lightning bolt will cause the worm to writhe as if an earthquake has happened. The worm will turn to its side slightly and rock back and forth for a bit and disgorge a bit more water out of its stomach. A goodly portion of water is ejected, and the sphincters stay open a good 5 -10 seconds or so, as does the mouth. This is not enough time to get from the throat sphincter past the mouth even at flying speed, but it does show that the party is on the right track.
So, what does the party have that is orders of magnitude above a fireball or lightning bolt in power?
The answer is the archmage's staff of the archmage. This staff has a full retributive strike of 400 points of damage and in its current state can still do over 200 points of damage.
Were someone to break the staff right next to the heart, it would cause the worm so much heartburn that the worm would instantly disgorge the entire contents of its stomach and its gullet out of its body through its mouth in one great demi-godly belch! While this would be a wild ride, it would see most everyone, especially if prepared for the outcome, safely outside the worm.
The staff is really the only way to escape the worm. Should the archmage be convinced that breaking the staff would free everyone, he would certainly be most glad to do it, both in an attempt to defy Flupnir, as revenge on the worm, as a means of seeing his charges (the factions) to safety, and as a means of ending his miserable existence.
The archmage can be convinced to use the staff by showing him a demonstration of what fireballs and other effects have on the heart and on the worm. In addition, the party could try to charm the mage or take his staff from him, although it might be easiest and best to simply convince him.
Should the archmage break the staff, he will die (or be transported to another plane). His robe will either be destroyed or travel with him.
What if the Party is Stuck?
The party needs to be directed into the stomach. If the party is trying to get out but refuses to go into the stomach, the DM can have a female triton take a little shine to a male party member and relate that her husband went into the stomach about a year ago certain he could escape. A few days later, the female claims she had a dream of him escaping out of the beast and to safety. In her dream, her husband urged her to come into the stomach to safety, but the woman has children here and could not leave them, nor can she risk them in the stomach. But this dream seemed so real that she is convinced it is a sending from her husband, and that the way out lies within the stomach.
It is still possible that the party may enter the stomach and not go after the heart. Divination spells are very useful for providing hints here, but also, a DM can give the party dreams from Flupnir which suggest that the party get to the "heart of the matter", and so forth. The idea is to give the party just enough information to figure it out on their own.
In addition, it is possible that the party may try to burn the heart, see some effect but not enough, and not make the connection that they need lots more power or that such power can be found in the archmage's staff. In this case, the DM can have the archmage take a personal interest in what the party is accomplishing and he can even volunteer to use his staff, for he would love to cheat Flupnir and get back at him in any way possible.
The most important thing is for the DM to keep the adventure moving, and not to let the party get unduly stuck or discouraged.
If all else fails, the DM can simply have the worm arrive at its destination and disgorge everyone on its own (except for the archmage of course, who is bound to remain).
Out and There:
When everyone is belched forth from the worm, it will turn tail and dive to the depths to sulk. The party and the factions will find themselves in the ocean, with an island a ways off to the northeast. The Captain will swear that it is the very same isle he was taken to by the white worm…the Lost Isle.
The factions will quickly disperse with some growling and threats to the other side should any try to follow them. All will briefly thank the party and perhaps give them trinket gifts (like a conch horn or a shell necklace).